

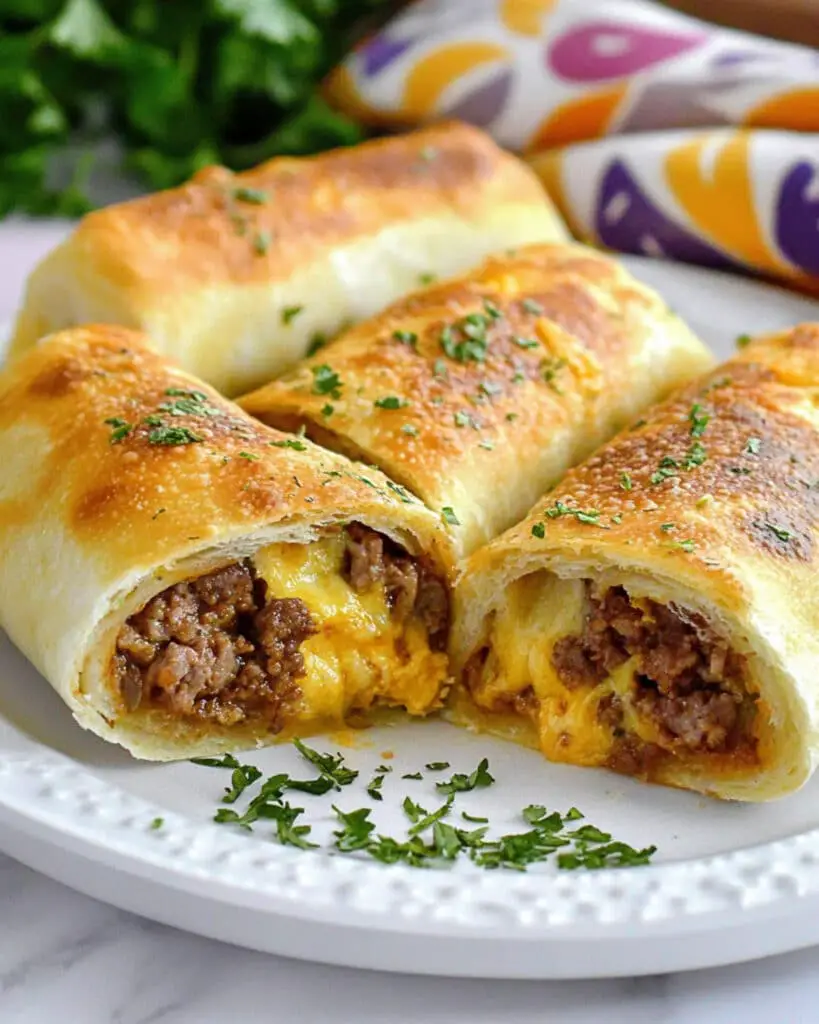
These Easy Cheesy Taco Sticks are about to become your new weeknight obsession. Picture golden, pillowy breadsticks stuffed with seasoned beef and gooey cheddar—basically, tacos and cheesy bread had a love child. They’re wonderfully quick to make, outrageously delicious, and so much fun to eat. Whether you whip them up as a crowd-pleasing appetizer or an all-in-one dinner, these taco sticks deliver on flavor and convenience. Perfect for a busy weeknight when you need something hearty, hands-on, and sure to win smiles from every age.
Why You’ll Love This Recipe
- Serious Comfort Food: It’s all your favorite taco flavors, but in a soft, cheesy breadstick!
- Quick & Fuss-Free: You’ll go from start to finish in about 30 minutes, no lengthy prep or complicated steps.
- Fun for All Ages: Kids (and adults) LOVE these taco sticks. They’re easy to eat and perfect for little hands.
- Customizable: Totally flexible—switch up the cheese, the meat, or try your own twists!
- Minimal Cleanup: One skillet, one work surface, and a baking sheet—the kitchen stays (mostly) tidy.
Ingredients You’ll Need
- Ground Beef: The classic taco filling, hearty and savory. You can use ground turkey or chicken if you’d like to lighten things up.
- Taco Seasoning: Adds instant bold, Tex-Mex flavor to your meat. Go homemade if you’re feeling extra, but packaged seasoning is easy and perfect here.
- Cheddar Cheese Sticks: Melty, sharp cheddar is essential for that glorious cheese pull. Pre-sliced cheese sticks save time and melt beautifully.
- Refrigerated Pizza Crust: The shortcut hero—delivers perfectly chewy, golden bread in a flash. Crescent dough or homemade dough will also work.
- Flour: Just a bit, to keep your dough from sticking as you roll it out.
- Butter (Melted): Brushed on top for flavor and that irresistible glossy finish.
- Garlic Powder & Parsley Flakes: Sprinkle for aroma, flavor, and a touch of color.
Tip: Parchment or a silicone mat makes cleanup a dream and ensures the taco sticks won’t stick.
Note: You’ll find the complete list of ingredients, along with their exact measurements, in the printable recipe card at the bottom of this post.
Variations
Want to shake things up? Try these easy swaps and additions:
- Protein Change: Use shredded rotisserie chicken, seasoned tofu, or even black beans for a meatless option.
- Cheese Fun: Swap cheddar for Monterey Jack, mozzarella, or pepper jack for extra kick.
- Stuff In Extras: Layer in some thinly sliced jalapeños, sautéed onions, or drained canned corn before rolling.
- Dip & Top: Serve with salsa, guacamole, sour cream, or queso for even more taco-shop vibes.
- Dough Tweaks: Crescent roll dough or even biscuit dough can be used in a pinch, just adjust bake time as needed.
How to Make Easy Cheesy Taco Sticks
Step 1: Cook the Taco Filling
Begin by browning the ground beef in a skillet over medium-high heat. Break it up as it cooks for even crumbles. Once it’s fully browned, drain off the extra grease, then stir in your taco seasoning. Let it simmer for a few minutes so those flavors sink in.
Step 2: Prep the Dough
Lightly dust your work surface with flour to keep things from sticking. Roll out the refrigerated pizza crust until it’s about ¼ inch thick, aiming for an even rectangle. Cut the dough into eight equal rectangles—don’t stress if they’re not perfectly square.
Step 3: Assemble the Taco Sticks
Lay a cheddar cheese stick half in the center of each rectangle. Spoon a bit of the hot taco beef mixture over the cheese. Tuck the ends in, then roll the dough around the filling to seal it up, just like making a mini burrito.
Step 4: Bake
Arrange the taco sticks seam-side down on a parchment or silicone mat-lined baking sheet. Slide them into a preheated 425°F oven and bake for about 10 minutes, until they’re puffed up and golden brown.
Step 5: Finish with Flavor
As soon as they come out, brush each stick with melted butter and sprinkle generously with garlic powder and parsley flakes. This step isn’t optional—don’t skip it! It’s what gives them their irresistible finish.
Pro Tips for Making the Recipe
- Don’t Overstuff: Too much filling can make them tricky to seal and prone to leaking.
- Seal Well: Pinch the seams to keep that cheese neatly inside where it belongs.
- Bake on Middle Rack: For even browning, place your sheet in the center of the oven.
- Let Them Rest Briefly: Hot cheese can be lava—give them a minute or two before digging in.
- Make Ahead Trick: Assemble the sticks and refrigerate (covered) up to a few hours before baking.
How to Serve
These taco sticks truly shine with simple, tasty accompaniments:
- Dippers: Pair with bowls of your favorite salsa, guacamole, or cool sour cream.
- Side Dishes: Serve alongside a crisp salad, Mexican street corn, or even a quick slaw.
- Party Platter: Cut them in half and arrange with lots of dipping sauces for easy passing at gatherings.
- Lunchboxes: They travel well—perfect hot or at room temperature for school or work.
Make Ahead and Storage
Storing Leftovers
Allow taco sticks to cool completely, then store in an airtight container in the fridge for up to 3 days. They hold up well and can be enjoyed cold or reheated.
Freezing
Place cooled taco sticks in a freezer-safe bag. Freeze for up to 2 months. They’re great for quick snacks—just reheat from frozen (or thaw overnight) for best texture.
Reheating
Warm in a toaster oven or regular oven at 350°F until heated through and cheese is melty. Microwave works in a pinch, but the bread will be softer.
FAQs
-
Can I use a different dough if I don’t have pizza crust?
Absolutely! Crescent roll dough or even biscuit dough work great. Crescent rolls will give a flakier, softer result, while pizza dough will be chewier— both delicious in their own way.
-
What’s the best way to keep the cheese from leaking out during baking?
Make sure you tuck in the ends of the dough and pinch all the seams tightly. You can also roll the filled sticks seam-side down, which helps keep everything inside as they bake.
-
Are these spicy? Can I make them milder or hotter?
The heat level depends on your taco seasoning and if you choose to add extras like jalapeños. Most packaged seasonings aren’t very spicy. For a milder version, use less seasoning or a mild version; for extra heat, add some chopped peppers or use pepper jack cheese.
-
Can I make these ahead of time for a party?
Yes! Assemble them in advance and keep covered in the fridge until ready to bake. You can also bake them, let cool, and reheat just before serving. They’re sturdy, tasty, and make a terrific party snack.
Final Thoughts
Easy Cheesy Taco Sticks are a game-changer for busy nights. They combine all the satisfaction of tacos and cheesy bread into one irresistibly simple, flavorful package. Whether you’re feeding a family, prepping for a party, or just need a quick dinner fix, this recipe is pure comfort with minimal fuss. Try them soon—you might find yourself making them on repeat!
Print
Easy Cheesy Taco Sticks Recipe
- Prep Time: 15 minutes
- Cook Time: 18 minutes
- Total Time: 33 minutes
- Yield: 8 taco sticks 1x
- Category: Snacks
- Method: Baking
- Cuisine: Mexican-American
- Diet: Halal
Description
These Easy Cheesy Taco Sticks combine seasoned ground beef, gooey cheddar cheese, and golden pizza crust into irresistible handheld snacks. Perfect for a quick dinner, game day, or a fun family meal, they feature savory taco flavors wrapped in a soft, buttery breadstick.
Ingredients
For the Filling
- 1 lb. ground beef
- 1 package taco seasoning
For the Sticks
- 4 cheddar cheese sticks, cut in half lengthwise (8 pieces total)
- 1 refrigerated pizza crust
- Flour (for dusting the work surface)
For Topping
- 2 Tbsp. butter, melted
- Garlic powder, to taste
- Parsley flakes, to taste
Instructions
- Preheat the Oven: Preheat your oven to 425°F (220°C). Line a baking sheet with parchment paper or a silicone baking mat.
- Cook the Ground Beef: In a skillet over medium-high heat, cook the ground beef until fully browned. Make sure to break it up into small pieces as it cooks.
- Season the Beef: Drain any excess grease from the skillet. Add the taco seasoning and stir well, simmering over low heat for 2-3 minutes to infuse the meat with flavor.
- Prepare the Dough: Lightly flour your work surface and unroll the refrigerated pizza crust. Roll the dough out until it is roughly ¼ inch thick.
- Portion Dough Rectangles: Using a knife or pizza cutter, cut the dough into 8 evenly-sized rectangles.
- Assemble the Taco Sticks: Place one cheese stick piece into the center of each dough rectangle. Spoon a small amount of the cooked taco meat on top of each cheese stick.
- Shape the Sticks: Carefully fold in the short ends of each rectangle and roll them up, enclosing the filling to form breadsticks. Pinch the seams closed to ensure the filling doesn’t leak.
- Bake: Arrange the taco sticks seam-side down on your prepared baking sheet. Bake for 10 minutes or until golden brown and cooked through.
- Finish with Butter & Seasoning: Brush the hot taco sticks with melted butter, then sprinkle with garlic powder and parsley flakes to taste. Serve warm.
Notes
- You can substitute ground turkey or chicken for beef if desired.
- For extra spice, add chili flakes or jalapenos to the beef filling.
- Try different cheese varieties such as pepper jack for a twist.
- Serve with salsa, guacamole, or sour cream for dipping.
- Leftovers can be stored in an airtight container and reheated in the oven for best texture.
Nutrition
- Serving Size: 1 taco stick
- Calories: 295
- Sugar: 2g
- Sodium: 585mg
- Fat: 17g
- Saturated Fat: 8g
- Unsaturated Fat: 7g
- Trans Fat: 0.5g
- Carbohydrates: 17g
- Fiber: 1g
- Protein: 17g
- Cholesterol: 53mg


