
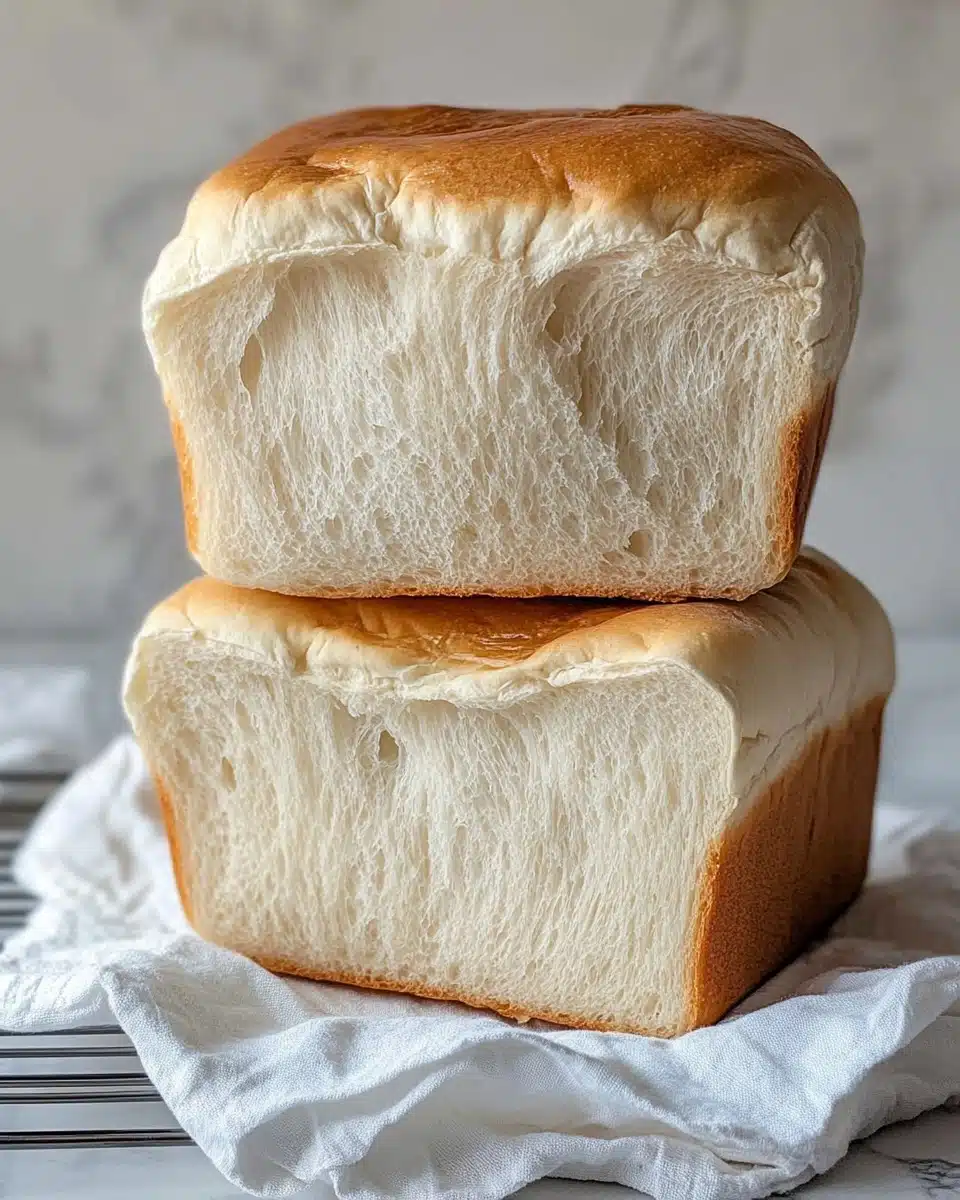
There’s something magical about slicing into a towering, soft, and feathery Easy Milk Bread Loaf—especially when you’ve baked it yourself! This beloved Asian-inspired bread is shockingly easy for beginners and rewarding for seasoned home bakers, with a pillowy, tender crumb and shiny golden crust. Whether you’re craving the perfect sandwich base or just a slice with butter and jam, this loaf will have you swooning from the very first bite!
Why You’ll Love This Recipe
- Unbelievably Soft Texture: Each slice of Easy Milk Bread Loaf practically melts in your mouth, delivering the kind of fluffiness usually reserved for bakery favorites.
- Beginner-Friendly Technique: The step-by-step process is simple, forgiving, and doesn’t require specialty tools—just follow along and you’ll be amazed!
- Versatile Flavor: Mildly sweet and oh-so-rich, this bread pairs beautifully with anything, from breakfast spreads to savory sandwiches or French toast.
- Make-Ahead Magic: Thanks to its tender crumb, Easy Milk Bread Loaf stays fresh for days and can even be frozen for later.
Ingredients You’ll Need
One of the true delights of making Easy Milk Bread Loaf is how a few humble pantry staples can transform into something so irresistible. Here’s what you’ll need, along with why each element matters for pillowy-soft, bakery-worthy results.
- Bread Flour: The high protein content in bread flour develops the stretchy gluten you need for a tender, light-as-air crumb.
- Sugar: Adds a hint of sweetness, giving the bread that classic milk loaf flavor and helping it brown to a glistening finish.
- Instant Yeast: This ensures a reliable rise without fussing with proofing or special equipment.
- Cold Water: Starting with cold liquid keeps the dough from overheating during kneading, which is key to the bread’s soft texture.
- Cold Milk: Milk gives the loaf its extraordinary softness and that familiar, subtle richness in every bite.
- Sea Salt: Balances the flavor, so your loaf isn’t bland or overly sweet, and strengthens the dough structure.
- Unsalted Butter: Adds moisture, a subtle aromatic richness, and helps form a tender, beautiful crumb.
- Butter for coating & brushing: Brushing the loaf with melted butter after baking gives that signature shine and irresistible aroma.
- Flour for coating the pan: Prevents sticking, ensuring your Easy Milk Bread Loaf slides out effortlessly.
Variations
Once you’ve mastered the classic Easy Milk Bread Loaf, the fun really begins—there are endless ways to tailor it to your own cravings, ingredients on hand, or dietary needs. Let these ideas inspire your next bake!
- Whole Wheat Version: Swap up to half the bread flour for white whole wheat for a heartier, more wholesome flavor with a gentle nutty note.
- Dairy-Free Milk Bread: Use an unsweetened plant-based milk and vegan butter in place of their dairy counterparts for a just-as-pillowy, allergy-friendly loaf.
- Filled Loaf: Add a swirl of sweet red bean paste, chocolate chips, or cinnamon sugar before rolling up the dough for a fun, bakery-style twist.
- Mini Dinner Rolls: Shape and bake the dough as rolls in a muffin tin for adorable sliders or snack-sized portions.
How to Make Easy Milk Bread Loaf
Step 1: Mix and Autolyse the Dough
Start by combining the bread flour, sugar, instant yeast, cold water, and cold milk in the bowl of your stand mixer. Let your mixer knead the dough on low until it comes together. Then, cover the bowl and let it rest for 30 minutes—this simple “autolyse” gives the flour a chance to fully hydrate and begin gluten development, making your loaf extra soft and easy to knead later.
Step 2: Add Salt and Butter
After your autolyse rest, sprinkle salt over the dough and knead for another minute. Next, add the softened butter cubes. Continue kneading, first on low, then just a minute on medium speed, until the dough becomes super smooth and elastic—check for the “windowpane” stage by gently stretching a piece: it should stretch into a thin, almost translucent sheet without tearing. This step is key for that trademark fluffiness in your Easy Milk Bread Loaf!
Step 3: First Rise (Bulk Fermentation)
Shape the sticky dough into a ball and transfer it to a lightly greased bowl. Cover and let rise in a warm spot (ideally 82°F-90°F) until nearly doubled in size—about 1 hour. This gentle rise builds flavor and creates that mesmerizing, cloud-like interior.
Step 4: Divide and Shape
Tip the dough onto your work surface and divide it neatly into three equal portions (use a knife or bench scraper rather than tearing). Shape each into a ball, cover, and let them rest for 15 minutes to relax the gluten—this makes rolling much easier later.
Step 5: Roll, Rest & Final Shape
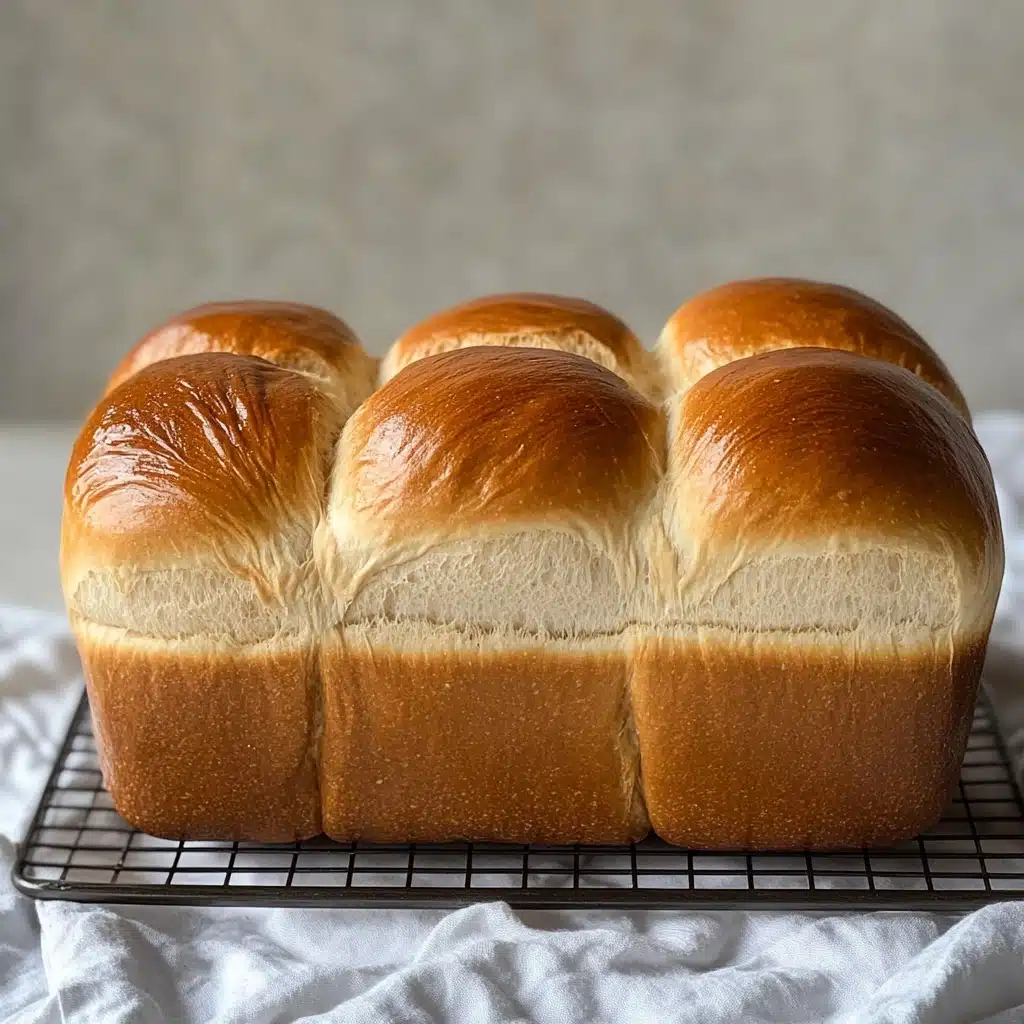
Roll each ball gently into an oval, then roll it up into a short log. Cover and let the logs rest for another 15 minutes. Now, turn each log 90°, roll them out again into longer rectangles, and roll those up into a tight, cinnamon roll-like coil. Grease and flour your loaf pan, then nestle the three shaped coils inside.
Step 6: Final Proof
Cover the pan with greased plastic wrap and let the dough rise one final time in a warm spot until the loaf fills 80-90% of the pan—about 1 to 1.5 hours. You’ll see beautifully domed, puffy sections hinting at the dreamy crumb to come.
Step 7: Bake and Finish
Preheat your oven to 375°F about 20 minutes into proofing. Bake the Easy Milk Bread Loaf for 30-35 minutes, covering loosely with foil after 15 minutes so it doesn’t get too dark. When done, tap the pan on the counter (this prevents shrinkage), then carefully remove the loaf and let it cool on a rack. Brush the warm top with melted butter—this is where the magic aroma happens! Cool for at least 15 minutes before slicing, if you can possibly wait.
Pro Tips for Making Easy Milk Bread Loaf
- Windowpane Test Mastery: Stop kneading as soon as the dough stretches thin without breaking—this prevents overworking and guarantees a cloud-like texture.
- Chill Your Liquids: Using cold water and milk (and even chilling them a bit extra in summer!) helps avoid a too-warm dough, which can lead to dense bread.
- Proofing Temperature Sweet Spot: A warm, cozy spot (around 85°F) is your best friend for even, billowy rises; the inside of a turned-off oven with a tray of hot water beneath works perfectly on chilly days.
- Weigh Your Ingredients: Bread baking is a science—use a kitchen scale for flour and liquid to guarantee consistent, fluffy results every time.
How to Serve Easy Milk Bread Loaf
Garnishes
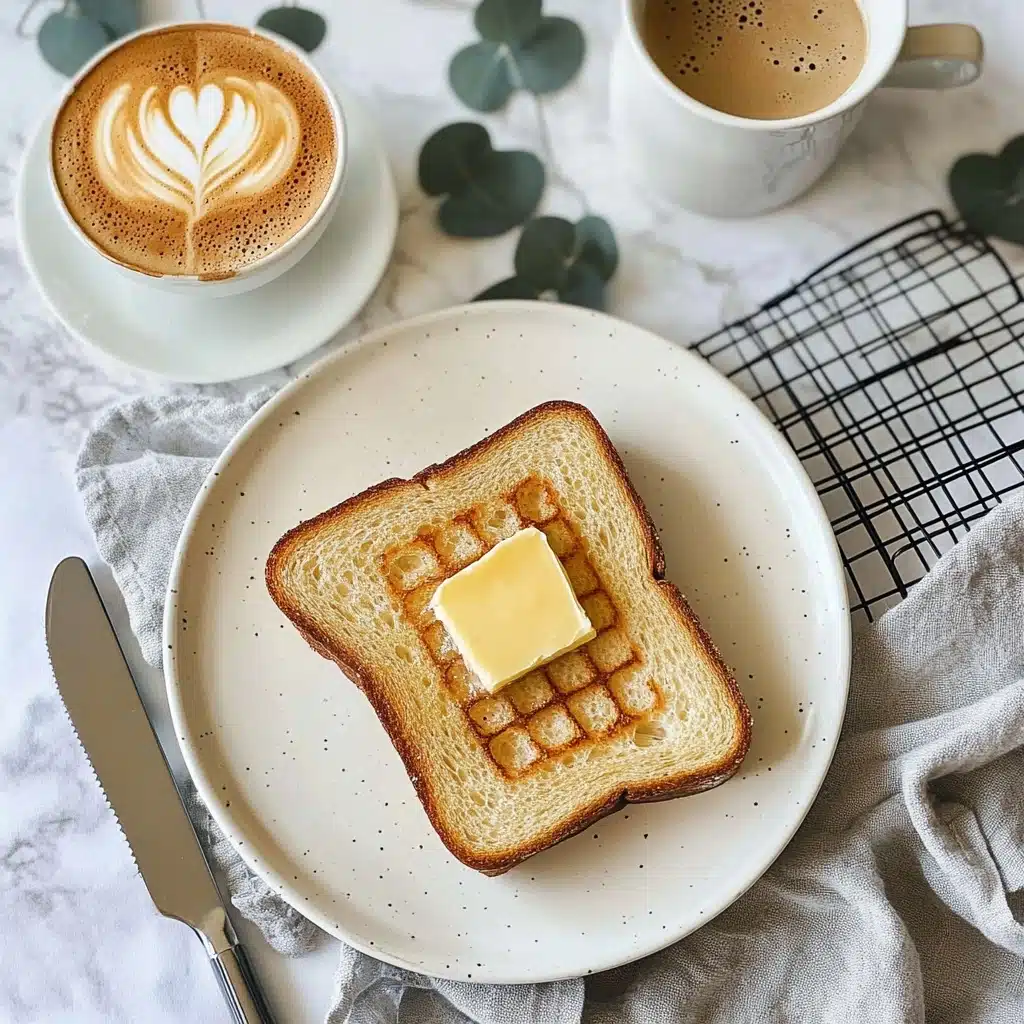
A still-warm slice of Easy Milk Bread Loaf is bliss with just a smear of creamy butter, but you can take it further! Try a dusting of powdered sugar, a brush of honey, a sprinkle of flaky sea salt, or even a glinting layer of fruit preserves for instant elegance.
Side Dishes
This light, barely-sweet bread is a chameleon at the table—serve it with an eggy breakfast platter, a bowl of creamy potato soup, or alongside a refreshing fruit salad. It’s also perfect for mopping up saucy curries or serving next to a crunchy salad for lunch.
Creative Ways to Present
For gatherings, slice your Easy Milk Bread Loaf thick and cut each piece into sticks for dippable “bread fingers.” Toast and serve with flavored butters, whip up sweet or savory tea sandwiches, or transform leftovers into impossibly soft French toast for a show-stopping brunch.
Make Ahead and Storage
Storing Leftovers
Keep sliced Easy Milk Bread Loaf fresh by storing it in an airtight bag or bread box at room temperature—it’s best consumed within 3 days for maximum pillowy softness. If your kitchen is quite warm or humid, popping it in the fridge can help prolong freshness, though the fridge may dry it out a bit more quickly, so only do this when absolutely necessary.
Freezing
Milk bread freezes beautifully! Once completely cooled, wrap the loaf (whole or sliced) tightly in plastic wrap and then in foil, or use a ziplock freezer bag. It keeps well for up to 2 months—just thaw at room temperature before serving for bread that’s almost as good as fresh-baked.
Reheating
To enjoy that “just-baked” magic, briefly warm individual slices in a toaster or low oven (325°F for 5 minutes). For even more wow-factor, brush with melted butter before toasting. This quick reheat wakes up the fluffy crumb and makes leftovers feel brand new.
FAQs
-
Can I make Easy Milk Bread Loaf without a stand mixer?
Absolutely! While a stand mixer makes kneading and windowpane testing easier, you can mix and knead this dough by hand—it just takes a little more time and muscle. Use a sturdy spatula to bring the dough together, then knead on a lightly greased surface until smooth and elastic (15–20 minutes). The results will be just as delicious.
-
Why does my milk bread sometimes turn out dense?
Dense results can happen if the dough is under-kneaded (gluten needs to fully develop), if liquids are too warm and overproof the dough, or if measurements (especially flour) are off—always use a kitchen scale and check the dough texture at each step. Cold liquids and the autolyse step both help prevent density.
-
How can I tell if my bread is done baking?
Your Easy Milk Bread Loaf should be deeply golden on top and sound hollow when you tap the bottom or sides. For best accuracy, check the internal temperature with an instant-read thermometer—the loaf is perfectly baked at 190°F (87°C).
-
What size pan do I need for this recipe?
This recipe is designed for a 1.5lb loaf pan (10" x 5" x 3"). If you only have a 1lb pan (8.5" x 4.5"), reduce all ingredient amounts and shorten the bake by about 5 minutes—the loaf will still come out tall, soft, and gorgeous!
Final Thoughts
If you’ve been dreaming of baking impossibly soft, bakery-style bread right in your own kitchen, Easy Milk Bread Loaf is truly the recipe to try. Once you taste your first homemade slice, you’ll be hooked—so don’t wait, gather your simple ingredients and dive into baking happiness!
Print
Easy Milk Bread Loaf Recipe
- Prep Time: 30 minutes
- Cook Time: 35 minutes
- Total Time: 4 hours 20 minutes
- Yield: 1 loaf, approximately 12 slices
- Category: Bread
- Method: Baking
- Cuisine: International
- Diet: Vegetarian
Description
Learn how to make an easy milk bread loaf that will delight your taste buds. This recipe results in a soft and fluffy bread that is perfect for sandwiches or to enjoy on its own.
Ingredients
Main Dough:
- 500 g bread flour (3 3/4 cups)
- 40 g sugar (3 tablespoons)
- 1 1/2 tsp instant yeast
- 225 g cold water (a little bit less than 1 cup)
- 115 g cold milk (1/2 cup)
- 9 g sea salt (1 1/2 tsp)
- 25 g unsalted butter (1 3/4 tbsp)
Other Ingredients:
- Butter for coating the pan and brushing the bread
- Flour for coating the pan
Instructions
- Making Bread Dough: Mix bread flour, sugar, yeast, water, and milk in a stand mixer, kneading on low speed until the dough is formed. Cover and let it rest for 30 minutes. Add salt and continue kneading. Add butter cubes and knead until the dough passes the windowpane test. Let rise for 1 hour.
- Shaping: Divide dough, shape into balls, rest, roll out, and shape into logs. Place in loaf pan to rise.
- Baking: Preheat oven, bake the bread for 30-35 minutes, covering with foil halfway. Cool, then brush with butter.
Notes
- Measure ingredients accurately with a kitchen scale.
- Start with cold liquids to prevent dough from warming too much.
- Use the Autolyse method for better texture.
- Proof dough in a warm place for best results.
- Baking time may vary, ensure internal temperature reaches 190°F.
- Adjust ingredient amounts for different loaf pan sizes.
Nutrition
- Serving Size: 1 slice
- Calories: 189 kcal
- Sugar: 4g
- Sodium: 298mg
- Fat: 3g
- Saturated Fat: 1g
- Trans Fat: 1g
- Carbohydrates: 35g
- Fiber: 1g
- Protein: 6g
- Cholesterol: 5mg


