
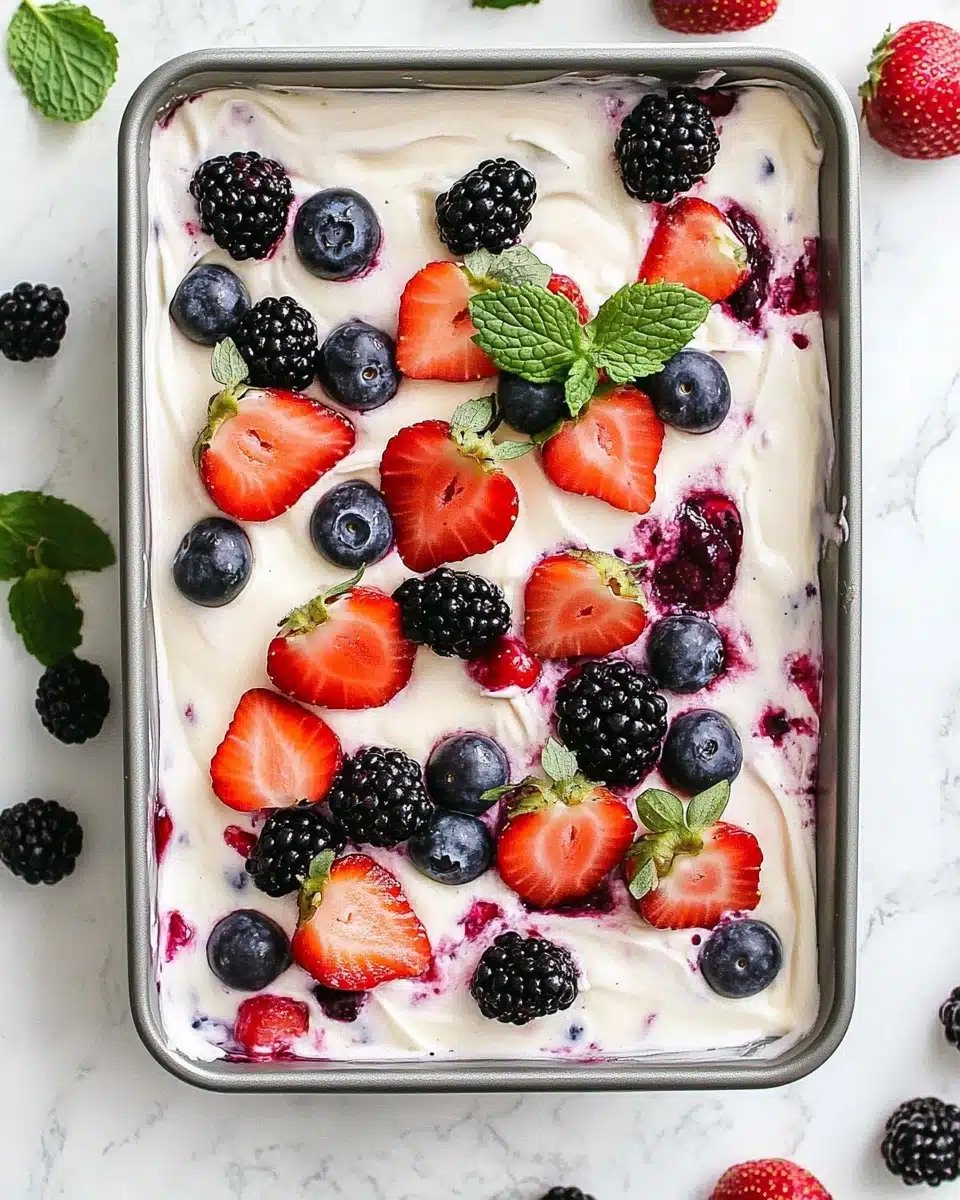
Berry Icebox Cake is my favorite answer to hot summer days when you crave something lusciously creamy and bursting with fresh fruit. With plush layers of vanilla wafers, a dreamy cheesecake-flavored filling, and heaps of ripe berries, this no-bake dessert truly tastes like sunshine in a pan!
Why You’ll Love This Recipe
- No-Bake Magic: Beat the heat and skip the oven—this Berry Icebox Cake comes together right in your fridge!
- Irresistibly Creamy Layers: Each bite is full of velvety cheesecake filling, tender cookies, and fresh, juicy berries.
- Make-Ahead Friendly: Perfect for parties or potlucks, you can prep this dessert the night before and wow your guests with minimal effort.
- A Celebration of Summer Produce: Loaded with your favorite seasonal berries, it’s as stunning to look at as it is to eat!
Ingredients You’ll Need
You only need a handful of kitchen staples and beautiful fresh berries to let this Berry Icebox Cake shine. Each ingredient works its magic—crisp cookies, dreamy filling, and bursts of berry flavor bring this chilled treat to life.
- Vanilla Wafers: These create delicious, cake-like layers as they soak up the creamy filling. Graham crackers also work in a pinch!
- Cream Cheese: Softened cream cheese gives the filling its rich, cheesecake-inspired tang and smooth texture.
- Instant Cheesecake Pudding Mix: Adds flavor and body, making the filling thick and decadent—vanilla pudding can be used if you can’t find cheesecake flavor.
- Milk: Helps to blend the pudding and cream cheese into a perfectly creamy mixture; whole or 2% both work well.
- Whipped Topping: Cool Whip adds a light, pillowy texture to the filling, but homemade whipped cream is a lovely alternative.
- Fresh Berries: A colorful mix of strawberries, blueberries, raspberries, or blackberries makes every bite pop with bright, juicy flavor.
Variations
One of the best things about this Berry Icebox Cake is how adaptable it is—mix and match to fit what’s seasonal or whatever your family loves! Here are a few ways to make it your own.
- Tropical Twist: Use sliced mango, kiwi, and pineapple for a sunshine-filled rendition—fresh mint makes a gorgeous garnish!
- Chocolate Lovers: Layer in chocolate wafers or add mini chocolate chips between layers for a chocoholic-friendly version.
- Gluten-Free Adaptation: Swap in gluten-free cookies or graham crackers if you need a gluten-free treat.
- Dairy-Free Delight: Use dairy-free whipped topping and vegan cream cheese to suit lactose sensitivities without sacrificing creaminess.
How to Make Berry Icebox Cake
Step 1: Make the Luscious Cream Cheese Filling
Grab your hand mixer (or stand mixer if you like) and beat the softened cream cheese together with both boxes of instant pudding until ultra-smooth and creamy. Drizzle in the milk slowly, whipping until everything looks billowy and uniform, then gently fold in the whipped topping for that light, dreamy texture.
Step 2: Fold in the Berries
Next, fold about 3 to 4 cups of berries right into your prepared cream cheese mixture, saving some berries for the beautiful topping. Every fold should gently swirl those berries into the filling to avoid breaking them up too much—think juicy, gem-like pops in every bite!
Step 3: Layer Away
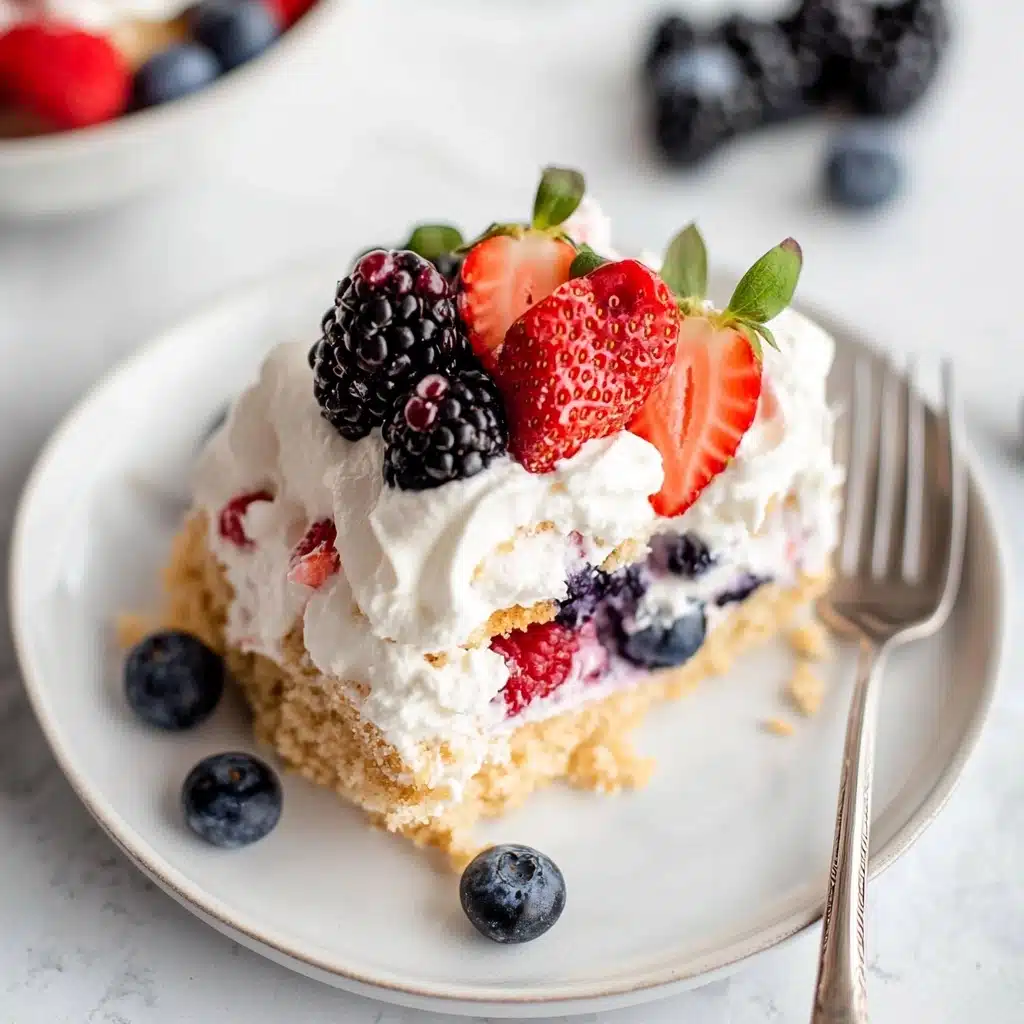
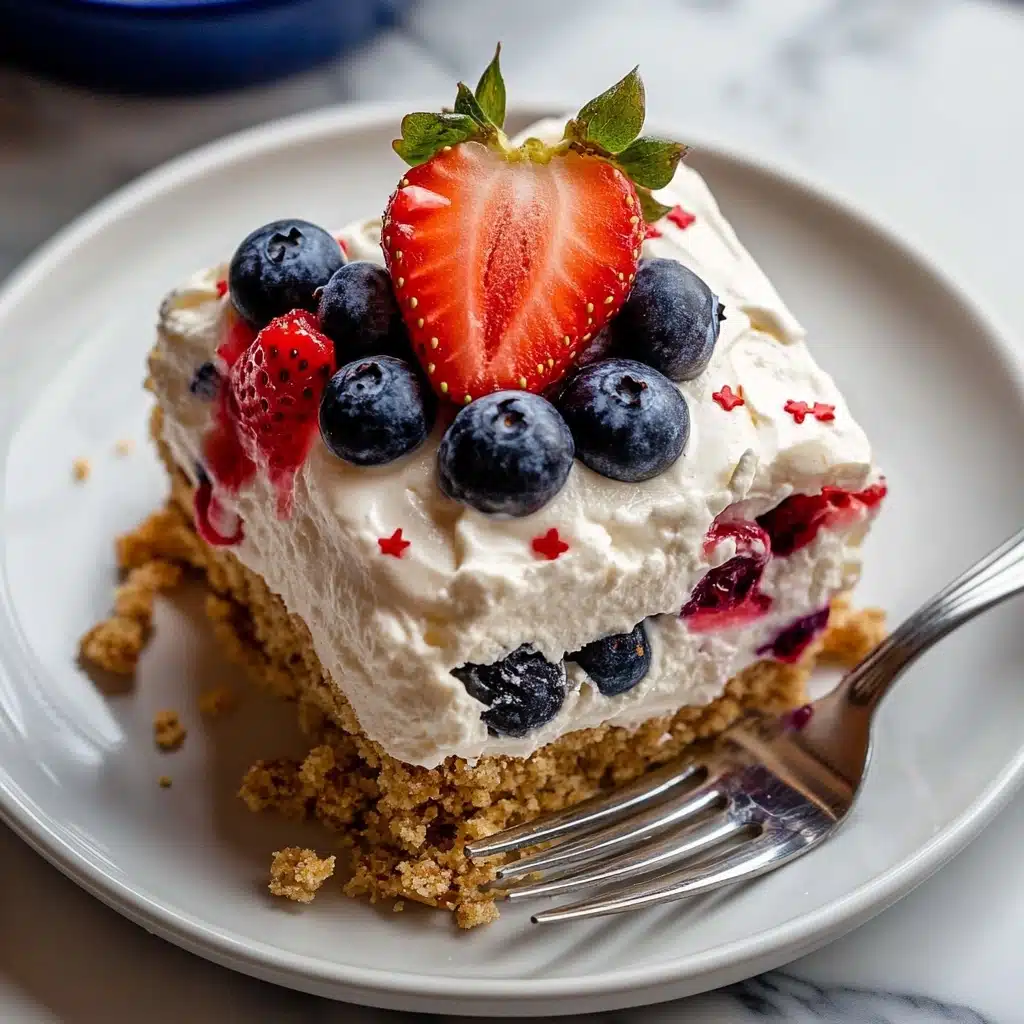
Spread a spoonful of the creamy filling onto the bottom of your 9×13-inch pan to anchor the cookies, then line the bottom with vanilla wafers—break a few to fit every nook. Top with half the berry-flecked filling, add another generous layer of wafers, and spread the rest of the mixture over the top for that sky-high, dessert-shop effect.
Step 4: Chill and Finish with Berries
Now comes the hardest part: pop your Berry Icebox Cake into the fridge for at least 4 hours (overnight is even better) so those cookies soak up the luscious cream and transform into soft, cakey layers. Right before serving, pile the reserved fresh berries on top for a gorgeous finish!
Pro Tips for Making Berry Icebox Cake
- Room Temperature Cream Cheese: Let your cream cheese soften fully before mixing so your filling ends up silky, not lumpy.
- Even Berry Distribution: Chop larger berries like strawberries so you get an even pop of fruit in every forkful.
- Overnight Chill for Best Results: If possible, let the cake chill overnight—the vanilla wafers become fantastically soft and “cakey!”
- Garnish at the Last Minute: Top with fresh berries just before serving to keep them vibrant and juicy—not wilted or soggy.
How to Serve Berry Icebox Cake
Garnishes
For the prettiest finish, scatter extra fresh berries across the chilled cake just before slicing. A dusting of powdered sugar, a swirl of whipped cream, or a few sprigs of fresh mint add a lovely touch for parties or picnics—make it as fanciful or simple as you please!
Side Dishes
This cheerful dessert is amazing on its own, but it plays beautifully with a scoop of lemon or berry sorbet on a hot day. Try serving it with iced tea, sparkling lemonade, or a platter of cut-up melon for a truly festive summer spread.
Creative Ways to Present
If you’re hosting, try making individual Berry Icebox Cakes in glass jars or small tumblers for a show-stopping (and portable!) treat. For a family gathering, slice the chilled cake into big, generous squares and pile them onto a vintage cake stand—guaranteed to make eyes light up!
Make Ahead and Storage
Storing Leftovers
If you’re lucky enough to have leftovers, simply cover the pan tightly with plastic wrap and refrigerate. This Berry Icebox Cake will stay fresh and creamy for up to 3 days—just know that the cookies will continue to soften as time goes on.
Freezing
Berry Icebox Cake can be frozen, but for best results, do so before adding the top layer of berries. Wrap the cake well and freeze for up to one month; thaw overnight in the fridge and add fresh berries right before serving for vibrant color and texture.
Reheating
This dessert is meant to be served cold, straight from the refrigerator—no reheating needed! If it’s frozen, just allow it to thaw in the fridge until soft and ready to slice.
FAQs
-
Can I use frozen berries instead of fresh in Berry Icebox Cake?
You can use frozen berries in a pinch, but be sure to thaw and thoroughly drain them to prevent excess moisture from making the cake soggy. The color may “bleed” a bit, but it’ll still be delicious!
-
What are the best berries to use?
Strawberries, blueberries, raspberries, and blackberries all work beautifully—use any combo you love or whatever is freshest at your market. Just chop larger berries so every slice is balanced.
-
Can I make Berry Icebox Cake gluten-free?
Absolutely! Simply swap in your favorite gluten-free vanilla wafers or graham crackers. All other ingredients are naturally gluten-free (just double-check your pudding mix labels to be sure).
-
How far in advance can I make Berry Icebox Cake?
This dessert is perfect for making a day ahead; in fact, chilling overnight helps the layers meld together for the ultimate creamy, cakey texture. Just hold off on garnishing with fresh berries until right before serving.
Final Thoughts
If you’re looking for a fuss-free, gorgeous dessert that’ll make everyone smile, Berry Icebox Cake is always a winner. I hope you’re inspired to give it a try—the flavors are pure summer, and the process is simple joy from start to finish. Happy layering!
Print
Berry Icebox Cake Recipe
- Prep Time: 15 minutes
- Cook Time: 4 hours
- Total Time: 4 hours 15 minutes
- Yield: 12 servings
- Category: Dessert
- Method: No Bake
- Cuisine: American
- Diet: Vegetarian
Description
This Berry Icebox Cake is a delightful no-bake dessert perfect for summer gatherings. Layers of vanilla wafers, creamy cheesecake pudding, whipped topping, and fresh berries create a refreshing and easy-to-make treat.
Ingredients
For the Cake:
- 1 (11 ounce) Box Vanilla Wafers, Can substitute graham crackers
- 8 ounces Cream Cheese, Softened
- 2 (4 serving size) Boxes Instant Cheesecake Flavored Pudding, Can substitute vanilla
- 2 1/2 cups Milk
- 8 ounces Whipped Topping
- 4–5 cups Fresh Berries
Instructions
- Mix Cream Cheese and Pudding: In a large bowl, blend the cream cheese and both packages of instant pudding using a hand mixer or stand mixer. Gradually incorporate the milk.
- Add Whipped Topping: Gently fold in the whipped topping to the cream cheese mixture.
- Layer the Cake: Spread a layer of the cream cheese mixture in a 9×13 inch baking dish. Fold in 3-4 cups of berries.
- Assemble: Line the dish with vanilla wafers, add half of the cream cheese mixture, another layer of wafers, then the remaining cream cheese mixture. Refrigerate for at least 4 hours.
- Serve: Before serving, top with the remaining fresh berries.
Notes
- Cook time listed is for chilling.
- Cool Whip is recommended but homemade whipped cream can be used instead. To make homemade whipped cream, beat 2 cups of heavy cream until stiff.
Nutrition
- Serving Size: 1 slice
- Calories: 150 kcal
- Sugar: 12g
- Sodium: 220mg
- Fat: 8g
- Saturated Fat: 5g
- Unsaturated Fat: 3g
- Trans Fat: 0g
- Carbohydrates: 18g
- Fiber: 1g
- Protein: 2g
- Cholesterol: 20mg


