
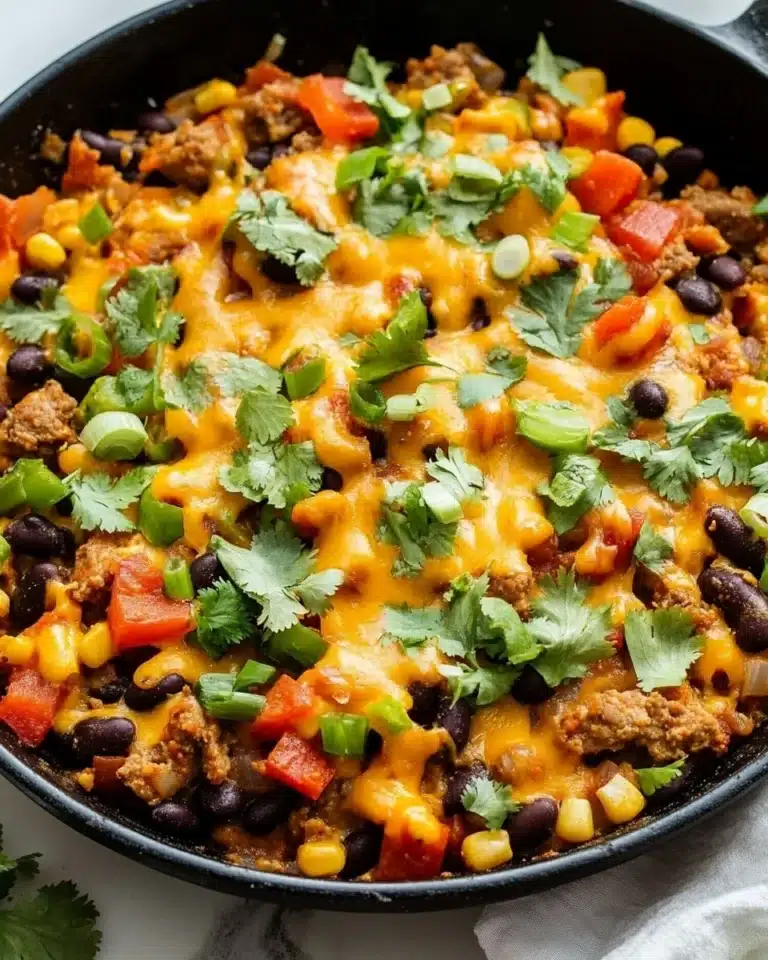
I absolutely love this Chicken Fajitas Casserole Recipe because it takes all the vibrant, zesty flavors of classic fajitas and turns them into a comforting, cheesy baked dish that’s perfect for a busy weeknight. When I first tried this casserole, I was amazed at how easily it all came together — just a handful of simple ingredients transform into a family-favorite meal that everyone eagerly digs into. You’ll find that this recipe is not only delicious, but it’s also a little hands-off, which means more time to relax while it’s baking.
This Chicken Fajitas Casserole Recipe is perfect whether you’re feeding a crowd or just want tasty leftovers for the next day. The combination of tender chicken, sautéed peppers and onions, plus creamy melted cheese baked right on top creates that perfect cozy meal vibe. I discovered this trick when I needed a way to get my fajita fix without standing over the stove stuffing tortillas late at night — trust me, it’s absolutely worth a try!
Why You’ll Love This Recipe
- Easy to make: You’ll love how simple and approachable this recipe is, especially when you want flavorful comfort food without fuss.
- Family favorite: My family goes crazy for this casserole, and I bet yours will too — it’s a great way to get everyone around the dinner table happily.
- Make-ahead friendly: Prep the ingredients in advance and just pop it in the oven when you’re ready, saving you time on busy days.
- Packed with flavor: The mix of spices, juicy chicken, and melty cheese creates layers of deliciousness you can’t get enough of.

Ingredients You’ll Need
When you gather your ingredients for this Chicken Fajitas Casserole Recipe, focus on fresh veggies and quality spices to build those authentic fajita flavors. Using colorful bell peppers and fresh chicken makes all the difference, so grab the best you can find.
- Chicken breasts: I prefer boneless, skinless for quick cooking and easy slicing later.
- Bell peppers: A mix of red, green, and yellow peppers adds a vibrant color and crunch.
- Onion: A yellow or white onion works great to bring mild sweetness.
- Fajita seasoning: You can buy a pre-mixed blend or make your own; it gives that smoky, spicy kick.
- Garlic: Freshly minced garlic always amps up the flavor.
- Shredded cheese: Cheddar or a Mexican blend melts beautifully on top.
- Tortillas: Flour tortillas layered in the casserole absorb those tasty juices.
- Olive oil: For sautéing everything just right without burning.
- Salt and pepper: Simple, but essential seasonings to bring all flavors together.
Variations
One of my favorite things about this Chicken Fajitas Casserole Recipe is how easy it is to make your own. Whether you want to pull back on the spice or add a new twist, it’s super forgiving and totally customizable.
- Spice it up: For those who love heat, I like adding chopped jalapeños or a few dashes of cayenne to the fajita seasoning — it’s a real crowd-pleaser.
- Vegetarian version: Swap chicken for sautéed mushrooms, zucchini, or even black beans; the flavors stay great, and it’s a delightful change.
- Cheese swaps: Try pepper jack for extra zing or even a sprinkle of queso fresco for an authentic touch.
- Low-carb option: Skip the tortillas and layer the veggies and chicken directly with cheese for a keto-friendly casserole.
How to Make Chicken Fajitas Casserole Recipe
Step 1: Prep and Sauté Your Chicken and Veggies
Start by slicing your chicken breasts into thin strips — this helps them cook quickly and absorb all those fajita spices better. Heat some olive oil in a large skillet over medium-high heat, then toss in the chicken with fajita seasoning, salt, and pepper. Once the chicken is mostly cooked (about 4-5 minutes), add your sliced bell peppers and onions to the pan. Sauté everything together until the veggies are tender but still vibrant — this usually takes another 5-6 minutes. Make sure not to overcrowd the pan; stir frequently to get even cooking and avoid sogginess.
Step 2: Assemble Your Casserole Layers
Next, grab your baking dish and start layering. Begin with a layer of flour tortillas on the bottom — they soak up the juices beautifully and keep everything from sticking. Spread half of your chicken and veggie mix evenly over the tortillas, then sprinkle a generous handful of shredded cheese. Repeat with another tortilla layer and the rest of your filling. Finish off by topping everything with a final layer of cheese; this will create that golden, melty crust we all love. You’ll want to preheat your oven to 375°F (190°C) while you do this so it’s ready to go.
Step 3: Bake and Serve
Bake your casserole uncovered for about 20-25 minutes until the cheese is bubbly and golden brown. Keep an eye on it during the last 10 minutes — oven temps can vary and you want that perfect melt without burning. Once it’s done, let it rest for 5-10 minutes before serving so the layers set nicely. You’ll find this step really helps with clean slices and that gorgeous layered look.
Pro Tips for Making Chicken Fajitas Casserole Recipe
- Even slices: When cutting your chicken, slice it against the grain for the most tender, juicy bites.
- Don’t skip resting: Giving your casserole time to rest after baking makes serving cleaner and flavors meld perfectly.
- Use fresh veggies: Fresh bell peppers and onions bring the best crunch and color — frozen veggies can make your casserole soggy.
- Adjust seasoning to taste: I always taste as I go and add a little extra fajita seasoning or salt if needed — don’t hesitate to tweak for your palate.
How to Serve Chicken Fajitas Casserole Recipe
Garnishes
My go-to garnishes for this casserole are fresh cilantro and a dollop of sour cream or guacamole. The bright herbiness of cilantro cuts through the richness beautifully, and a touch of sour cream adds that creamy coolness your palate will thank you for. If you like a little extra tang, a squeeze of fresh lime is fantastic too!
Side Dishes
I often serve this Chicken Fajitas Casserole Recipe alongside a simple Mexican street corn salad or a fresh green salad with avocado. Roasted Mexican-style street corn adds sweetness and char, perfectly complementing the spicy fajita flavors. You could also keep it light with black beans and rice or some crunchy tortilla chips on the side for texture contrast.
Creative Ways to Present
For a fun twist when friends come over, I’ve tried serving the casserole scooped into crispy tortilla bowls with all the garnishes on top. Another favorite is layering it in a pretty glass casserole dish and letting everyone help themselves — the colorful layers make it look like a fiesta on your dinner table. It’s always a conversation starter!
Make Ahead and Storage
Storing Leftovers
I like to store leftovers in an airtight container in the fridge for up to 3 days. The casserole actually tastes even better the next day once those flavors have had time to meld. When storing, make sure it’s cooled completely before sealing to avoid sogginess from condensation.
Freezing
This Chicken Fajitas Casserole Recipe freezes beautifully! I usually portion it into individual containers so I can thaw exactly what I need. Wrap tightly with plastic wrap and foil to keep it fresh in the freezer for up to 2 months. When you’re ready to eat, thaw overnight in the fridge.
Reheating
To reheat, I find baking leftovers in a 350°F (175°C) oven for about 15-20 minutes restores that fresh-baked texture and melts the cheese perfectly. If you’re in a hurry, the microwave works too — just cover to keep moisture in, but the oven always gives the best taste and texture.
FAQs
-
Can I use chicken thighs instead of breasts in this Chicken Fajitas Casserole Recipe?
Absolutely! Chicken thighs are more flavorful and stay juicy even if slightly overcooked. Just cut them into strips like the breasts and adjust cooking time a bit since thighs might take slightly longer to cook through. The rich flavor from thighs pairs beautifully with fajita spices.
-
Is there a dairy-free option for the cheese topping?
Yes! You can use dairy-free shredded cheese alternatives made from nuts or coconut. Nutritional yeast also works well if you want a cheesy flavor without melting cheese. Just be mindful that texture might vary slightly.
-
Can I prepare the casserole entirely ahead of time and bake it later?
Definitely! You can assemble the whole casserole and cover it tightly with foil. Store it in the fridge for up to 24 hours before baking. Just add a few extra minutes to baking time if you put it in cold straight from the fridge.
-
What can I substitute if I don’t have fajita seasoning?
You can make your own using a mix of chili powder, cumin, paprika, garlic powder, onion powder, oregano, salt, and pepper. Feel free to adjust spice levels based on your preferences.
Final Thoughts
Honestly, this Chicken Fajitas Casserole Recipe has become a staple in my kitchen because it hits that perfect balance between ease and amazing flavor — and it always impresses without requiring hours in the kitchen. I love how it’s flexible enough for tweaking based on whatever veggies or cheese you have on hand, and the leftovers are just as dreamy. If you’re after a cozy meal that feels like a celebration but comes together quickly, this recipe is exactly what you want. Give it a try, and I’m sure it’ll become a favorite in your home too!
Print
Chicken Fajitas Casserole Recipe
- Prep Time: 10 minutes
- Cook Time: 15 minutes
- Total Time: 25 minutes
- Yield: Serves 4
- Category: Main Course
- Method: Stovetop
- Cuisine: Italian
- Diet: Gluten Free
Description
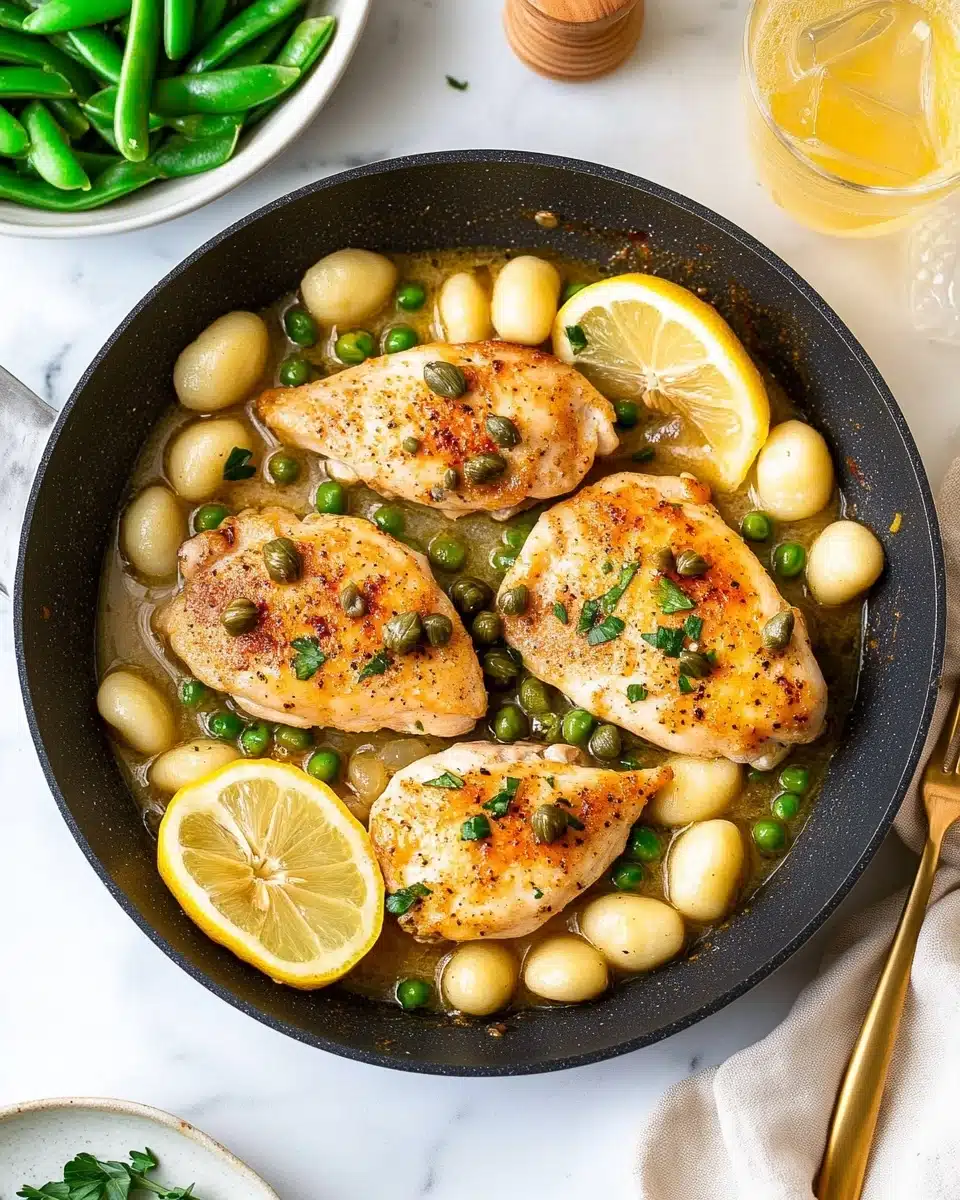
This Chicken Piccata with Gnocchi recipe offers a deliciously tangy and buttery Italian-inspired meal featuring tender gluten-free chicken cutlets sautéed in a lemon-caper sauce paired with soft, pillowy gnocchi. The dish combines classic flavors of garlic, capers, and lemon balanced with a rich pan sauce, creating a comforting yet elegant entrée perfect for a quick weeknight dinner or a special occasion.
Ingredients
Chicken Piccata
- 1/4 cup gluten-free all-purpose flour
- 1 teaspoon Italian seasoning
- Salt and pepper to preference
- 2-3 chicken breasts, cut horizontally in half
- 2 tablespoons light olive oil
- 5 tablespoons unsalted butter, divided
- 2 cloves garlic, minced
- 1 cup chicken broth
- 1/4 cup white wine
- 2 tablespoons capers, rinsed and drained
- 3 tablespoons fresh lemon juice (about 1/2 lemon)
Gnocchi
- 1 – 12 oz. package gluten-free gnocchi
Optional Toppings
- Fresh Italian parsley, finely chopped
- Parmigiano Reggiano, finely grated
Instructions
- Prepare the flour and seasonings: In a shallow bowl, combine the gluten-free flour, Italian seasoning, salt, and pepper. This seasoned flour mix will be used to dredge the chicken, coating it evenly and adding flavor.
- Dredge the chicken: Coat each chicken breast half thoroughly in the seasoned flour, shaking off any excess to avoid clumps. Discard unused flour mixture afterwards.
- Cook the chicken: Heat the olive oil and 2 tablespoons of butter in a large pan over medium heat. Cook the chicken in batches, ensuring not to overcrowd the pan, for 3 minutes per side until just cooked through. Remove cooked chicken to a plate and set aside.
- Cook the gnocchi: Bring 4 quarts of salted water to a rolling boil in a medium pot. Add the gluten-free gnocchi and gently stir. Cook until the gnocchi float to the surface, about 2 minutes. Drain and briefly set aside.
- Prepare the sauce: To the same pan used for chicken, add the remaining 3 tablespoons butter and melt over medium-low heat. Add the minced garlic and stir quickly until fragrant.
- Add liquids and flavorings: Pour in the chicken broth, white wine, capers, and fresh lemon juice. Stir well, scraping up any browned bits from the pan bottom, and cook for about 1 minute to blend flavors.
- Finish the chicken in sauce: Return the cooked chicken breasts to the pan with the sauce. Cook together for an additional 2 minutes to heat through and allow the sauce to thicken slightly.
- Combine gnocchi and chicken piccata: Add the drained gnocchi to the pan and gently stir or nudge to coat them evenly with the sauce and mix with the chicken.
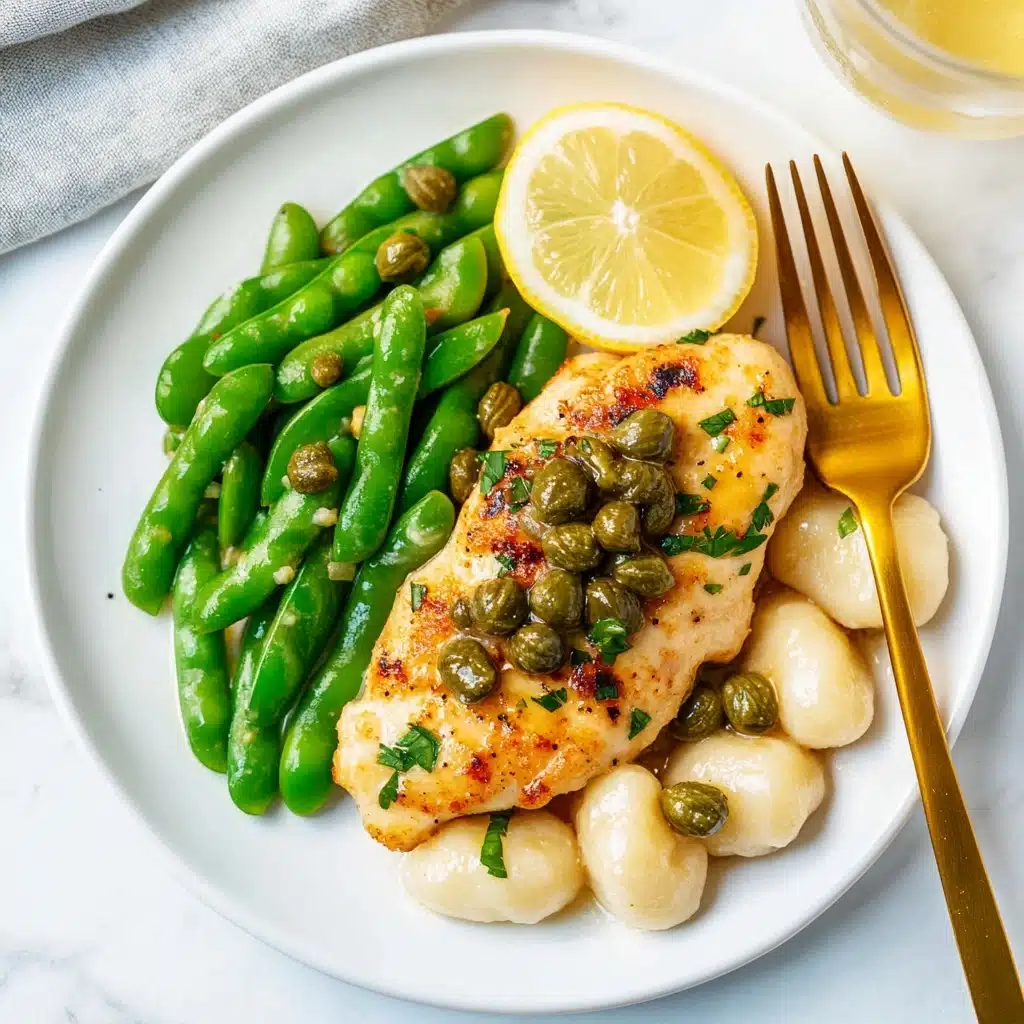
- Serve: Turn off the heat and remove the pan from the stove. Optionally, garnish with finely chopped fresh Italian parsley and grated Parmigiano Reggiano. Serve the dish alone or alongside your favorite roasted or sautéed vegetables. Enjoy!
Notes
- If chicken breasts are thicker than 1/4 inch after slicing horizontally, pound between plastic wrap with a meat mallet to achieve proper thickness for even cooking.
- The piccata sauce is highly adaptable: omit white wine for additional chicken broth if preferred, increase capers for a stronger flavor, and adjust lemon juice to taste for desired acidity.
- Complement this meal with a variety of vegetables such as sautéed sugar snap peas, roasted broccoli florets, roasted asparagus, wilted spinach, or a simple green salad for a balanced plate.
- The equipment mentioned includes common kitchen tools but also references gluten-free products ensuring dietary suitability.

