
I absolutely love this Taco Bubble Up Recipe because it’s like having all the best parts of tacos baked into one cozy dish. When you want a no-fuss, crowd-pleasing dinner that comes together quickly but still feels special, this recipe is your new best friend. It’s perfect for weeknights when you’re juggling a million things, yet still want that satisfying taco flavor everyone loves.
What makes this Taco Bubble Up Recipe stand out is how it combines simple ingredients — like ground beef, flaky biscuits, and melted cheese — into a delicious, bubbly casserole. I discovered this trick one busy evening when traditional taco night felt too much, and since then, it’s been a staple with my family. You’ll find that it’s both hearty and comforting, plus super versatile to tweak with your favorite toppings and seasonings.
Why You’ll Love This Recipe
- Quick and Easy: It comes together fast, ideal for busy nights when you want something tasty without the hassle.
- Crowd-Pleaser: My family goes crazy for this, and it’s perfect for feeding a group or potluck.
- Flavor-Packed: Combining taco seasoning, enchilada sauce, and Rotel gives it that classic Mexican-inspired zing.
- Adaptable: You can easily swap toppings and add-ins to make it your own.

Ingredients You’ll Need
Every ingredient in this Taco Bubble Up Recipe is chosen for layering flavors and creating a satisfying texture — from the juicy seasoned beef to the fluffy biscuit pieces. Here’s what you want to have on hand, and I’ve thrown in some tips to help you shop smart.
- Ground beef: I used 80/20 for good flavor and juiciness, but you can go leaner if you prefer.
- Taco seasoning packet: Store-bought works well here, but homemade seasoning can really boost flavor.
- Enchilada sauce: Adds richness and depth — I like the mild or medium heat versions depending on my mood.
- Diced tomatoes with green chilies (Rotel): This gives that little kick and some freshness in every bite.
- Pillsbury homestyle grands biscuits: These biscuits puff up beautifully, creating the perfect doughy pockets.
- Colby jack cheese: I shred my own for melty, gooey goodness, but pre-shredded works too.
- Favorite taco toppings: Think sour cream, avocado, jalapeños, or extra salsa — whatever you love on tacos.
- Fresh cilantro (optional): A flourish of freshness that brightens the whole dish.
Variations
I love making this Taco Bubble Up Recipe my own by switching up proteins or going veggie-friendly. Don’t be afraid to get creative here—it’s a forgiving recipe that takes to changeups like a champ.
- Ground turkey or chicken: I swapped in ground turkey once for a lighter take, and it still packed plenty of flavor with the seasoning and sauces.
- Vegetarian version: Try black beans or seasoned lentils instead of meat; add corn for texture.
- Spicier sauce: Turning up the heat with a hot enchilada sauce or adding diced jalapeños made it a hit for spice lovers.
- Cheese swaps: Pepper jack or a Mexican cheese blend also melt beautifully and add a nice kick.
How to Make Taco Bubble Up Recipe
Step 1: Brown the Beef and Build Flavor
Heat a large skillet over medium-high and brown your ground beef until there’s no pink left, about 8-10 minutes. Make sure you crumble it well as it cooks—that helps with even seasoning. Once browned, drain the excess grease to keep things from getting too oily. Next, stir in that taco seasoning, enchilada sauce, and the diced tomatoes with green chilies (a.k.a. Rotel). The mixture will be saucy and vibrant—this is where the magic starts!
Step 2: Prep the Biscuits and Mix
While your meat mixture is cooling a bit, cut the biscuits into eighths—this gives you bite-sized dough pieces that will soak up all those awesome flavors. Toss the biscuit pieces into a large bowl, then gently fold in the taco meat mixture. Don’t overmix here; you want that dough to stay a little chunky so you get that satisfying soft crumb in the finished dish.
Step 3: Assemble and Bake
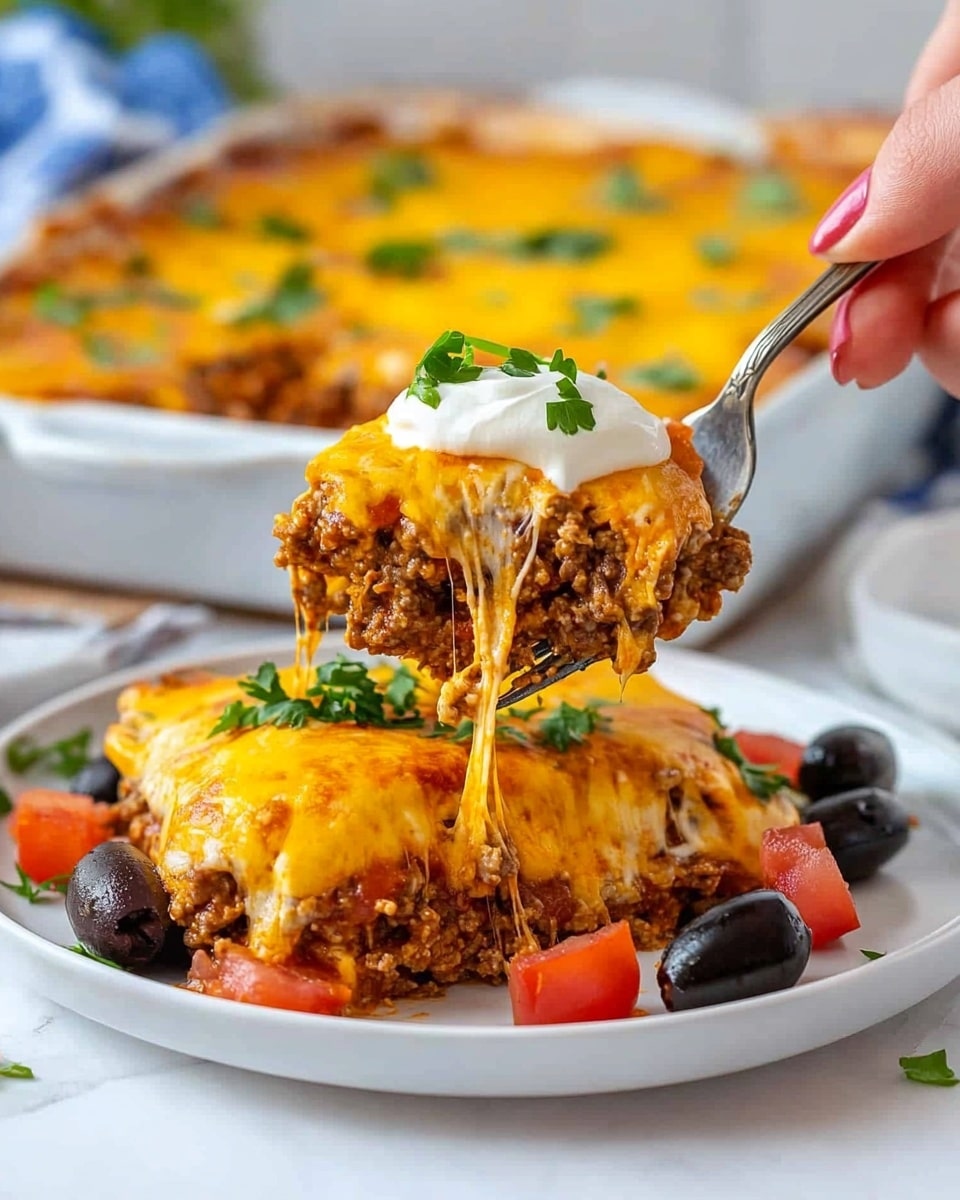
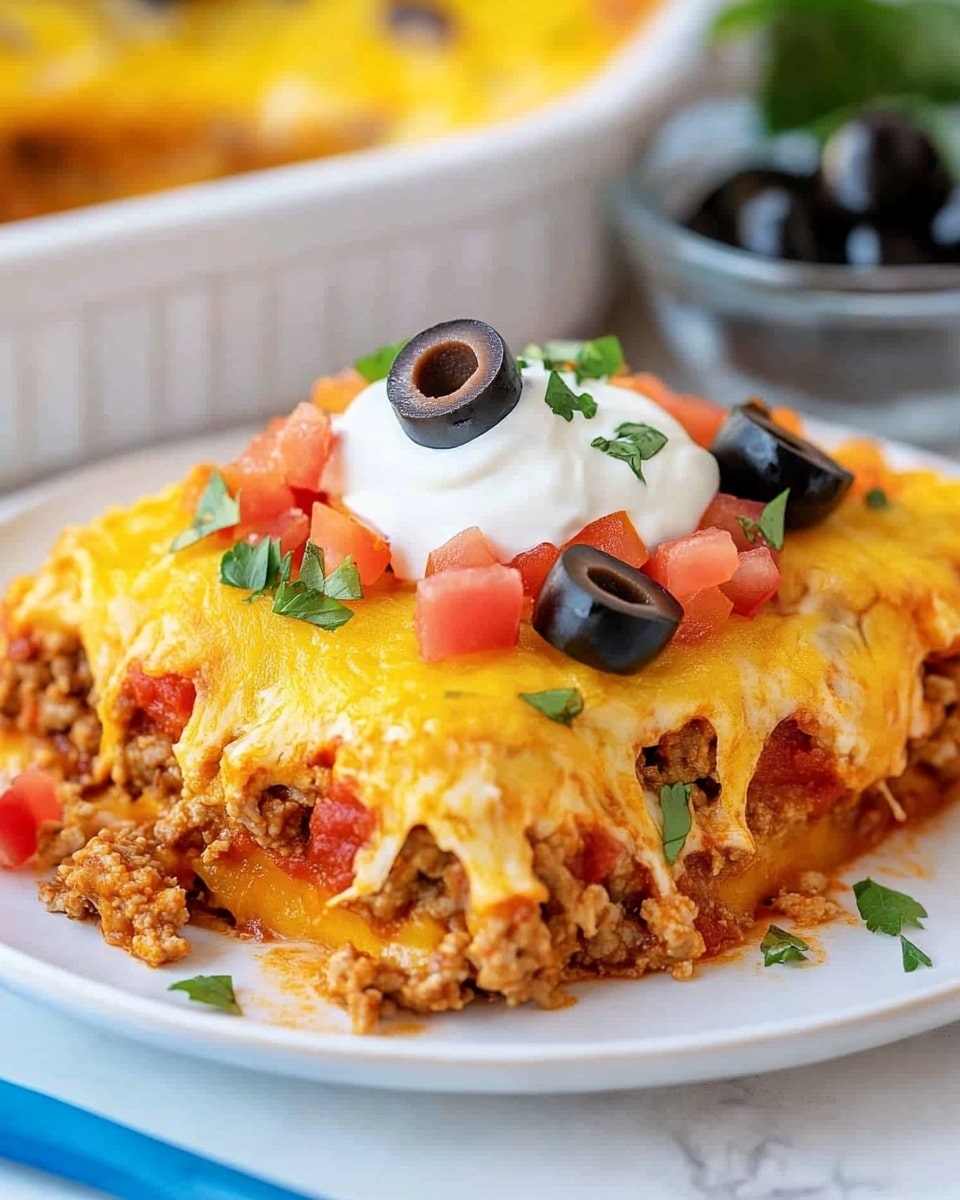
Spray a 9×13-inch baking dish with cooking spray to keep things from sticking, then transfer your biscuit and meat mix evenly into the dish. Sprinkle the shredded Colby jack cheese on top like a blanket of melty goodness. Pop it into a 375°F oven and bake uncovered for 25-30 minutes. You’ll know it’s done when the edges bubble up, cheese is golden brown, and biscuits are cooked through. Resist the urge to slice right away — letting it cool for about 10 minutes helps everything set and makes serving a breeze.
Pro Tips for Making Taco Bubble Up Recipe
- Don’t Overmix the Biscuit and Meat: Gently folding keeps the biscuits from getting too dense and keeps the texture light and fluffy.
- Drain Excess Grease: I learned this the hard way; too much grease can weigh the dish down and make it soggy.
- Let It Rest Before Serving: That 10-minute cooldown helps the layers settle so you get clean slices instead of a sloppy mess.
- Use Shredded Cheese Over Slices: It melts more evenly and creates that perfect golden crust.
How to Serve Taco Bubble Up Recipe
Garnishes
I always top my Taco Bubble Up with a dollop of sour cream, a sprinkle of fresh diced avocado, and a handful of chopped cilantro when it’s in season. These add creamy, cooling elements that balance the bold taco spices. For a bit of crunch, I sometimes add sliced jalapeños or a handful of crushed tortilla chips on top just before serving.
Side Dishes
Light sides like a crisp green salad, Mexican rice, or a simple corn and black bean salad make great companions. I’ve found that a side of fresh salsa and guacamole really rounds out the meal and keeps it feeling festive without extra fuss.
Creative Ways to Present
For gatherings, I’ve served this Taco Bubble Up Recipe in individual ramekins for a neat, portioned presentation. It’s also fun to scoop the warm, cheesy mixture onto tostada shells or corn tortillas for a make-your-own taco bar setup that everyone loves. Presentation-wise, colorful garnishes like diced tomatoes and green onions add a cheerful pop of color on the plate.
Make Ahead and Storage
Storing Leftovers
Leftover Taco Bubble Up stores beautifully in an airtight container in the fridge for up to 3 days. I usually portion it out so I have easy lunches ready to go, and it reheats wonderfully without drying out.
Freezing
If you want to freeze it, I recommend baking the casserole first, then letting it cool completely before wrapping tightly with foil and freezing. This method keeps the texture intact; when you thaw and reheat, it tastes nearly as fresh as the first time.
Reheating
I reheat leftovers in the oven at 350°F, covered with foil to keep moisture in, for about 15-20 minutes until warmed through. Microwaving works in a pinch, but the oven gives you that nice fresh-baked texture again.
FAQs
-
Can I make this Taco Bubble Up Recipe gluten-free?
Yes! Just swap the biscuits for a gluten-free biscuit dough or use an alternative dough like gluten-free crescent rolls. Make sure your taco seasoning and enchilada sauce are labeled gluten-free to keep it safe!
-
Can I prepare the taco meat mixture ahead of time?
Absolutely. You can cook and assemble the meat mixture a day ahead, then add the biscuits and cheese right before baking for best texture. Just cover and refrigerate until ready.
-
What can I use instead of Pillsbury biscuits?
If you can’t find Pillsbury homestyle grands, flaky canned biscuits like those from other brands work great. Alternatively, you could use refrigerated crescent roll dough for a slightly different texture.
-
Is this recipe freezer-friendly?
Yes, it freezes well after baking. Just be sure to cool completely before freezing, then thaw in the fridge and warm up in the oven when ready to enjoy.
Final Thoughts
This Taco Bubble Up Recipe is one of those dishes that I come back to time and again because it hits all the right notes — quick, flavorful, and comforting. It’s easy enough to whip up on a busy weeknight but also feels festive enough to share with friends. I really encourage you to try it out and make it your own with your favorite toppings and twists. Once you do, I bet it’ll become your go-to taco night winner just like it did for me!
Print
Taco Bubble Up Recipe
- Prep Time: 10 minutes
- Cook Time: 30 minutes
- Total Time: 40 minutes
- Yield: 9 servings
- Category: Main Dish
- Method: Baking
- Cuisine: Mexican-inspired
Description
Taco Bubble Up is a quick and delicious casserole perfect for a family meal, combining seasoned ground beef, cheesy biscuits, and classic taco flavors baked to bubbly perfection. This easy one-dish recipe is great for busy weeknights and offers endless customization with your favorite taco toppings.
Ingredients
Meat and Sauce
- 1 pound ground beef (80/20)
- 1 ounce packet taco seasoning
- 10 ounce can enchilada sauce
- 10 ounce can diced tomatoes with green chilies (Rotel)
Biscuit and Cheese
- 2 (6 ounce) cans Pillsbury homestyle grands biscuits
- 8 ounce block Colby Jack cheese, shredded
Toppings
- Your favorite taco toppings (suggested: sour cream, diced tomatoes, lettuce, sliced olives, jalapeños)
- Fresh cilantro, for garnish (optional)
Instructions
- Preheat and Prepare Baking Dish: Preheat your oven to 375°F (190°C). Spray a 9×13-inch baking dish with cooking spray to prevent sticking and set it aside.
- Cook the Ground Beef: In a large skillet over medium-high heat, cook the ground beef by browning and crumbling it until there is no pink left, about 8 to 10 minutes. Drain off excess fat completely to keep the dish from being greasy.
- Add Seasonings and Sauces: Stir in the taco seasoning packet, enchilada sauce, and the diced tomatoes with green chilies (Rotel) into the browned beef. Mix thoroughly to combine. Remove the skillet from heat and set aside.
- Prepare Biscuit Pieces: Cut each biscuit into eighths and place the pieces into a large mixing bowl.
- Combine Meat and Biscuit Pieces: Add the taco meat mixture from the skillet into the bowl with biscuit pieces. Gently fold everything together so biscuit pieces are coated but not mashed.
- Assemble in Baking Dish: Transfer the combined mixture into the prepared baking dish, spreading it evenly.
- Add Cheese Topping: Sprinkle the shredded Colby Jack cheese evenly over the top of the biscuit and meat mixture.
- Bake: Place the dish in the preheated oven and bake uncovered for 25 to 30 minutes or until the edges are bubbly, the cheese is golden brown and melted, and the biscuits are cooked through.
- Cool and Serve: Remove the dish from the oven and let it cool for 10 minutes before serving. Top with your favorite taco toppings and fresh cilantro if desired for extra flavor and presentation.
Notes
- You can substitute ground turkey or chicken for ground beef for a leaner option.
- Adjust the level of heat by choosing mild or hot taco seasoning and enchilada sauce.
- Use gluten-free biscuit dough if you require a gluten-free version.
- Adding extra cheese or mixing different cheeses like cheddar or Monterey Jack can enhance the flavor.
- For a dairy-free version, use a vegan cheese substitute and ensure biscuits meet dietary needs.
- Leftovers keep well refrigerated for up to 3 days and reheat well in the oven or microwave.
Nutrition
- Serving Size: 1 serving
- Calories: 350
- Sugar: 4g
- Sodium: 700mg
- Fat: 20g
- Saturated Fat: 8g
- Unsaturated Fat: 10g
- Trans Fat: 0.5g
- Carbohydrates: 25g
- Fiber: 2g
- Protein: 18g
- Cholesterol: 65mg


