
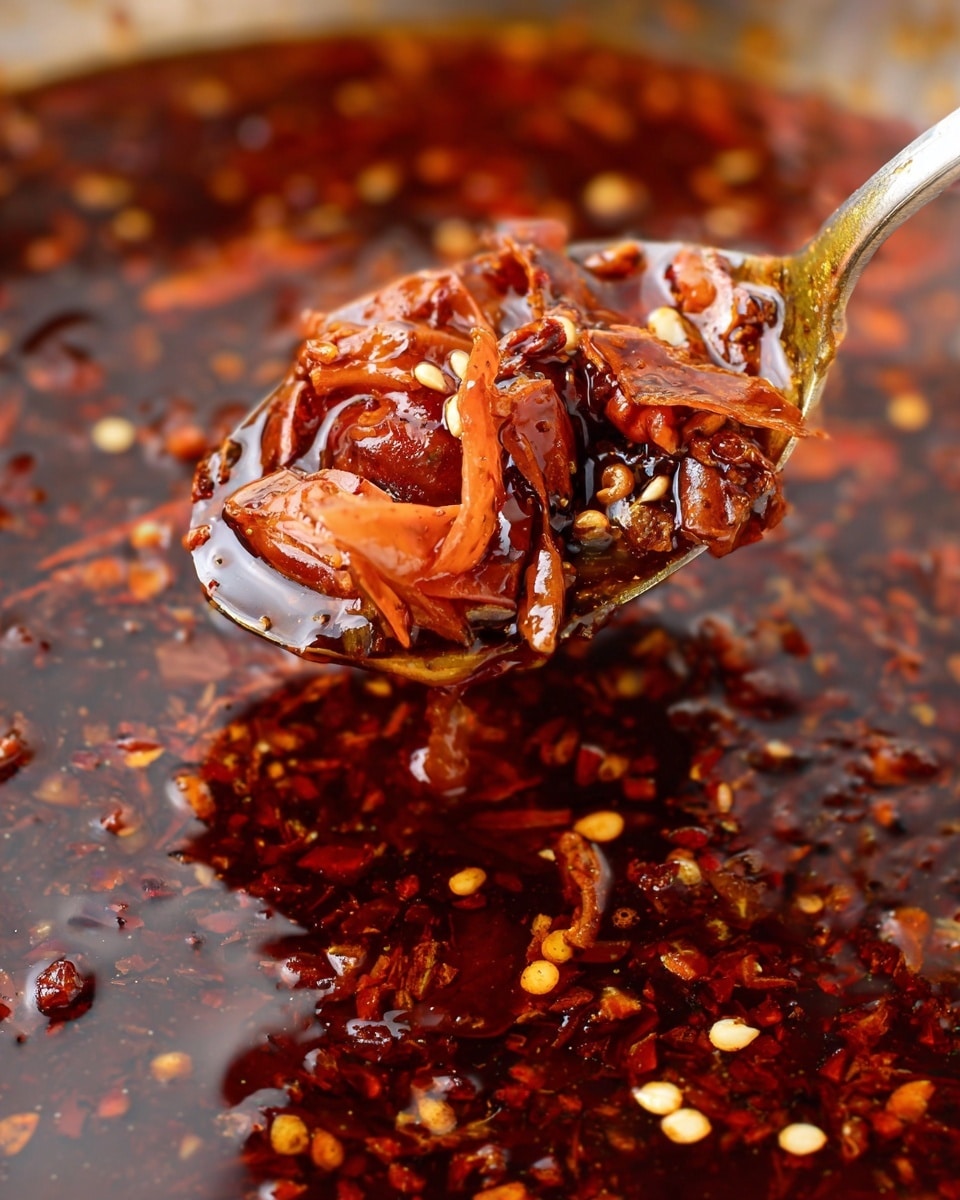
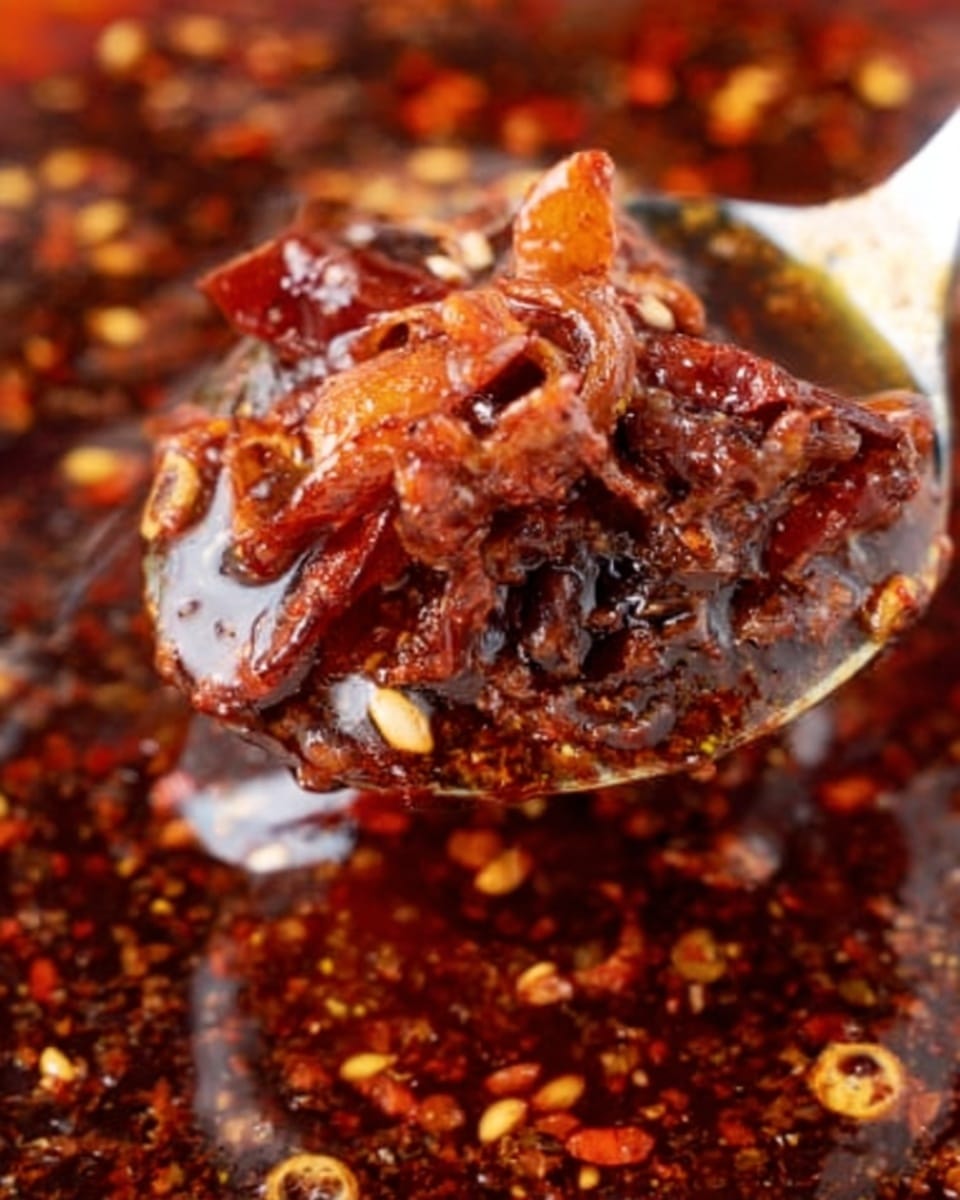
If you love spicy condiments with a bit of crunch, you’re going to adore this Homemade Chili Crisp Recipe. It’s one of those magical jars I always keep stocked in my fridge because it transforms any dish from ordinary to extraordinary in seconds. Seriously, whether it’s drizzled over dumplings, mixed into noodles, or just tasted straight off a spoon, it never fails to add that perfect balance of heat, aroma, and texture.
When I first tried making my own chili crisp, I was amazed at how simple the ingredients come together to make this addictive powerhouse of flavor. Plus, it’s totally customizable to your heat preference. You’ll find that having this Homemade Chili Crisp Recipe in your kitchen arsenal is a game-changer for weeknight dinners or impressing guests without much fuss.
Why You’ll Love This Recipe
- Crunchy Texture: The fried shallots and garlic add an irresistible crunch you won’t get from regular chili oil.
- Balanced Heat & Umami: It’s spicy without overwhelming, with savory notes from soy sauce and toasted sesame.
- Versatile Use: Use it as a dip, a topping, or a flavor booster for basically anything you cook.
- Easy to Make at Home: No hard-to-find ingredients, and the process is straightforward with great step-by-step tips ahead.

Ingredients You’ll Need
Gathering fresh and quality ingredients makes all the difference in your Homemade Chili Crisp Recipe. The combination creates a rich, crunchy, and fragrant condiment that’s more than just spicy oil.
- Neutral Oil: I like vegetable, canola, or grapeseed oil for a clean, subtle backbone that doesn’t overpower.
- Shallots: Thinly sliced, they fry beautifully and add a sweet, crunchy depth.
- Garlic: Lots of it! Sliced thin so it crisps up without burning.
- Szechuan Chili Flakes: The star ingredient for heat and classic Sichuan peppercorn aroma.
- Sesame Seeds: Toasted or raw, they add a nutty note and texture contrast.
- Salt: Season to enhance all the flavors without hiding the spice.
- Sugar: Just a touch to balance the savory and spicy elements.
- Soy Sauce: Adds umami richness that keeps this condiment from tasting one-dimensional.
- Sesame Oil: A little goes a long way for that signature toasted sesame fragrance.
Variations
I love tweaking the basic Homemade Chili Crisp Recipe to suit what I have on hand or switch up the flavor profile. Feel free to customize with different chilies, nuts, or even add some dried shrimp for extra umami punch.
- Spicier Chili Crisp: I added a few dried red chilies along with chili flakes once and it amped the heat perfectly without losing balance.
- Nutty Twist: Toasted chopped peanuts or cashews stirred in before cooling gave a delicious crunch variation that my family went crazy for.
- Vegan Version: Simply omit soy sauce if you prefer a gluten-free soy alternative or tamari, and keep all else the same.
- Mild Version: Use milder chili flakes or scale back the amount if you want that chili crisp flavor but less heat.
How to Make Homemade Chili Crisp Recipe
Step 1: Fry the Shallots and Garlic
Start by adding your neutral oil to a saucepan over medium-high heat. Once hot, add the thinly sliced garlic and shallots. You’ll want to keep an eye on them because they go from golden to burnt fast! The goal here is to get them bubbling and turning a pale golden brown — that’s where the magic flavor develops. Use a slotted spoon to strain these out and reserve the infused oil; the crispy bits are pure gold for texture.
Step 2: Prepare the Dry Mix
In a large heatproof bowl, combine your Szechuan chili flakes, salt, sugar, and sesame seeds. I like to mix these dry ingredients first so when the hot oil hits them, everything releases its flavor evenly without clumping. This step is crucial for that perfect balance of heat and seasoning.
Step 3: Pour the Hot Oil
Heat the reserved oil in the saucepan to around 350-375°F (you can test by flicking a small bit of shallot into the oil, it should sizzle). Carefully pour the sizzling hot oil over the chili flake mixture – this is where the flavors burst and the spices bloom. Use a sturdy spoon or spatula to stir everything together thoroughly. Be cautious here: the oil will bubble up when it hits the mix!
Step 4: Season and Add Crispy Bits
Finally, stir in the soy sauce and sesame oil for savory depth and nutty fragrance. Toss in the crispy fried garlic and shallots from earlier, giving everything a final mix. Let the mixture cool before transferring to a clean jar — this is when it thickens slightly and all the textures come together perfectly.
Pro Tips for Making Homemade Chili Crisp Recipe
- Use a Good Quality Neutral Oil: It lets the flavors of chili and garlic shine without interference from strong oil flavors.
- Slice Shallots and Garlic Thin: Thinner slices crisp more evenly and avoid burning, which gives you that perfect crunch.
- Heat Oil to Right Temperature: Too hot and the oil smokes, too cool and it won’t release flavors — 350-375°F is ideal.
- Cool Before Storing: Letting it cool prevents condensation, so your chili crisp stays crunchy longer.
How to Serve Homemade Chili Crisp Recipe
Garnishes
When I serve chili crisp, I often sprinkle a little extra on top of dishes like steamed veggies or rice bowls. Sometimes I even add a few fresh chopped scallions or cilantro for a fresh pop that offsets the richness. A wedge of lime on the side is great too if you want a little acidity to cut through the oil.
Side Dishes
Personally, I love pairing my Homemade Chili Crisp Recipe with simple sides: steamed white rice, crispy tofu, or stir-fry noodles. It’s fantastic alongside grilled meats or mixed with scrambled eggs. I find it adds such a warm, vibrant kick that pretty much any neutral dish benefits from it.
Creative Ways to Present
For parties, I like to serve chili crisp in small bowls alongside dumplings, spring rolls, or even roasted nuts. You can also create a DIY condiment station with chili crisp, soy sauce, and vinegar so guests can customize their meals. It’s a fun way to showcase this homemade gem and get everyone talking about it!
Make Ahead and Storage
Storing Leftovers
I keep mine in a clean glass jar with a tight lid, stored in the fridge. The chili crisp keeps well for several weeks (we’re usually done before then because it’s so addictive). Just always use a dry spoon to avoid introducing moisture which can soften the crispy bits.
Freezing
Freezing chili crisp isn’t something I usually do because the texture can change, but if you want to freeze it, pack it in a freezer-safe container and thaw overnight in the fridge. Give it a good stir before using to revive the flavors.
Reheating
When using leftover chili crisp, I usually add it directly to a warm dish. If you want to refresh it, gently warm it in a pan on low heat, stirring carefully so you don’t burn the crispy bits. This helps revive the aroma without losing that sought-after crunch.
FAQs
-
What’s the difference between chili oil and the Homemade Chili Crisp Recipe?
Great question! While chili oil is usually just infused oil with chili flavor, chili crisp adds crunchy fried shallots and garlic along with sesame seeds for texture and complexity. It’s a spicier, more textured condiment that adds layers of flavor and crunch.
-
Can I make Homemade Chili Crisp Recipe without a thermometer?
Absolutely! Just heat the oil over medium-high heat until small pieces of garlic or shallot sizzle immediately when added. You want the oil hot enough to gently fry but not smoking. Keep an eye on the color to avoid burning—the garlic and shallots should turn a light golden brown.
-
How long does homemade chili crisp last?
Stored properly in an airtight container in the fridge, your chili crisp can last up to 3-4 weeks. Just make sure to use a clean, dry spoon every time to keep it fresh and crunchy.
-
Can I adjust the heat level in the Homemade Chili Crisp Recipe?
Yes! You can use less chili flakes for a milder crisp or add extra if you crave serious heat. Mixing in different types of chili flakes or dried chilies also lets you customize the flavor and spice profile.
Final Thoughts
I absolutely love how this Homemade Chili Crisp Recipe elevates my everyday meals with minimal effort. It’s one of those recipes I recommend to friends because it’s simple, flexible, and packed with bold flavor that keeps you coming back for more. Trust me, once you make your own, you’ll wonder how you ever ate without it!
Print
Homemade Chili Crisp Recipe
- Prep Time: 5 minutes
- Cook Time: 10 minutes
- Total Time: 15 minutes
- Yield: About 50 servings (1 teaspoon per serving)
- Category: Condiment
- Method: Frying
- Cuisine: Chinese
Description
Homemade Chili Crisp is a flavorful and crunchy chili oil condiment made with fried shallots, garlic, and Szechuan chili flakes. This versatile spicy topping adds a perfect balance of heat, texture, and aromatic depth to any dish—from noodles to rice, dumplings, and more.
Ingredients
Oil and Aromatics
- 3 cups neutral oil (like vegetable or canola oil)
- 2 large shallots, thinly sliced
- 12 cloves garlic, thinly sliced
Spices and Seasonings
- 1.5 cups Szechuan chili flakes
- 1 tablespoon sesame seeds
- 1/2 tablespoon salt
- 1/2 tablespoon sugar
Final Flavor Enhancers
- 2 tablespoons soy sauce
- 1/2 tablespoon sesame oil
Instructions
- Heat Oil and Fry Aromatics: Add the neutral oil to a saucepan and heat over high heat. Once hot, add the sliced garlic and shallots. Cook them until they bubble and turn a pale golden brown, ensuring they become crispy without burning. Then, strain the shallots and garlic from the oil and set both aside separately.
- Prepare Chili Flakes and Seasoning: In a large heatproof bowl, combine the Szechuan chili flakes, salt, sugar, and sesame seeds. This mixture will form the base of the chili crisp, providing both heat and texture.
- Heat Oil to Proper Temperature: Return the strained oil to the saucepan and heat it until it reaches between 350°F and 375°F (175°C to 190°C). The hot oil will help release the flavors and aromas of the spices when poured over.
- Infuse Chili Mixture with Hot Oil: Carefully pour the hot oil over the chili flakes and spice mixture in the heatproof bowl. Stir gently but thoroughly to combine and let the flavors meld together.
- Season and Finish: Add the soy sauce and sesame oil to the chili crisp mixture. Then toss in the crispy fried garlic and shallots you set aside earlier for that signature crunchy texture. Stir everything well to fully incorporate all elements.
- Enjoy: Transfer the chili crisp to a jar or bowl and use it as a spicy topping on noodles, rice, vegetables, or any dish that could use a crunchy, flavorful kick.
Notes
- Chili Crisp offers a delicious alternative to simple chili oil by adding texture and crunch from the fried garlic and shallots.
- Ensure to monitor the frying garlic and shallots carefully to avoid burning, which can lead to bitterness.
- Store chili crisp in an airtight container in a cool, dark place for up to a month.
- Adjust the amount of chili flakes to control heat level according to your preference.
Nutrition
- Serving Size: 1 teaspoon (approx. 5g)
- Calories: 40 kcal
- Sugar: 0.1 g
- Sodium: 110 mg
- Fat: 4.5 g
- Saturated Fat: 0.6 g
- Unsaturated Fat: 3.7 g
- Trans Fat: 0 g
- Carbohydrates: 0.4 g
- Fiber: 0.04 g
- Protein: 0.1 g
- Cholesterol: 0 mg


