

This Baked Salsa Chicken is a game-changer for busy weeknights! With just a handful of ingredients and minimal prep work, you’ll have a flavor-packed, protein-rich dish on the table in under an hour. The combination of zesty taco seasoning, vibrant salsa, and melty cheese creates an irresistible meal that’s both satisfying and simple. Trust me, this might become your new go-to dinner solution!
Why You’ll Love This Recipe
- Incredibly Simple: With just 6 main ingredients and straightforward steps, this recipe is perfect even when you’re too tired to cook.
- Quick Preparation: The actual hands-on time is only about 10 minutes – the oven does the rest of the work!
- Amazing Flavor Payoff: The combination of taco seasoning and salsa infuses the chicken with wonderful Mexican-inspired flavors without any complicated sauce-making.
- Family-Friendly: Kids and adults alike love this dish – it’s flavorful without being too spicy (unless you want it to be!).
- Versatile: Works with whatever salsa you have on hand and pairs beautifully with numerous side dishes.
Ingredients You’ll Need
- Boneless, Skinless Chicken Breasts: The star of the show! They absorb all the wonderful flavors while staying juicy and tender.
- Taco Seasoning: Provides that perfect blend of Mexican spices without having to measure out individual spices. Make your own or use store-bought for convenience.
- Salt and Pepper: Enhances all the other flavors – don’t skip this basic but essential seasoning.
- Olive Oil: Used for searing the chicken, creating a beautiful golden crust that locks in moisture.
- Salsa: The magic ingredient that adds moisture, flavor, and a sauce all in one! Use your favorite type – chunky, smooth, mild, spicy – it all works wonderfully.
- Shredded Cheese: Creates that irresistible melty topping. Cheddar, Monterey Jack, Mexican blend, or pepper jack are all fantastic options.
- Fresh Cilantro: Adds a bright, fresh finish that cuts through the richness of the cheese and complements the Mexican flavors.
Note: You’ll find the complete list of ingredients, along with their exact measurements, in the printable recipe card at the bottom of this post.
Variations
Want to customize this dish? Here are some delicious options:
- Salsa Verde Chicken: Use green salsa instead of red for a tangier flavor profile.
- Spicy Version: Add sliced jalapeños or use a hot salsa for those who like some heat.
- Southwest Style: Use a black bean and corn salsa for added texture and flavor.
- Cheesy Delight: Mix different types of cheese like cheddar, Monterey Jack, and queso fresco for more complexity.
- Lower Carb Option: Use a fresh homemade salsa with no added sugar for a cleaner version.
How to Make Baked Salsa Chicken
Step 1: Prepare and Season the Chicken
Preheat your oven to 375°F. Pat the chicken breasts dry with paper towels (this helps the seasoning stick better and improves browning). Season both sides generously with taco seasoning, followed by salt and pepper to taste.
Step 2: Sear the Chicken
Heat olive oil in a large oven-safe skillet over medium-high heat. Once hot, add the chicken breasts and sear them for about 2-3 minutes on each side until they develop a beautiful golden-brown crust. Remember, you’re not cooking them through at this point – just developing flavor and color.
Step 3: Prepare the Baking Dish
If your skillet isn’t oven-safe, transfer to a 9×13-inch baking dish. Pour half the salsa into the bottom of your dish, creating a bed for the chicken.
Step 4: Add Chicken and Salsa
Place the seared chicken breasts on top of the salsa layer. Spoon the remaining salsa over each chicken breast, making sure they’re well covered.
Step 5: Bake
Place the dish in your preheated oven and bake for 20-30 minutes. The exact time will depend on the thickness of your chicken breasts. You’re looking for an internal temperature of 165°F for perfectly cooked chicken.
Step 6: Add Cheese and Finish
Once the chicken is cooked through, top each breast with a generous layer of shredded cheese. Return to the oven for another 4-5 minutes, just until the cheese is melted and bubbly.
Step 7: Garnish and Serve
Sprinkle freshly chopped cilantro over the top before serving for a pop of color and fresh flavor.
Pro Tips for Making the Recipe
- Quality Salsa Matters: Since salsa is a star ingredient, use one you genuinely enjoy eating – the flavor really comes through.
- Even Chicken Breasts: If your chicken breasts vary in thickness, pound them to an even thickness so they cook uniformly.
- Shred Your Own Cheese: Pre-shredded cheese contains anti-caking agents that can prevent that perfect melt. Shredding your own takes just a minute and makes a noticeable difference.
- Don’t Skip the Sear: This step adds so much flavor through caramelization and helps lock in moisture.
- Let It Rest: Allow the dish to rest for about 5 minutes after removing from the oven. This helps the juices redistribute through the chicken.
How to Serve
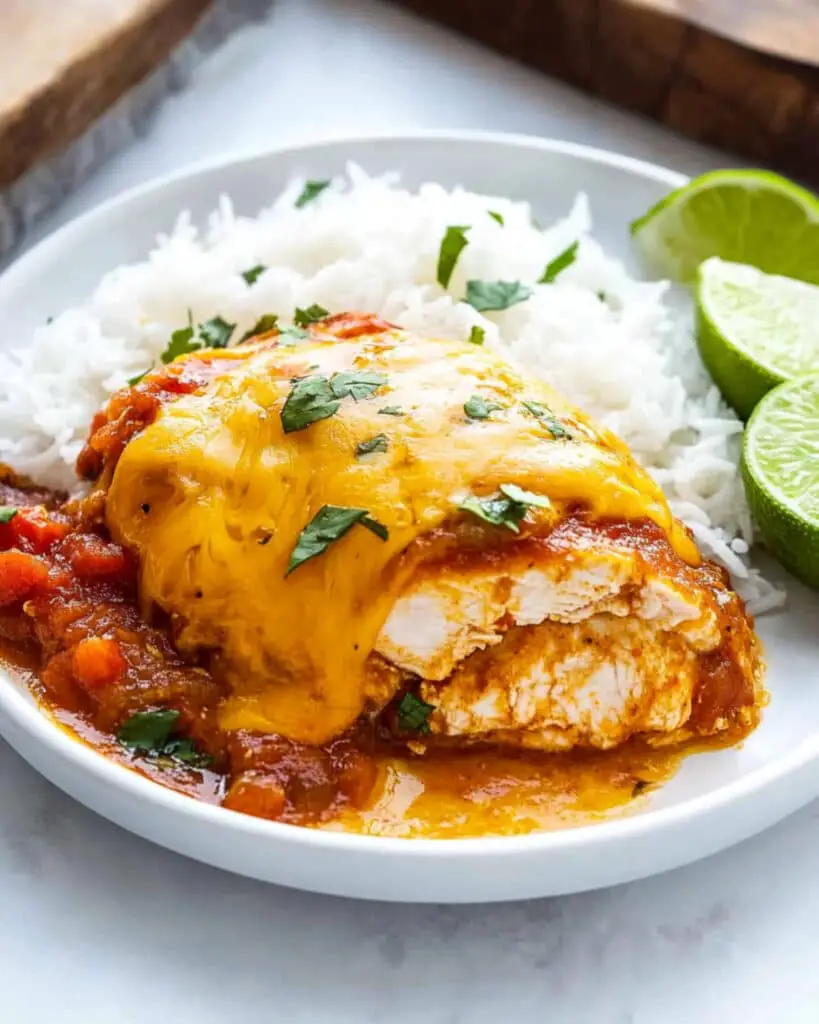
This versatile dish pairs beautifully with so many sides:
Mexican-Inspired Pairings
Serve with Mexican rice, black beans, or refried beans for a complete Mexican-inspired meal.
Fresh Accompaniments
A simple side salad with avocado and lime dressing or corn on the cob makes for a fresh contrast.
Low-Carb Options
Serve over cauliflower rice or alongside roasted vegetables for a lighter meal.
Extra Toppings
Set out bowls of additional toppings like sour cream, guacamole, extra salsa, or pickled jalapeños for a customizable experience.
Make Ahead and Storage
Storing Leftovers
Store cooled leftover chicken in an airtight container in the refrigerator for up to 3 days. The flavors actually continue to develop, making this dish excellent for meal prep.
Freezing
This dish freezes surprisingly well! Freeze individual portions in airtight containers for up to one month. Perfect for those emergency “I have nothing to cook” nights.
Reheating
For best results, thaw frozen portions in the refrigerator overnight. Reheat in a 350°F oven for about 15-20 minutes until warmed through. You can also microwave portions, but cover with a damp paper towel to prevent the chicken from drying out.
FAQs
-
Can I use chicken thighs instead of breasts?
Absolutely! Boneless, skinless chicken thighs work beautifully in this recipe and often stay even juicier than breasts. You may need to adjust the cooking time slightly as thighs can take a few minutes longer to cook through. The same golden sear and internal temperature of 165°F applies.
-
My family doesn’t like cilantro. What can I use instead?
Cilantro can be polarizing! Feel free to substitute with fresh parsley for a different but still bright flavor, or simply omit the herb altogether. A sprinkle of sliced green onions can also add a nice fresh finish without the distinctive cilantro flavor.
-
Can I make this recipe ahead of time for a dinner party?
This is a great make-ahead dish! You can prepare everything up to the baking step, cover and refrigerate for up to 24 hours. When ready to serve, allow the dish to sit at room temperature for 20 minutes, then bake as directed, adding about 5-10 minutes to the cooking time since you’re starting with a cold dish.
-
Is there a way to make this dish without an initial stovetop sear?
While the sear adds wonderful flavor, you can skip it if you’re short on time or want to dirty fewer dishes. Simply season the chicken, place in your baking dish with the salsa, and add about 5-10 minutes to the baking time. The dish will still be delicious, though it may not have quite the same depth of flavor.
Final Thoughts
This Baked Salsa Chicken recipe proves that incredible flavor doesn’t require complicated techniques or countless ingredients. With its perfect balance of zesty seasoning, juicy chicken, tangy salsa, and melty cheese, it’s a reliable crowd-pleaser that fits into even the busiest schedules. Whether you’re cooking for a family dinner or meal prepping for the week ahead, this dish delivers maximum flavor with minimal effort. Give it a try tonight – I’m confident it will earn a permanent spot in your recipe collection!
Print
Baked Salsa Chicken Recipe
- Prep Time: 10 minutes
- Cook Time: 35 minutes
- Total Time: 45 minutes
- Yield: 4 servings 1x
- Category: Main-course
- Method: Baking
- Cuisine: Tex-Mex
- Diet: Gluten Free
Description
This Baked Salsa Chicken recipe is a quick, flavorful, and family-friendly main-course dish made with tender chicken breasts, zesty taco seasoning, fresh salsa, and melty cheese. Perfect for busy weeknights, it’s a convenient one-pan meal that delivers delicious Tex-Mex flavors with minimal effort and cleanup.
Ingredients
For the Chicken:
- 4 boneless, skinless chicken breasts
- 1 1/2 tablespoons taco seasoning (store-bought or homemade; about 3/4 packet)
- Kosher salt, to taste
- Freshly ground black pepper, to taste
- 1 tablespoon olive oil
For Baking:
- 1 1/2 cups salsa (store-bought or homemade; any type)
- 1 cup shredded cheese (your favorite kind)
For Garnish:
- 2 tablespoons chopped fresh cilantro
Instructions
- Preheat the Oven: Preheat your oven to 375°F (190°C) to ensure that it’s hot and ready for baking your chicken.
- Season the Chicken: Pat the chicken breasts dry with paper towels. Season both sides of each chicken breast evenly with the taco seasoning, then add salt and freshly ground black pepper according to your taste preferences. This step ensures maximum flavor in every bite.
- Sear the Chicken: Heat the olive oil in a large skillet over medium-high heat. Sear the chicken breasts for 2-3 minutes per side until golden brown. The goal is to develop color and flavor; no need to cook the chicken all the way through at this step. Remove the chicken from the skillet and set aside.
- Prepare Baking Dish: If your skillet is oven-safe, use it directly. Otherwise, transfer to a 9×13-inch baking dish. Pour half of the salsa into the bottom of the skillet or dish to create a flavorful base.
- Arrange and Top: Place the seared chicken breasts on top of the salsa layer. Spoon the remaining salsa evenly over the top of the chicken breasts, ensuring each piece is well coated.
- Bake the Chicken: Transfer the dish to the oven and bake for 20-30 minutes, or until the internal temperature of the chicken reaches 165°F (74°C) and the chicken is cooked through.
- Add Cheese and Melt: Sprinkle ¼ cup (or ¼ of the total amount) shredded cheese on each chicken breast. Return to the oven and bake for another 4-5 minutes, or until the cheese is melted and bubbly.
- Garnish and Serve: Remove the dish from the oven and sprinkle the chopped fresh cilantro over the top. Serve hot, and enjoy your flavorful salsa chicken!
Notes
- For the best cheese melt and texture, shred whole blocks of cheese at home rather than using pre-shredded varieties.
- Experiment with different salsa types (verda, chunky, black bean and corn, etc.) to change up the flavor profile.
- Increase the heat level by using hot salsa or adding chopped jalapeños to the baking dish.
- No extra liquid is necessary—the salsa keeps the chicken perfectly moist during baking.
- Store leftovers in an airtight container in the refrigerator for up to 3 days or freeze for up to 1 month.
Nutrition
- Serving Size: 1 chicken breast
- Calories: 350
- Sugar: 4g
- Sodium: 950mg
- Fat: 17g
- Saturated Fat: 6g
- Unsaturated Fat: 9g
- Trans Fat: 0g
- Carbohydrates: 8g
- Fiber: 2g
- Protein: 41g
- Cholesterol: 105mg

