
Get ready to savor the ultimate American classic right from your own kitchen—crispy, juicy, golden buttermilk fried chicken! This recipe is your new secret weapon for weeknight dinners, Sunday suppers, or any gathering where you want smiles at the table. Best of all, it’s straightforward, incredibly rewarding, and delivers that irresistible crunch on the outside while keeping everything ridiculously juicy inside. You won’t need any fancy tools or complicated techniques, just a few common pantry staples and a little patience for marinating. If you think homemade fried chicken sounds intimidating, you’re about to change your mind!
Why You’ll Love This Recipe
- Crispy Outside, Juicy Inside: The buttermilk marinade works magic, giving you chicken that’s tender and flavorful deep to the bone, with a shatteringly crisp coating.
- Simple Steps, Big Results: If you can mix and marinate, you can master this recipe. No special equipment required—just a bowl, oil, and your favorite frying pan.
- Flexible & Family-Friendly: Whether you use a whole chicken or favorite pieces, this method works every time. Kids and adults alike will rave.
- Ideal for Busy Nights: Prep ahead by marinating the chicken, then fry when you’re ready. You don’t need to spend hours in the kitchen.

Ingredients You’ll Need
Here’s what brings this buttermilk fried chicken to life—plus why each ingredient matters!
- Chicken (whole or bone-in pieces): For that classic, juicy fried chicken experience. Bone-in, skin-on pieces work best for max flavor and moisture.
- Buttermilk: The not-so-secret star! Buttermilk tenderizes the chicken and infuses it with tangy flavor while ensuring a super moist bite.
- Paprika: Adds a subtle smokiness and gorgeous color to the marinade and breading.
- Cayenne Pepper: For a gentle, back-of-the-throat heat. Adjust up or down depending on your spice preference.
- White Pepper: Brings a uniquely earthy heat different from black pepper, boosting complexity.
- Onion Powder & Garlic Powder: Classic seasonings that bring bold flavor without overpowering the chicken.
- Salt: Essential for seasoning the meat all the way through and enhancing every flavor.
- Freshly Ground Black Pepper: For that final kick of warmth and depth.
- Vegetable Oil: Neutral and high-smoke point for perfect deep frying. Feel free to substitute canola or peanut oil—just avoid olive oil, which doesn’t hold up to high heat.
Note: Don’t be shy about seasoning the chicken or coating—well-seasoned layers are the secret to unforgettable fried chicken!
Note: You’ll find the complete list of ingredients, along with their exact measurements, in the printable recipe card at the bottom of this post.
Variations
Don’t be afraid to make this recipe your own! Here are some fun tweaks:
- Spicy Twist: Double the cayenne or add a little hot sauce to the buttermilk marinade if you crave more heat.
- Herb Infusion: Mix dried thyme, oregano, or rosemary into the breading for a fragrant, Southern-style update.
- Crispy Cornmeal: Swap out a third of the flour for cornmeal in the coating for extra crunch and a rustic texture.
- Gluten-Free Option: Use gluten-free flour for dredging—rice flour works especially well for crispiness.
- Buttermilk Substitute: If you’re out of buttermilk, use milk mixed with a tablespoon of lemon juice or vinegar. Let it sit for 5 minutes before using.
How to Make American Buttermilk Fried Chicken
Step 1: Marinate the Chicken
In a large bowl, toss the chicken pieces thoroughly with the buttermilk and all marinade spices (paprika, cayenne, white pepper, onion powder, garlic powder, salt, black pepper). Make sure every nook and cranny is coated! Let this mixture sit, covered, in the fridge for at least 4 hours—for pure magic, give it a full 24 hours.
Step 2: Prepare the Coating
Mix your dry ingredients (typically seasoned flour with similar spices as the marinade) in a broad bowl.
Step 3: Dredge Each Piece
Remove the chicken from the fridge about 30 minutes before you’re ready to fry—cold chicken does not fry evenly! Roll each piece in the dry coating, pressing firmly so every inch is enveloped in a thick, even layer.
Step 4: Heat the Oil
Pour enough oil into your chosen frying pan or Dutch oven to submerge the chicken pieces. Heat over medium-high until shimmering—test it by dropping in a pinch of the dry mix; it should sizzle instantly. Aim for 350–365°F, and adjust the heat to maintain a steady 320°F as you cook.
Step 5: Fry in Batches
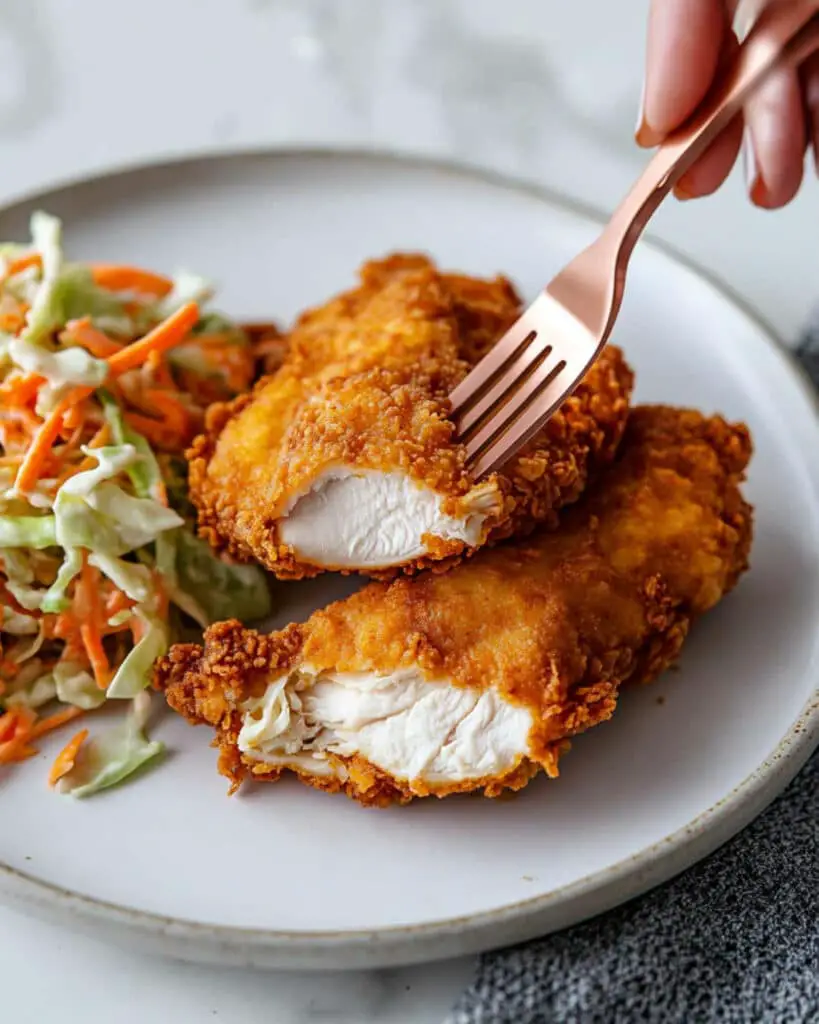
Gently add 3–4 chicken pieces at a time, being mindful not to crowd the pan. Fry for 6–8 minutes per side, or until the crust is warmly golden brown and the internal temp of each piece hits 165°F.
Step 6: Drain and Serve
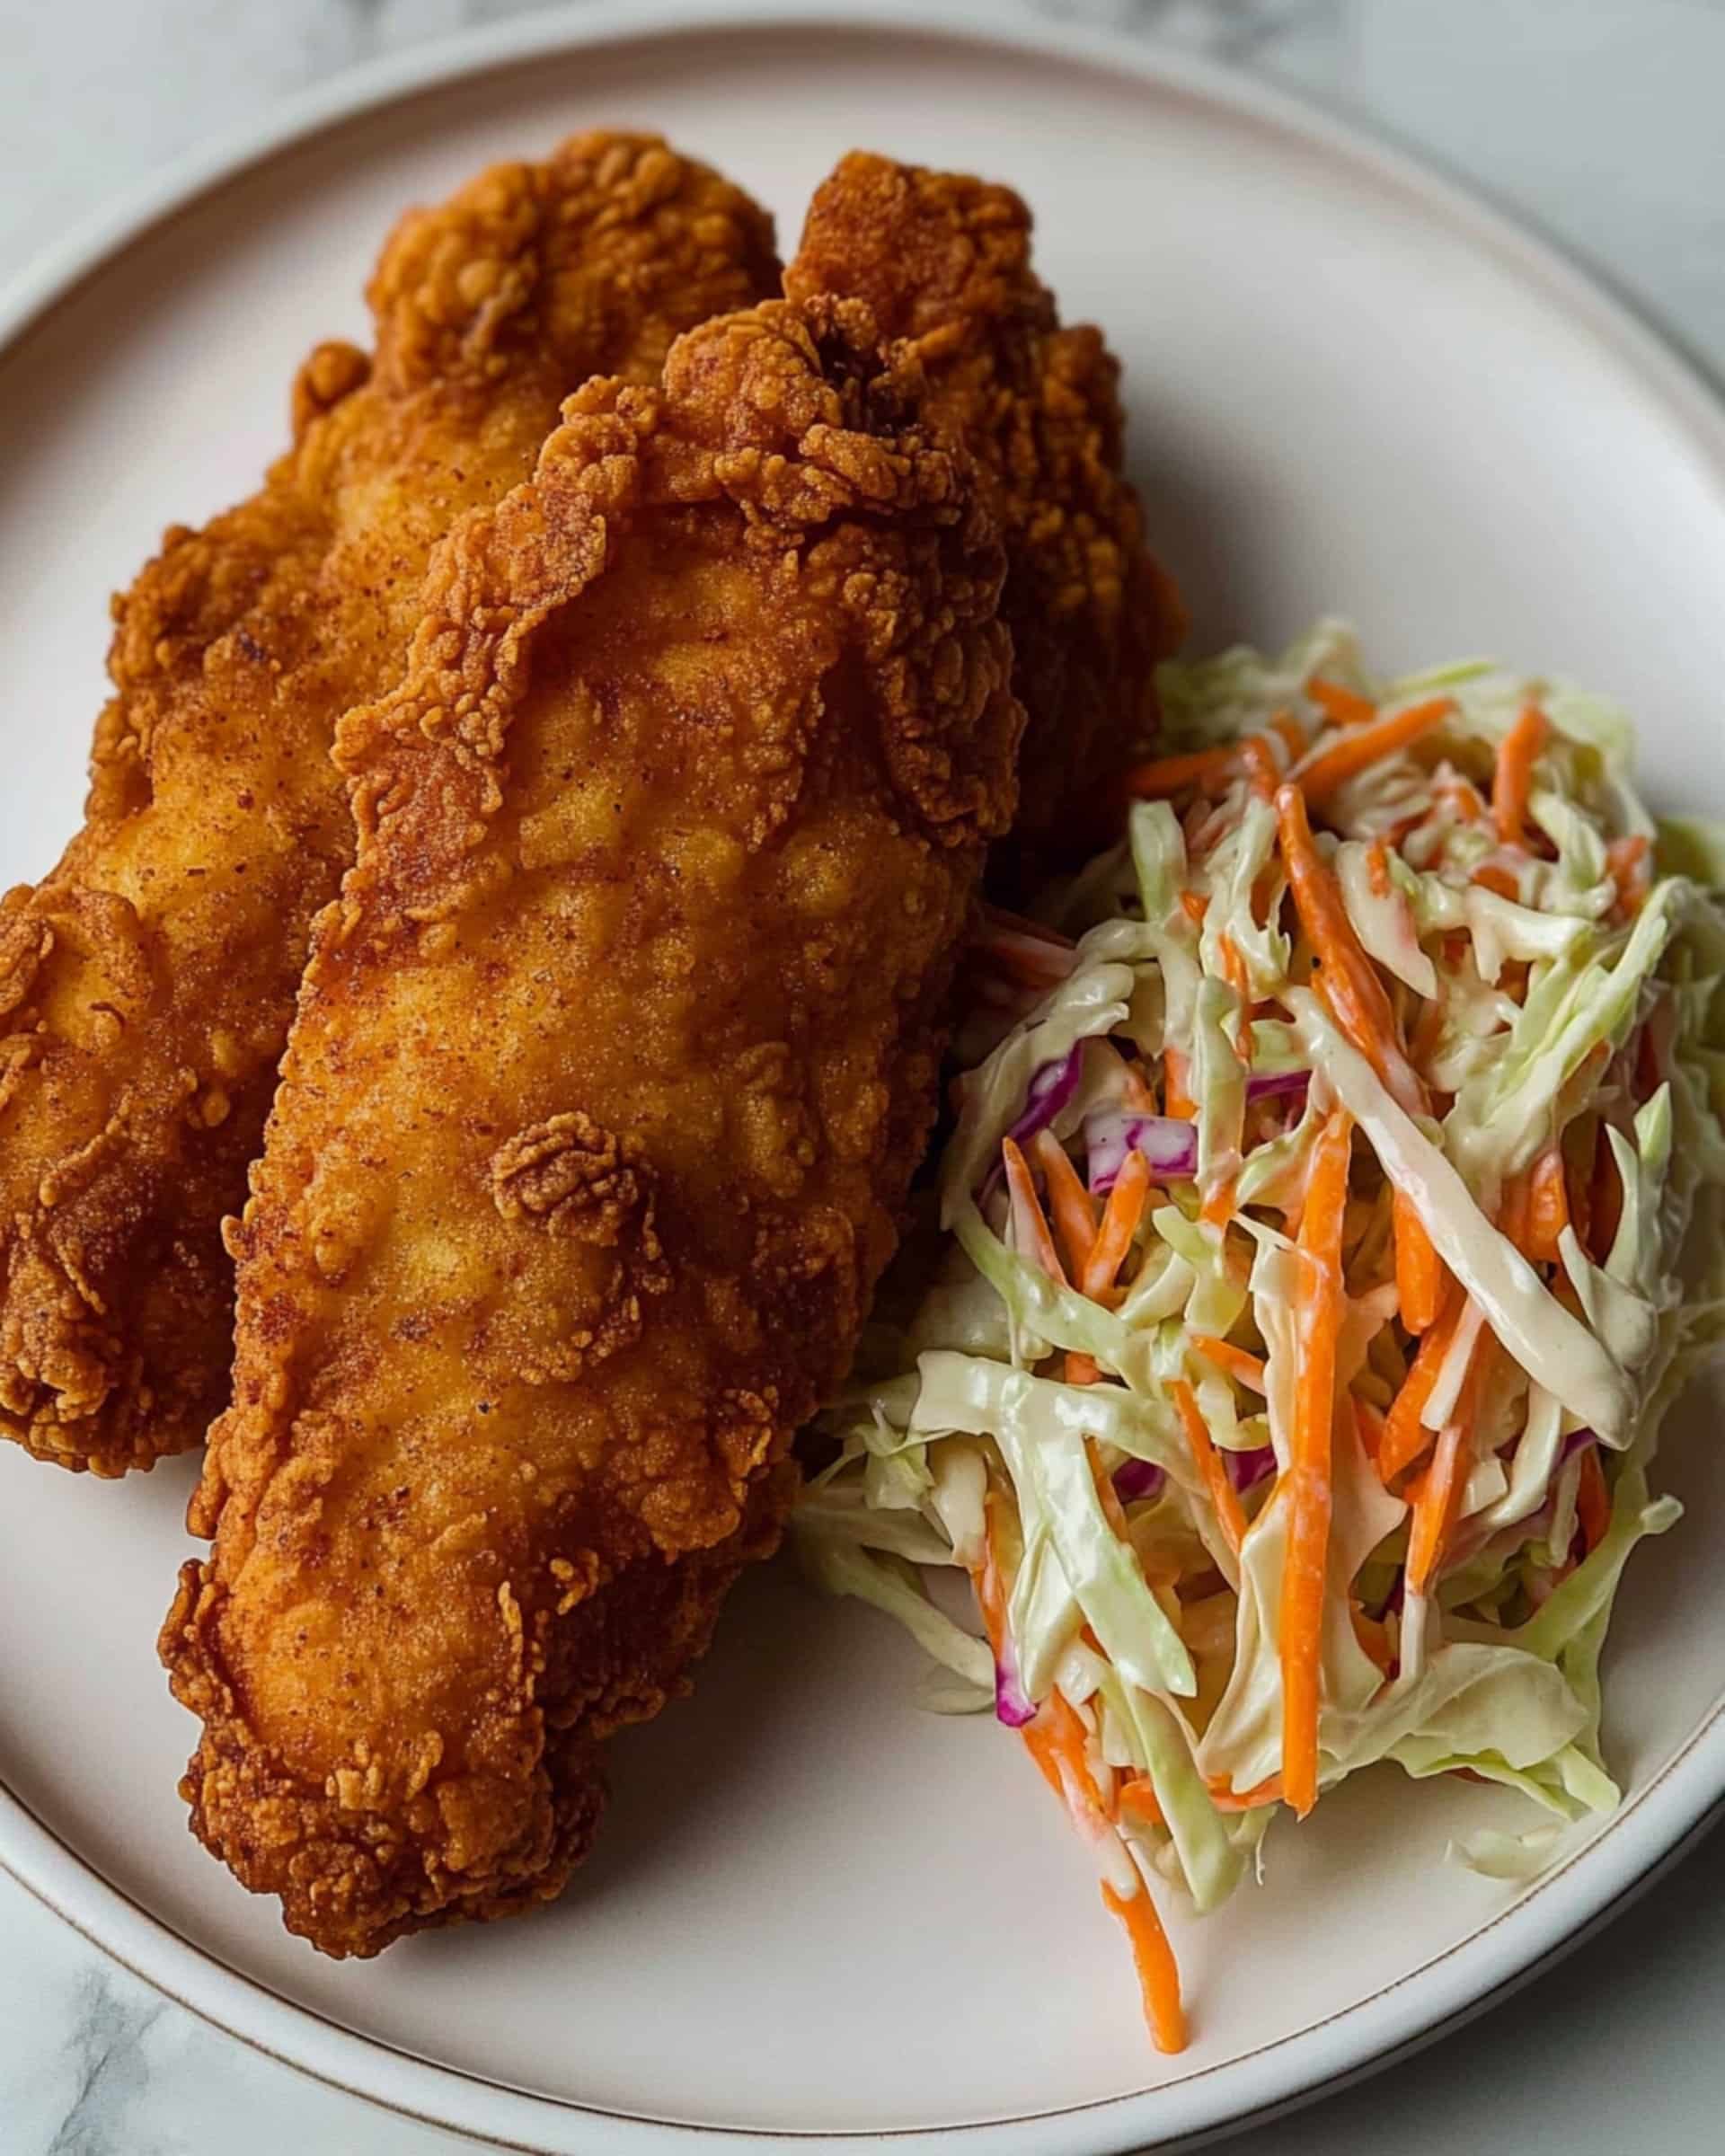
Transfer cooked chicken onto a wire rack set over paper towels—this keeps things crispy while draining any excess oil. Sprinkle lightly with extra salt. Serve hot, and enjoy every crunchy, savory bite!
Pro Tips for Making the Recipe
- Marinate as long as possible: The more time the chicken spends in buttermilk, the juicier and more flavorful it becomes.
- Double Dredge for Extra Crunch: For extra crunch, repeat the dip in buttermilk and dredge process.
- Temperature Control Is Key: Use a thermometer if you have one. Frying too hot burns the coating; too cool and you’ll get greasy results.
- Don’t Crowd the Pan: Give those pieces space—overcrowding lowers oil temp and leads to soggy, uneven chicken.
- Rest Before Serving: Letting the chicken rest on a rack after frying keeps it crisp on all sides.
How to Serve
This crispy buttermilk fried chicken is made for feasting. Serve it hot—fresh from the fryer!
Perfect Pairings:
- Classic Sides: Creamy mashed potatoes, buttery biscuits, sweet corn on the cob, or tangy coleslaw.
- Sauces: Offer with honey, hot sauce, or your favorite gravy—each bite gets better.
- Picnic Fare: Pack up leftovers for a picnic, paired with cold salads and pickles.
Tip: Don’t forget sliced jalapeños or dill pickles for a Southern touch!
Make Ahead and Storage
Storing Leftovers
Keep any leftovers chilled in an airtight container for up to 3 days. The chicken remains flavorful and satisfying, even cold!
Freezing
Fried chicken freezes surprisingly well. Lay cooled pieces on a tray, freeze until solid, then transfer to a freezer bag. Store for up to 2 months.
Reheating
For ultimate crispiness, reheat on a rack in a 375°F oven until hot and crunchy again (about 15 minutes). The microwave works in a pinch but won’t preserve the crispy coating.
FAQs
-
How long should the chicken marinate in buttermilk?
A minimum of 4 hours is essential for tender, flavorful chicken, but overnight (up to 24 hours) is even better for maximum juiciness.
-
Can I use boneless or skinless chicken pieces?
Absolutely! Boneless pieces cook faster, while skin-on pieces provide extra crispiness and flavor. Just be mindful to lower frying time if using boneless cuts.
-
What oil is best for frying?
Choose a neutral, high smoke point oil—vegetable, canola, or peanut oil are all excellent options. Avoid olive oil or butter, which can burn.
-
How do I know when the chicken is cooked through?
Check that the internal temperature reaches 165°F. If you don’t have a thermometer, pierce the thickest piece and ensure the juices run clear, not pink.
Final Thoughts
If you’ve ever dreamed of making classic fried chicken with a crispy, golden crust and juicy, flavorful meat, this buttermilk fried chicken recipe delivers every single time. It’s simple, fuss-free, and takes your home cooking to a whole new level. Just marinate, dredge, fry—and enjoy! Roll up your sleeves and give it a try; your kitchen will be filled with laughter, good smells, and plenty of second helpings. Happy frying!
Print
American Buttermilk Fried Chicken Recipe
- Prep Time: 20 minutes (plus 4–24 hours marinating time)
- Cook Time: 25 minutes
- Total Time: 45 minutes (plus marinating time)
- Yield: 6 servings
- Category: Main-course
- Method: Frying
- Cuisine: American Southern
- Diet: Halal
Description
This classic American Buttermilk Fried Chicken recipe delivers pieces that are juicy on the inside, incredibly crispy on the outside, and bursting with bold southern flavors after marinating in a seasoned buttermilk mixture before being deep-fried to golden perfection.
Ingredients
Chicken
- 3 lb whole chicken, divided (or use individual bone-in, skin-on pieces)
Wet Mix (Marinade)
- 2 cups buttermilk
- 1 teaspoon paprika
- 1 teaspoon cayenne pepper
- 1 teaspoon white pepper
- 1 teaspoon onion powder
- 1 teaspoon garlic powder
- 1 teaspoon salt
- 1/2 teaspoon freshly ground black pepper
For Frying
- 3–4 cups vegetable oil (or more as needed, for deep frying)
Dry Mix (for dredging)
- 2 cups all-purpose flour (suggested, not specified, but needed for breading)
- 1 teaspoon salt
- 1 teaspoon paprika
- 1 teaspoon cayenne pepper
- 1 teaspoon white pepper
- 1 teaspoon onion powder
- 1 teaspoon garlic powder
- 1/2 teaspoon freshly ground black pepper
Instructions
- Marinate the Chicken: In a large mixing bowl, combine all wet mix ingredients with the divided chicken pieces. Ensure all chicken is fully coated. Cover and refrigerate for at least 4 hours (up to 24 hours for optimal juiciness).
- Bring Chicken to Room Temperature: Remove marinated chicken from the fridge about 30 minutes before frying, allowing it to come to room temperature for even cooking and improved texture.
- Prepare the Dry Mix: In a shallow bowl or tray, mix all dry dredging ingredients (flour, seasonings, and spices).
- Dredge the Chicken: Dip each piece of chicken in the dry mix, pressing well to ensure coating sticks and covers every crevice. Place coated pieces on a tray and repeat for all chicken.
- Heat the Oil: Pour vegetable oil into a deep heavy skillet or fryer, filling enough to cover chicken pieces. Heat oil until it reaches 350°F–365°F (test by dropping some dry mix in; it should sizzle rapidly). Maintain oil temperature around 320°F while frying.
- Fry the Chicken: Working in batches (3–4 pieces at a time), gently lower the chicken pieces into hot oil. Fry each piece for 6–8 minutes per side, turning as needed, until deep golden brown and the internal temperature reaches 165°F. Try one piece first if this is your first time.
- Drain and Rest: Remove fried chicken pieces and place on a cooling rack lined with paper towels to drain any excess oil. Sprinkle with a bit of salt to absorb remaining moisture.
- Serve: Serve the fried chicken hot and crispy, immediately after frying for best taste and texture. Enjoy!
Notes
- Marinating for a full 24 hours yields the juiciest, most flavorful chicken.
- Let chicken come close to room temperature before frying to avoid chewy texture.
- Test oil temperature to ensure best crispiness and avoid greasy chicken.
- Always check chicken’s internal temperature; it must reach at least 165°F for food safety.
- Drain fried chicken on a rack to maintain crunchiness and prevent sogginess.
- You can adjust spices according to your preferred heat level.
Nutrition
- Serving Size: 1/6 recipe (approx. 1 piece)
- Calories: 420
- Sugar: 2g
- Sodium: 690mg
- Fat: 25g
- Saturated Fat: 6g
- Unsaturated Fat: 16g
- Trans Fat: 0g
- Carbohydrates: 19g
- Fiber: 1g
- Protein: 33g
- Cholesterol: 90mg


