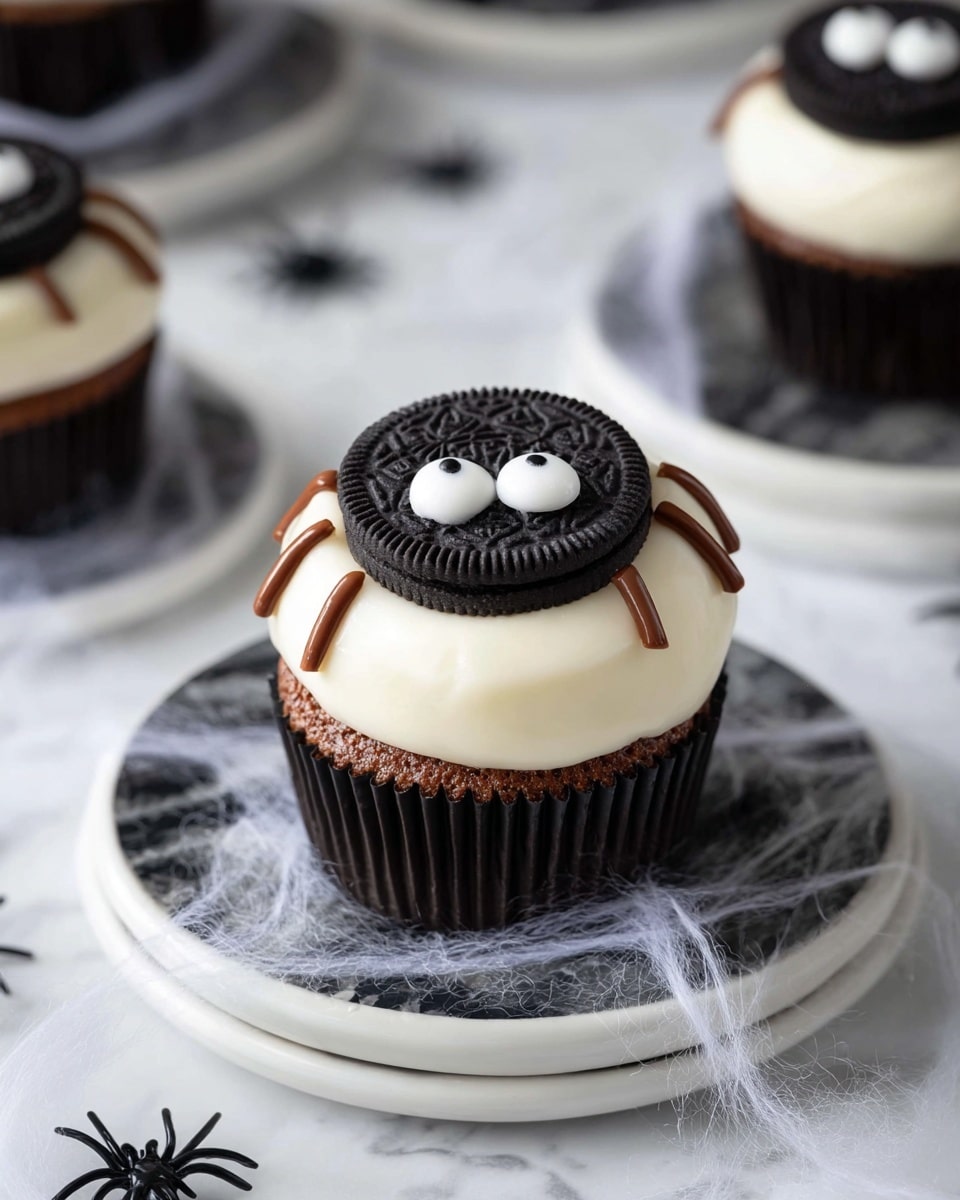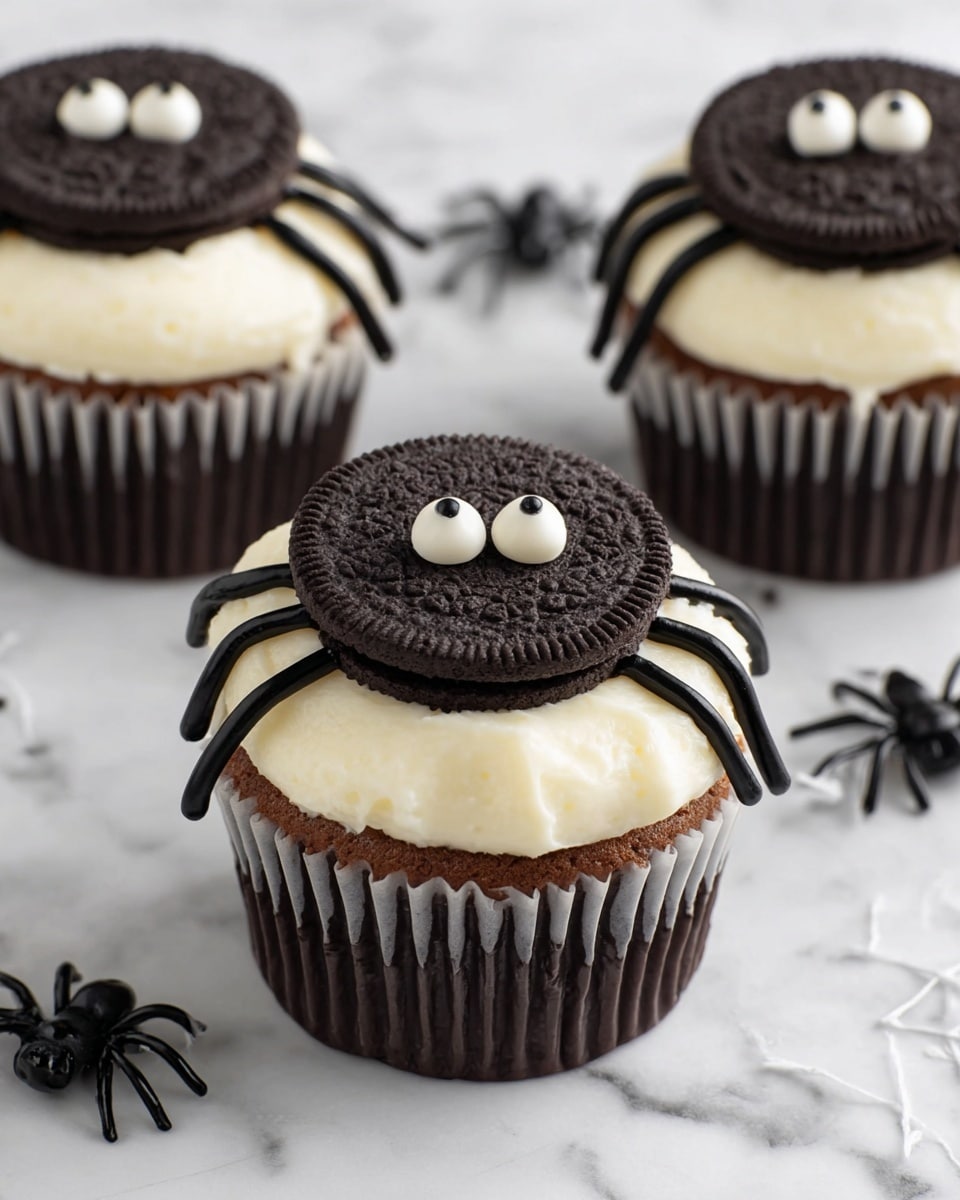
If you’re looking for a fun and spooky treat to wow your friends and family this season, you’ve got to try this Bat Cupcakes for Halloween Recipe. I absolutely love how these cupcakes combine rich chocolate flavor with adorable bat decorations that even the little ones will adore. Plus, you don’t need to be a pro baker to nail this—it’s straightforward, fun, and full of personality. Stick around, and I’ll walk you through every step to make the most fang-tastic cupcakes ever!
Why You’ll Love This Recipe
- Simple Ingredients: Uses pantry staples with easy swaps like coconut sugar or honey to suit your preferences.
- Impressively Cute: The bat decorations are surprisingly easy to make yet look professionally spooky.
- Flexible Recipe: Works with gluten-free options and whole wheat flour for dietary needs.
- Fun for All Ages: My family goes crazy for these, especially the little eyes and chocolate legs that bring the bats to life!
Ingredients You’ll Need
These ingredients come together to create a moist, chocolatey cupcake base topped with a dreamy cream cheese frosting. I love using Dutch-process cocoa because it makes the chocolate flavor richer and less bitter, but natural cocoa also works fine.
- Granulated sugar (or coconut sugar or honey): Choose according to your sweetness preference and dietary needs.
- Flour: You can use all-purpose, whole wheat, or gluten-free flour—each gives a slightly different texture.
- Cocoa powder: Dutch-process for a smoother taste, natural works too.
- Baking powder & baking soda: Both help with a nice rise and cake fluffiness.
- Salt: Enhances all the chocolate flavor.
- Eggs (or chia eggs): Bind everything together; chia eggs are a great vegan swap.
- Milk: Whole milk or dairy-free options keep cupcakes moist.
- Oil: Vegetable or canola, for tender crumb.
- Vanilla extract: Adds warm flavor.
- Boiling water: Helps bloom the cocoa, intensifying chocolate taste.
- Unsalted butter: Softened, for the frosting base.
- Full-fat cream cheese: Perfectly tangy and creamy for frosting.
- Powdered sugar: For smooth frosting sweetness.
- Oreos (or gluten-free Oreos): These create the bat bodies—get ready for the fun part!
- Semi-sweet chocolate chips (or chopped chocolate): Melts into the “legs” of the bats.
- Candy eyes: The finishing touch that makes these bats come alive.
Variations
One of the things I love about this Bat Cupcakes for Halloween Recipe is how easy it is to make it your own. Whether you want to adjust sweetness, swap dairy ingredients, or even switch the decoration theme, you’ll find these cupcakes welcoming to your creativity.
- Gluten-Free Version: I’ve made these with gluten-free flour blends and GF Oreos—my friends with gluten sensitivities didn’t even notice!
- Vegan Twist: Substituting eggs with chia eggs and using dairy-free cream cheese makes these cruelty-free yet delicious.
- Flavor Boost: Adding a teaspoon of espresso powder to the batter helps deepen the chocolate flavor—one of my secret tricks!
- Seasonal Decor: You can swap the bat wings for small fondant ghosts or pumpkins if you want a change-up.
How to Make Bat Cupcakes for Halloween Recipe
Step 1: Mix the Dry Ingredients
Start by whisking together the sugar, flour, cocoa powder, baking powder, baking soda, and salt in a large bowl. This ensures everything is evenly distributed and helps your cupcakes rise evenly. I always sift the cocoa powder to avoid clumps—totally worth the extra step!
Step 2: Whisk Wet Ingredients Separately
In another bowl, beat together eggs, milk, oil, and vanilla extract until smooth. If you’re using chia eggs, prepare these ahead by mixing ground chia seeds with water and letting them gel up—made this a lifesaver on egg-less baking days!
Step 3: Combine Wet and Dry Mixtures, Add Boiling Water
Pour the wet mixture into the dry ingredients and stir until smooth. Then, carefully add the boiling water—this is the magic that brings out the deep chocolate flavor. Your batter will be thin, but that’s exactly how it should be, so don’t panic.
Step 4: Bake the Cupcakes
Fill cupcake liners about two-thirds full and bake at 350°F (175°C) for 18 to 20 minutes. The tops should spring back lightly when pressed and a toothpick inserted should come out clean. I learned the hard way not to overbake—your cupcakes will stay moist and tender if you keep a close eye.
Step 5: Make the Cream Cheese Frosting
Beat softened butter and cream cheese together until smooth, then slowly add powdered sugar, vanilla, and salt. I like to taste as I go because sometimes I want it just a bit sweeter or tangier. Chill for 10 minutes to thicken before frosting.
Step 6: Create the Bat Decorations
Gently twist apart Oreos for the bat bodies, then melt chocolate chips to make legs by piping thin lines onto parchment paper—let them set hard. Place candy eyes on the frosting, assemble the “legs,” and add Oreo wings to bring your bats to life. This step is a blast with kids—they love helping!
Pro Tips for Making Bat Cupcakes for Halloween Recipe
- Don’t Skip the Boiling Water: This is what really makes your chocolate flavor pop—trust me, it’s worth it.
- Use Fresh Ingredients: Baking powder and soda lose power over time, so make sure yours are fresh for a perfect rise.
- Prep Oreos Early: Twist and separate the Oreos ahead of time to speed up assembly when cupcakes are cooled.
- Avoid Overmixing: Mix your batter just until combined—the texture will be softer and more tender.
How to Serve Bat Cupcakes for Halloween Recipe
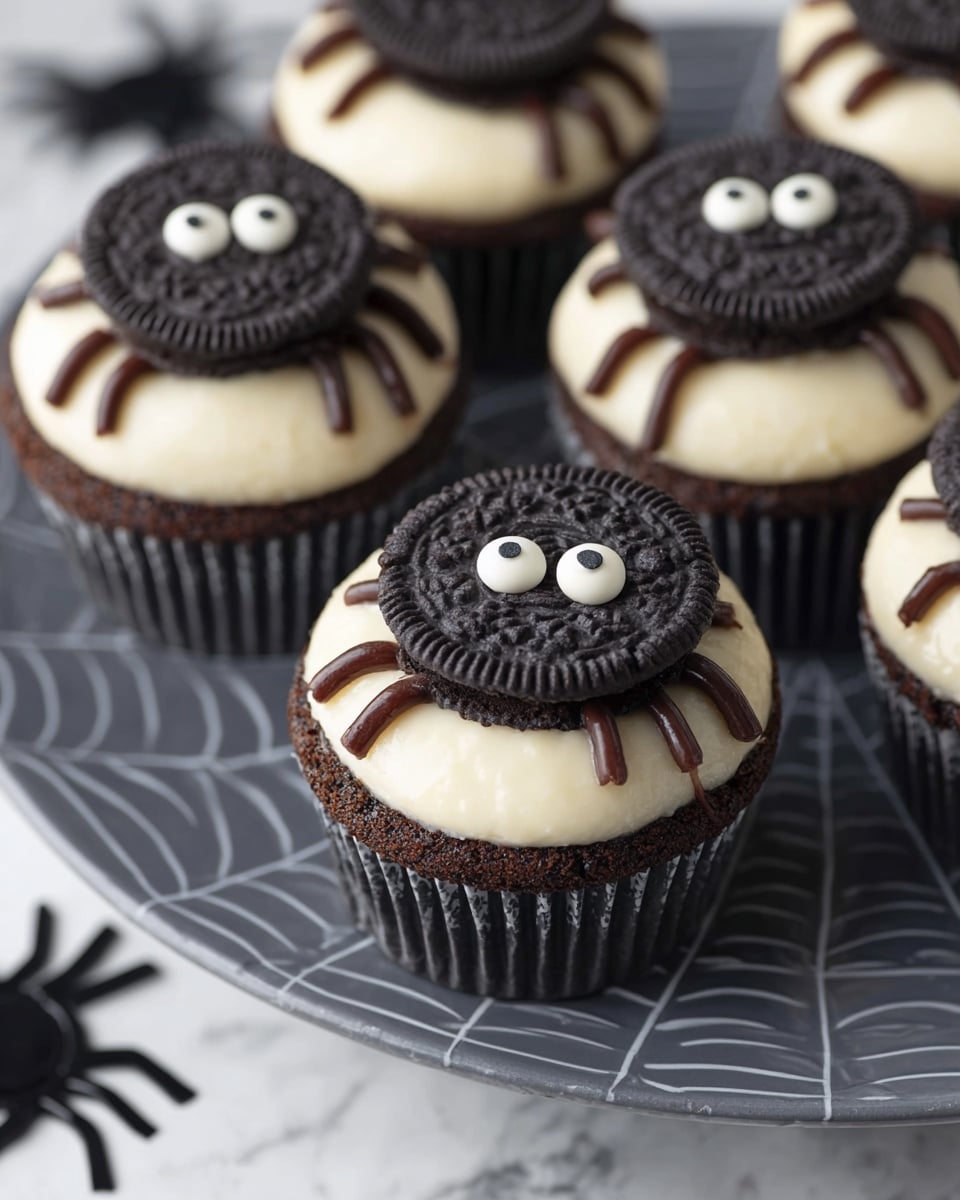
Garnishes
I love using those quirky little candy eyes—nothing says “Halloween” like a bunch of wide-eyed bats staring up at you! If you want to switch it up, mini chocolate chips or tiny edible stars also work great for some whimsical flair.
Side Dishes
These cupcakes stand beautifully on their own but pair fabulously with a simple vanilla or pumpkin spice latte. If you’re hosting a party, try serving with some tangy fruit punch or even fun Halloween-themed popcorn for the perfect spooky spread.
Creative Ways to Present
Arrange your bats on black or dark purple platters for maximum contrast. I’ve even used mini Halloween baskets lined with shredded black paper for a neat party display. For kid parties, placing a few cupcakes inside a spider web-themed cake dome is an instant showstopper!
Make Ahead and Storage
Storing Leftovers
Once decorated, I keep the remaining cupcakes covered tightly in the fridge for up to 3 days. The cream cheese frosting holds up well chilled, but make sure to bring them to room temperature before serving for the best flavor.
Freezing
If you want to make these ahead, bake and freeze the unfrosted cupcakes in a sealed container for up to 1 month. When ready, thaw completely, then frost and decorate—they’ll taste just as fresh as the day you made them.
Reheating
I usually pop refrigerated cupcakes out of the fridge about 30 minutes before serving so they soften. If frozen, thaw overnight in the fridge and then bring to room temperature. I don’t recommend microwaving because the frosting texture can change.
FAQs
-
Can I make the bat decorations ahead of time?
Absolutely! You can prepare the Oreo bat wings and bake the chocolate legs ahead. Store them in an airtight container at room temperature and assemble on the cupcakes the day you plan to serve.
-
What can I use if I don’t have candy eyes?
Options include mini chocolate chips, small white and black frosting dots made with a toothpick, or even edible pearls. These alternatives give the same cute effect with easy pantry ingredients.
-
Can I use store-bought chocolate frosting instead of cream cheese frosting?
You can, though cream cheese frosting adds that perfect tang to balance the rich chocolate cupcakes. If you prefer, a high-quality store-bought version will still work fine and save you some time.
-
How do I make chia eggs for the vegan option?
Mix 1 tablespoon of ground chia seeds with 3 tablespoons of water per egg. Let it sit for 5-10 minutes until it forms a gel-like consistency, then use as you would a regular egg in the batter.
Final Thoughts
When I first made these Bat Cupcakes for Halloween Recipe, my family couldn’t stop giggling at how cute (and tasty) they were. It’s hands-down one of my favorite seasonal treats because it blends fun decoration with delicious homemade cake and frosting. If you want a guaranteed crowd-pleaser this Halloween, I’d say grab your ingredients and get baking—you’re going to love the smiles these bring to the table!
Print
Bat Cupcakes for Halloween Recipe
- Prep Time: 40 min
- Cook Time: 18 min
- Total Time: 120 min
- Yield: 24 cupcakes
- Category: Dessert
- Method: Baking
- Cuisine: American
- Diet: Gluten Free
Description
Delightfully spooky and delicious, these Spider Cupcakes are perfect for Halloween celebrations. Featuring a rich chocolate base topped with creamy full-fat cream cheese frosting, each cupcake is decorated with an Oreo cookie spider and candy eyes, complete with chocolate legs for a creepy-crawly effect. Options for traditional, whole wheat, or gluten-free versions make these cupcakes accessible and fun for everyone.
Ingredients
Cake Ingredients
- 2 cups granulated sugar (or coconut sugar or 1 cup (320 grams) honey)
- 1 3/4 cups flour (see notes)
- 3/4 cup cocoa powder (Dutch-process recommended)
- 1 teaspoon baking powder
- 1 teaspoon baking soda
- 1 teaspoon salt
- 2 large eggs (50 grams each out of shell, or 2 chia eggs as a vegan alternative)
- 1 cup milk (dairy or plant-based as preferred)
- 1/2 cup oil (such as vegetable or canola oil)
- 2 teaspoons vanilla extract
- 3/4 cup boiling water
Frosting Ingredients
- 2/3 cup unsalted butter, softened
- 16 ounces full-fat cream cheese, room temperature
- 1/8 teaspoon salt
- 1/2 teaspoon vanilla extract
- 2 cups powdered sugar
Decoration Ingredients
- 24 Oreos (use gluten-free Oreos if needed)
- 1 1/3 cups semi-sweet chocolate chips or chopped chocolate
- 48 candy eyes
Instructions
- Prepare the Oven and Pans: Preheat your oven to 350°F (175°C). Line cupcake pans with paper liners and set aside.
- Mix Dry Ingredients: In a large bowl, sift together flour, cocoa powder, baking powder, baking soda, and salt. Set aside.
- Combine Wet Ingredients: In another bowl, beat the eggs with sugar until light and fluffy. Add milk, oil, and vanilla extract, mixing well.
- Combine Wet and Dry Mixtures: Gradually add the dry ingredients to the wet ingredients, mixing until just combined.
- Add Boiling Water: Carefully stir in the boiling water to thin the batter; the batter will be thin but this makes the cupcakes moist.
- Bake the Cupcakes: Fill cupcake liners about 2/3 full with batter. Bake for 18 minutes or until a toothpick inserted into the center comes out clean. Allow to cool completely on a wire rack.
- Prepare the Frosting: Beat the softened butter and cream cheese together until smooth. Add salt, vanilla extract, and powdered sugar gradually, beating until creamy and fluffy.
- Frost the Cupcakes: Once cupcakes are completely cooled, frost the tops generously with cream cheese frosting.
- Create the Oreo Spiders: Twist Oreo cookies apart carefully. Use one half with cream as the spider body. Stick two candy eyes on the cream part.
- Melt Chocolate: In a microwave-safe bowl or double boiler, melt the semi-sweet chocolate chips until smooth for piping the legs.
- Assemble Spiders: Dip a toothpick or small piping bag in melted chocolate, and pipe legs on each side of the Oreo spider body on the frosted cupcakes. Place the Oreo spider on top of the frosting.
- Chill to Set: Place cupcakes in the refrigerator for about 30 minutes to allow the frosting and chocolate to set firmly before serving.
Notes
- These spider cupcakes are simple to make with a chocolate base, cream cheese frosting, and Oreo spiders topped with candy eyes and chocolate legs.
- You can make the cupcakes traditionally with all-purpose flour, or substitute with whole wheat or gluten-free flour for dietary needs.
- Eggs can be substituted with chia eggs for a vegan version.
- Use gluten-free Oreos to keep cupcakes gluten-free.
- Ensure cupcakes are completely cooled before frosting to prevent melting.
- Boiling water addition is key to a moist and tender crumb in the chocolate cupcake.
Nutrition
- Serving Size: 1 cupcake
- Calories: 421 kcal
- Sugar: 36 g
- Sodium: 290 mg
- Fat: 24 g
- Saturated Fat: 11 g
- Unsaturated Fat: 11 g
- Trans Fat: 0.2 g
- Carbohydrates: 51 g
- Fiber: 2 g
- Protein: 5 g
- Cholesterol: 48 mg

