

If you love classic bakery treats with a nostalgic twist, you’re going to absolutely adore my Black and White Cookies with Vanilla and Chocolate Icing Recipe. These cookies are the perfect balance of soft, cakey bases topped with a luscious split of vanilla and chocolate icing that feels just right with every bite. I’ve tweaked this recipe over a few years, and I can confidently say it’s fan-freaking-tastic — perfect for sharing, gift-giving, or just keeping as a special treat for yourself.
Why You’ll Love This Recipe
- Perfect Texture: The cookies come out soft and cakey, unlike crunchy cookies, giving you that authentic black and white cookie experience every time.
- Balanced Icing: The sweet vanilla and rich chocolate icings create that classic half-and-half contrast, but with a glossy finish that won’t crack as they set.
- Beginner Friendly: Despite its gourmet look, this recipe is straightforward and forgiving, so even if you’re new to baking cookies, you’ll have great results.
- Versatile Treat: Whether it’s for a casual afternoon snack or a fancy afternoon tea, these cookies fit every occasion.

Ingredients You’ll Need
The magic of these Black and White Cookies with Vanilla and Chocolate Icing Recipe lies in simple, quality ingredients working together — nothing fancy, but each plays a key role. Use fresh room-temperature eggs and real unsalted butter for the best flavor and perfect blending. Don’t skip the buttermilk; it keeps things tender and moist.

- All-purpose flour: Provides the perfect structure; weighing it helps for consistent results.
- Baking soda: Gives a subtle lift and ensures lightness.
- Salt: Enhances flavor and balances sweetness.
- Unsalted butter: Room temperature is key for creaming smoothly with sugar.
- Granulated sugar: Sweetens while helping with buttery fluffiness.
- Large egg: Adds moisture and helps bind the dough.
- Vanilla extract: Gives warmth and depth to the cookie and vanilla icing.
- Buttermilk: The acidic moisture tenderizes and adds subtle tang.
- Confectioners’ sugar: For silky smooth icings — essential for that glossy finish.
- Lemon juice: Optional but adds a fresh brightness to the vanilla icing.
- Water: To adjust icing consistency.
- Light corn syrup: Keeps the icing shiny and smooth without hardening too fast.
- Cocoa powder: I prefer Dutch-processed for richer chocolate icing, but natural cocoa works too.
Variations
I love that this recipe is a blank canvas for your creativity. Over the years, I’ve played with different icings and even added fun mix-ins to the batter — and honestly, you’re free to make this your own!
- Flavor swaps: Sometimes I add almond extract to the vanilla icing for an extra nutty warmth that my family goes crazy for.
- Dairy-free version: Swap buttermilk for a plant-based milk plus a splash of lemon juice, and use vegan butter to make these suitable for sensitive diets.
- Mini cookies: For parties, I make bite-sized versions — they bake faster and become perfect little tea-time treats.
- Fun toppings: Try sprinkling finely chopped nuts or edible glitter just before the icing sets for a festive twist.
How to Make Black and White Cookies with Vanilla and Chocolate Icing Recipe
Step 1: Prep Your Dry Ingredients
Start by preheating your oven to 350°F and lining two baking sheets with silicone mats or parchment paper — trust me, parchment is a game-changer for easy cookie removal. In a bowl, whisk together the all-purpose flour, baking soda, and salt until well combined. This helps the leaveners disperse evenly, so your cookies rise perfectly.
Step 2: Cream Butter and Sugar
Using a stand mixer fitted with a paddle attachment, cream the room-temperature unsalted butter on medium-high speed until it looks pale and fluffy — about 2-3 minutes. Then add the sugar and continue beating on high until the mixture is light and airy. This step is crucial because the air you whip in gives your cookies their tender crumb. Mix in the egg and vanilla extract, scraping down the bowl to combine everything evenly.
Step 3: Alternate Adding Flour and Buttermilk
Now, add the flour mixture and buttermilk in three batches, starting and ending with the flour — this alternating helps keep the batter smooth and prevents overmixing. Mix on low speed to avoid developing gluten, which keeps the cookies soft rather than dense. Once combined, use a spatula to give the batter a final gentle fold to catch any unincorporated flour or butter.
Step 4: Scoop and Bake
Here’s where you want to be a little exact: use a ¼ cup cookie scoop or a greased measuring cup to portion out the batter onto your prepared baking sheets. Leave about 4 inches between the cookies because they spread quite a bit while baking. I usually put no more than five cookies on each sheet to give them plenty of space. Pop them into the oven on the center rack for 13-14 minutes, or until the centers feel springy when you gently press.
Step 5: Cool and Invert
Once baked, let the cookies cool on the sheets for about 5 minutes — this prevents them from breaking apart when moved. Then flip them upside down onto wire racks so the flat, baked side becomes the top for icing. This little trick guarantees the smooth, iconic surface you want for your black and white icing application.
Step 6: Prepare Vanilla and Chocolate Icing
While the cookies cool, whisk together the powdered sugar, vanilla extract, lemon juice (if using), corn syrup, and water in a large bowl. You’re aiming for a smooth, shiny icing that spreads easily but isn’t too runny — add water a little at a time to get the consistency just right. Transfer nearly half of this vanilla icing to another bowl and mix in your cocoa powder, a teaspoon of corn syrup, and a few teaspoons of water to create that rich chocolate icing. Use your mixer on high to get the chocolate icing glossy and smooth, just like the vanilla.
Step 7: Ice Each Half with Care
Using a small or offset spatula, spread a thin layer of vanilla icing on one half of each cookie. To make a neat line down the middle, gently pull the icing from the center to the edge with the knife’s sharp edge, then clean and do the same on the other side. Let that vanilla icing set for a bit — don’t rush this part; it helps avoid mixing or smudging before you apply the chocolate.
Next, cover the other half of the cookie with the chocolate icing, gently pushing it right up to the center line. Smooth it out quickly and evenly, then allow the icing to set completely. And voilà — you have perfectly iced black and white cookies that look as good as they taste!
Pro Tips for Making Black and White Cookies with Vanilla and Chocolate Icing Recipe
- Butter Temperature: Always use room temperature butter—it creams smoothly and traps air, giving the cookies a light texture.
- Don’t Overmix Batter: Overworking the batter creates tough cookies. Mix just enough until the ingredients come together, then stop.
- Icing Consistency: If your icing feels too thick, add water a teaspoon at a time; too thin? Add a pinch more powdered sugar to get that perfect spread.
- Use the Flip Cooling Trick: Flipping the cookies to cool with the bottom up creates that smooth flat surface that’s perfect for icing.
How to Serve Black and White Cookies with Vanilla and Chocolate Icing Recipe

Garnishes
I usually keep these cookies simple to showcase the classic icings, but sometimes I’ll sprinkle finely chopped toasted almonds or a few colored nonpareils on the chocolate side just before the icing sets for an extra fun touch. It adds a subtle crunch and makes them feel extra special without overwhelming the flavor.
Side Dishes
Pair these with a steaming cup of coffee or a classic black tea to balance their sweetness perfectly. For brunch or afternoon tea, I like serving the cookies alongside fresh fruit, like sliced strawberries or a fruit salad to add brightness.
Creative Ways to Present
One of my favorite ways to present these cookies is on a tiered cake stand with a mix of other petite desserts for a party – the black and white colors really pop. For holidays, I’ve also tied small stacks in parchment with twine and a sprig of fresh rosemary for a rustic gift everyone appreciates.
Make Ahead and Storage
Storing Leftovers
I keep my leftover black and white cookies in an airtight container at room temperature — they stay soft and moist for up to three days. If you live in a humid climate, adding a piece of bread to the container helps keep the cookies from drying out.
Freezing
Freezing these cookies works well if you want to bake ahead. I freeze the un-iced cookies individually on a tray, then transfer them to a freezer bag. When ready, thaw at room temperature before icing. The icing is best done fresh, but you can also freeze iced cookies for up to a month if wrapped tightly.
Reheating
If you want to freshen up your leftovers, pop the cookies in a microwave for 10-15 seconds to bring back that soft, warm texture. Avoid reheating too long or the icing might start to melt.
FAQs
-
Can I substitute the buttermilk in this Black and White Cookies with Vanilla and Chocolate Icing Recipe?
Absolutely! If you don’t have buttermilk on hand, you can make a quick substitute by adding 1 tablespoon of lemon juice or white vinegar to 1/3 cup of milk. Let it sit for 5 minutes before using. This mimics the acidity of buttermilk to keep your cookies tender.
-
How do I get the perfect split line between the vanilla and chocolate icing?
The secret is patience and using a clean, sharp tool like a butter knife or offset spatula edge to gently pull the icing from the center out to the edge while it’s still wet. Clean the tool after each pass, and let the first half dry fully before applying the second icing to prevent bleeding.
-
Can I make the icing ahead of time?
You can prepare the icing a day ahead and store it in airtight containers in the fridge. Bring it to room temperature and give it a quick stir before spreading on your cookies. If it thickens too much after refrigeration, thin it out with a small amount of water or corn syrup.
-
Why are my cookies spreading too much?
This usually happens if your butter is too warm or the dough is too loose. Make sure your butter is room temperature—not soft or melted—and don’t overcrowd the baking sheet so cookies have room to spread evenly without merging.
Final Thoughts
I’ve made so many variations of black and white cookies over the years, but this Black and White Cookies with Vanilla and Chocolate Icing Recipe comes out perfect every single time. The balance of soft cake-like cookies with just the right touch of glossy icing makes them stand out from the rest. I truly love sharing this with friends and watching their faces light up at that first delicious bite. Trust me, once you try this, you’ll feel like a neighborhood bakery pro. Grab your mitts and give it a go — you’re going to love the results as much as I do!
Print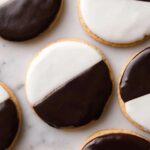
Black and White Cookies with Vanilla and Chocolate Icing Recipe
- Prep Time: 20 minutes
- Cook Time: 13 minutes
- Total Time: 33 minutes (excluding cooling and icing setting time)
- Yield: 8 cookies
- Category: Dessert
- Method: Baking
- Cuisine: American
Description
These classic Black and White Cookies feature a soft, cakey base topped with smooth vanilla and rich chocolate icing halves. Perfectly balanced in flavor and texture, they offer the best of both worlds with their distinctive dual glaze.
Ingredients
Dry Ingredients
- 1 ⅓ cups all-purpose flour (160g)
- ½ tsp baking soda
- ½ tsp salt
Wet Ingredients & Batter
- 6 Tbsp unsalted butter, room temperature (85g)
- ½ cup granulated sugar (100g)
- 1 large egg, room temperature
- 2 tsp vanilla extract (10mL)
- ⅓ cup buttermilk (80mL)
Vanilla Icing
- 2 cups confectioners’ sugar (240g)
- ½ tsp vanilla extract
- 2 tsp lemon juice, fresh (optional)
- 1 Tbsp light corn syrup
- 2 Tbsp water, plus more as needed
Chocolate Icing
- 3 Tbsp cocoa powder (preferably dutch-process, 18g)
- 1 tsp light corn syrup
- Water as needed to adjust consistency
Instructions
- Prepare Dry Ingredients: Preheat your oven to 350°F (175°C). Line two baking sheets with silicone mats or parchment paper. In a bowl, whisk together the flour, baking soda, and salt to combine evenly, then set aside.
- Cream Butter and Sugar: Using a stand mixer fitted with the paddle attachment, cream the room temperature butter until smooth. Add the granulated sugar and mix on high speed until the mixture becomes light and fluffy. This aeration is key for a soft cookie texture.
- Add Egg and Vanilla: Mix in the egg and vanilla extract thoroughly. Scrape down the bowl sides and mix once more until fully incorporated.
- Combine Batter: Alternately add the dry flour mixture and buttermilk to the wet ingredients in three batches, starting and ending with the flour mixture. Mix on low speed until just combined. Use a spatula to scrape down the bowl and ensure there are no pockets of flour or butter remaining.
- Shape Cookies: Using a ¼ cup cookie scoop or a greased measuring cup, drop the dough onto the prepared baking sheets. Leave about 4 inches of space between each cookie to allow for spreading. Bake no more than five cookies per sheet.
- Bake Cookies: Place the baking sheets on the center rack and bake for 13-14 minutes or until the cookie centers are springy to the touch. Allow cookies to cool for a few minutes on the sheet, then transfer to a wire rack to cool completely, turning them upside down so the flat bottom becomes the top for icing.
- Prepare Vanilla Icing: In a large bowl, combine the confectioners’ sugar, vanilla extract, lemon juice (if using), corn syrup, and water. Mix until smooth, adding additional water a few drops at a time if needed to reach a spreadable consistency.
- Prepare Chocolate Icing: Transfer nearly half of the vanilla icing to another bowl. Add cocoa powder, a teaspoon of corn syrup, and a few teaspoons of water. Mix on high speed until the icing is glossy and smooth, adjusting water to achieve a similar consistency to the vanilla icing.
- Ice Cookies – Vanilla Side: Using a small or offset spatula, spread a thin layer of the vanilla icing on half of each cookie. Use the edge of a knife or spatula to create a clean line down the center by gently drawing icing from the middle outwards on each half. Allow this icing to set slightly.
- Ice Cookies – Chocolate Side: Spread the chocolate icing on the other half of each cookie. Push the chocolate icing to the center with your spatula and smooth it out quickly. Let the icing set completely before serving or storing.
Notes
- These cookies offer a perfect balance between rich chocolate and sweet vanilla, so you don’t have to pick your favorite.
- Using room temperature ingredients helps achieve a smooth batter and even baking.
- Cooling the cookies upside down ensures a flatness ideal for even icing application.
- Dutch-process cocoa powder provides a richer chocolate flavor and smoother texture in the icing.
- This recipe yields 8 generously sized cookies, ideal for sharing or enjoying over several days when stored properly.
Nutrition
- Serving Size: 1 cookie
- Calories: 347 kcal
- Sugar: 45 g
- Sodium: 238 mg
- Fat: 10 g
- Saturated Fat: 6 g
- Unsaturated Fat: 3 g
- Trans Fat: 1 g
- Carbohydrates: 62 g
- Fiber: 1 g
- Protein: 4 g
- Cholesterol: 47 mg


