
If you’re on the hunt for a festive treat that’s as fun to make as it is to eat, you’re going to adore this Candy Cane Cookies Recipe. I absolutely love how these cookies capture that classic peppermint flavor and the iconic red-and-white swirl—perfect for holiday baking sessions or cozy afternoons. They’re not just cute; they have this delightful crispness with a hint of minty goodness that will have your family and friends coming back for more. Stick around, because I’m going to share all my tips and tricks so your candy cane cookies come out picture-perfect every single time!
Why You’ll Love This Recipe
- Classic Holiday Flavors: The peppermint and vanilla combo is such a nostalgic treat that instantly brings holiday cheer.
- Fun, Hands-On Baking: Twisting the red and white dough into candy cane shapes makes this recipe a joyful interactive activity, especially with kids.
- Perfect Texture: These cookies have the ideal balance of crisp edges and a tender center, something I learned through tweaking the baking time.
- Make-Ahead Friendly: You can prep the dough and even shape the cookies in advance, making your holiday baking stress-free.

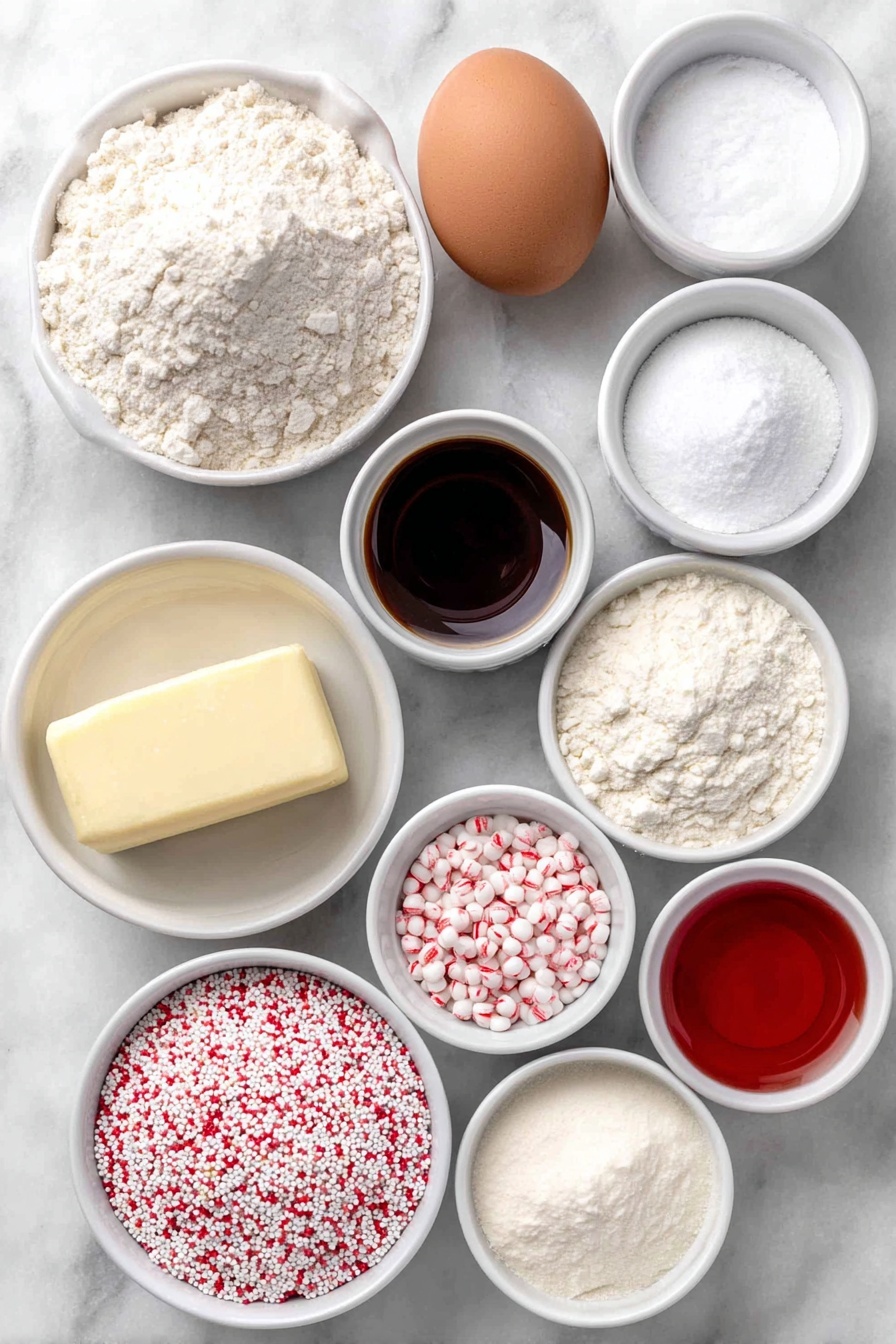
Ingredients You’ll Need
This recipe uses simple, classic ingredients you likely already have in your pantry. The combination of all-purpose flour and cornstarch helps achieve that tender yet sturdy texture that holds the unique twisted candy cane shape beautifully.
- All-purpose flour: Provides structure and stability to the cookies—make sure it’s fresh for the best results.
- Cornstarch: Helps keep the cookies tender and soft, giving them that melt-in-your-mouth feel.
- Baking soda & baking powder: Both leaveners ensure the right rise and lightness without spreading too much.
- Salt: Balances the sweetness and enhances all the flavors.
- Unsalted butter: Using room temperature butter creamed with sugar gives you that luscious cookie consistency.
- Granulated sugar: Sweetens and helps create those slightly crispy edges that I love.
- Egg: Adds moisture and helps bind everything together smoothly.
- Vanilla extract: Brings warm, rich flavor depth to the dough.
- Peppermint extract: The star of this recipe that delivers that unmistakable candy cane taste—don’t skip it!
- Red gel icing color: Easy to incorporate for vibrant, festive hues without altering the dough texture.
- Sprinkles or peppermint crunch: Totally optional, but I love them for adding a little sparkle and extra crunch on top.
Variations
While this Candy Cane Cookies Recipe is classic as is, I encourage you to play around with it. I’ve tried a few fun twists that add a fresh spin to these minty delights, so don’t be afraid to make it your own!
- Chocolate Peppermint: I like adding mini chocolate chips into the dough—it’s a game-changer for chocolate and mint lovers.
- Gluten-Free: Swap the all-purpose flour with a quality gluten-free blend plus some extra cornstarch for similar texture and shape.
- Natural Coloring: If you prefer to avoid gel colors, crushed freeze-dried raspberries can give a subtle, natural tint and a slight berry twist.
- Spiced Peppermint: Adding a pinch of cinnamon or ground ginger gives a warm holiday spice that pairs beautifully with the peppermint.
How to Make Candy Cane Cookies Recipe
Step 1: Mix Your Dry Ingredients
Start by whisking together the all-purpose flour, cornstarch, baking soda, baking powder, and salt in a medium bowl. I like doing this first—it makes sure everything is evenly distributed, which really helps the cookies bake perfectly.
Step 2: Cream Butter and Sugar
In a large mixing bowl, beat the room temperature unsalted butter and granulated sugar on medium speed until the mixture turns pale and fluffy—you’ll notice it getting lighter in color. This step is crucial because it traps air, giving your cookies that lovely light texture.
Step 3: Add the Flavorings
Beat in the egg, vanilla extract, and peppermint extract until everything is well combined. At this point, your kitchen is going to smell amazing—one of my favorite moments!
Step 4: Combine Wet and Dry
Gradually mix the dry ingredient mixture into the wet ingredients, but be gentle—just combine everything until you see no streaks of flour. Overmixing can make the cookies tough, so this is where patience pays off.
Step 5: Color the Dough
Split the dough into two equal portions. Add a few drops of red gel icing color to one half and mix gently until the color is evenly distributed. The white dough remains untouched. This vibrant contrast is what gives your cookies that signature candy cane look!
Step 6: Chill and Prep
Wrap and refrigerate both dough portions for 2 to 3 hours. I discovered that chilling the dough makes it much easier to handle when you’re rolling out and twisting the ropes, plus it helps maintain the shape during baking. If you want to get ahead, you can even roll teaspoon-sized balls before chilling—they’ll be ready to form as soon as you take them out.
Step 7: Form Candy Canes
Preheat your oven to 350°F (180°C) and line baking sheets with parchment paper or silicone mats. Take a teaspoonful of each dough and roll them into 5-inch ropes—using a ruler helps keep size consistent. Place the red and white ropes side by side and twist gently, starting from the middle going outward in each direction rather than twisting just from one end. Then form the top hook of the candy cane by curving one end. This step is where your cookies really come to life!
Step 8: Add Toppings and Bake
If you want, press some peppermint crunch or sprinkles on the front of each twisted candy cane before baking. Bake for 5 to 7 minutes—watch closely! The cookies should look set and just starting to turn golden at the edges. Overbaking can make them brittle, so timing is key.
Step 9: Cool Carefully
Let the cookies cool on the baking sheet for about 10 minutes to firm up before transferring them to a wire rack. I’ve learned the hard way that handling them too soon can cause breakage, so patience here really pays off.
Pro Tips for Making Candy Cane Cookies Recipe
- Perfect Twist Technique: I found twisting from the middle outward rather than just one end gives a smoother, more even candy cane pattern.
- Dough Chilling is Key: Refrigerating the dough is a game changer—it makes rolling and shaping so much easier and prevents spreading in the oven.
- Watch the Baking Time: Keep a close eye during the last couple of minutes—cookies can go from perfectly baked to too crisp surprisingly fast.
- Remove Gently: Use a thin spatula and cool the cookies enough on your baking sheet before moving to avoid cracks.
How to Serve Candy Cane Cookies Recipe

Garnishes
I love adding a sprinkle of crushed peppermint candies on top for extra crunch and sparkle. Sometimes, a light dusting of powdered sugar gives them a snowy holiday feel that really delights guests at a party or while sharing over cocoa.
Side Dishes
These cookies pair beautifully with a warm cup of hot chocolate, peppermint tea, or even a glass of cold milk if you’re looking for that classic combo. They also make a cute addition to a dessert platter along with gingerbread and sugar cookies.
Creative Ways to Present
For gifting or holiday parties, I arrange the candy cane cookies in a circular pattern on a festive platter to mimic a wreath—it’s an instant conversation starter! Wrapping individual cookies in cellophane tied with red ribbon is a charming way to share these with friends and neighbors, too.
Make Ahead and Storage
Storing Leftovers
I store any leftover Candy Cane Cookies in an airtight container at room temperature. They stay fresh and crisp for about 4 to 5 days, but honestly, they rarely last that long in my house!
Freezing
One thing I’ve learned is that both the dough and the baked cookies freeze well. For the dough, I shape the ropes and twist the candy canes, then freeze them on a tray before transferring to a zip-top bag—this way I can pop them in the oven directly from frozen, adding a minute or two to the bake time.
Reheating
To freshen up leftover cookies, I pop them in a 300°F (150°C) oven for 3-4 minutes. This revives the crisp edges and brings back that just-baked warmth without drying them out.
FAQs
-
Can I make the candy cane cookies without peppermint extract?
Absolutely! While peppermint extract is essential for that classic candy cane flavor, you can substitute it with vanilla extract alone for a milder cookie, or try other extracts like almond for a unique twist. Just know that the signature minty taste will be missing.
-
My cookie dough feels sticky—how can I prevent it from sticking while twisting?
Chilling the dough is your best friend here. Make sure the dough is well-refrigerated before handling. If it’s still sticky, lightly flour your hands and the work surface to make rolling and twisting smoother.
-
How do I store candy cane cookies to keep them crisp?
Keep them in an airtight container at room temperature and separate layers with parchment paper to avoid sticking. Avoid storing in the fridge, as moisture can soften the cookies.
-
Can I use food coloring other than red?
Definitely! While red is traditional and festive, green or even pink gels can be fun and still give you that candy cane vibe. Just use gel colors to avoid changing the dough’s consistency.
Final Thoughts
When I first tried making Candy Cane Cookies, I was a bit intimidated by the twisting, but once I got the hang of it, it quickly became a favorite holiday tradition at our house. I love how they bring that nostalgic peppermint flavor to the table wrapped up in such a charming, playful shape. If you’re looking for a recipe that’s festive, delicious, and fun to make, I can’t recommend this Candy Cane Cookies Recipe enough. Give it a go—you might just start your own holiday tradition!
Print
Candy Cane Cookies Recipe
- Prep Time: 3 hr
- Cook Time: 40 min
- Total Time: 3 hr 40 min
- Yield: About 60 cookies
- Category: Dessert
- Method: Baking
- Cuisine: American
Description
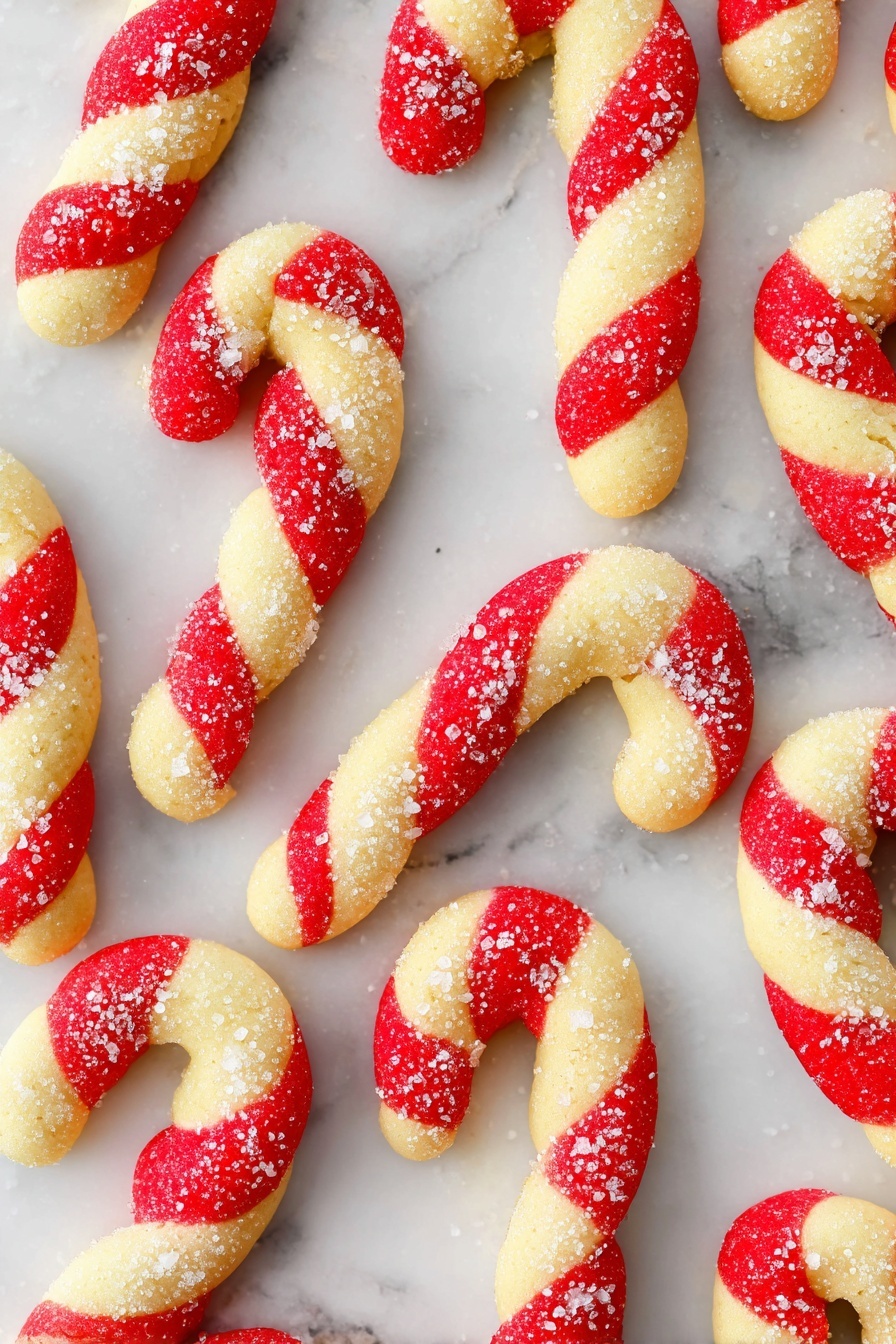
These Candy Cane Cookies are a festive holiday treat featuring a soft, peppermint-flavored dough twisted into classic candy cane shapes. The dough is divided and colored red and white, then twisted together to create charming striped cookies that are perfect for Christmas celebrations. Lightly sweetened and flavored with peppermint extract, these cookies are a delightful addition to any holiday cookie platter.
Ingredients
Dry Ingredients
- 2 3/4 cups (358g) all-purpose flour
- 2 tbsp cornstarch
- 1 tsp baking soda
- 1/2 tsp baking powder
- 1/2 tsp salt
Wet Ingredients
- 1 cup (224g) unsalted butter, room temperature
- 1 cup (207g) granulated sugar
- 1 egg
- 1 tsp vanilla extract
- 1 tsp peppermint extract
Additional
- Red gel icing color
- Sprinkles or peppermint crunch, optional
Instructions
- Mix Dry Ingredients: In a medium bowl, combine the all-purpose flour, cornstarch, baking soda, baking powder, and salt. Set this mixture aside for later use.
- Cream Butter and Sugar: Using a mixer on medium speed, cream together the room temperature unsalted butter and granulated sugar until the mixture is light in color and fluffy, indicating enough air has been incorporated.
- Add Egg and Extracts: Beat in the egg, vanilla extract, and peppermint extract until well combined, ensuring the flavors are evenly distributed throughout the batter.
- Incorporate Dry Ingredients: Gradually add the dry ingredient mixture to the wet ingredients. Mix just until the dough comes together, being careful not to overmix to keep the cookies tender.
- Color the Dough: Divide the cookie dough into two equal portions. Add red gel icing color to one half and mix until the color is evenly distributed, creating the red dough portion.
- Chill Dough: Refrigerate both dough portions for 2-3 hours to firm up, making the dough easier to handle and shape. Optionally, pre-portion the dough into 1 teaspoon-sized balls before chilling.
- Preheat Oven and Prepare Sheet: When ready to bake, preheat the oven to 350°F (180°C). Line baking sheets with parchment paper or silicone baking mats to prevent sticking.
- Shape Cookies: Roll each 1 teaspoon-sized dough ball into a 5-inch long rope. Lay a white rope next to a red rope and gently twist them together, first twisting one half and then the other half for an even spiral. Form the twisted rope into a candy cane shape by bending one end to create the hooked top.
- Add Toppings: Press sprinkles or peppermint crunch onto the front of each candy cane cookie for extra flavor and festive decoration, if desired.
- Bake: Place the shaped cookies on the prepared baking sheets and bake in the preheated oven for 5 to 7 minutes, until set but not browned.
- Cool: Let the cookies cool on the baking sheet for about 10 minutes to firm up and avoid breakage, then transfer them carefully to a wire rack to cool completely.
- Store: Store the cooled cookies in an airtight container. They are best enjoyed within 4-5 days but can be frozen for up to one month for longer storage.
Notes
- This classic Candy Cane Cookies recipe is perfect for the holiday season, featuring peppermint flavor and festive red and white colors.
- Chilling the dough is key to making the shaping easier and helping the cookies hold their shape while baking.
- Use gel icing color for vibrant red dough without altering the dough consistency.
- Handle twisted dough gently to prevent breaking.
- If you prefer, sprinkle toppings add a delightful crunch and extra peppermint flavor.
Nutrition
- Serving Size: 1 cookie
- Calories: 63
- Sugar: 3.4 g
- Sodium: 42.2 mg
- Fat: 3.2 g
- Saturated Fat: 1.9 g
- Unsaturated Fat: 1.3 g
- Trans Fat: 0 g
- Carbohydrates: 8 g
- Fiber: 0.2 g
- Protein: 0.7 g
- Cholesterol: 11.2 mg


