

This Cherries in the Snow Dessert is an absolute crowd-pleaser that comes together in just minutes—yes, minutes! Imagine fluffy angel food cake mingling with a luxuriously creamy, sweet layer, all crowned with glossy cherry pie filling. It’s cool, luscious, and so easy to pull off, even on the busiest weeknight. No baking required, just a handful of ingredients, and you’ve got a showstopping dessert everyone will adore. Whether you’re hosting a gathering or need a speedy treat for your family, this nostalgic favorite will steal the spotlight at any table.
Why You’ll Love This Recipe
- Effortlessly Quick: Perfect for those evenings when you want something special but don’t want to spend hours in the kitchen. All you do is mix, layer, and chill!
- Gorgeous Layers: It’s genuinely beautiful—white, fluffy cake, silky cream, and eye-catching cherries.
- Irresistibly Delicious: Every bite is a blend of cloud-like cake, rich cream, and that burst of fruity cherry.
- Beginner Friendly: Truly, even if you’re new to entertaining or baking, this recipe will make you look like a pro.
- Versatile for Any Occasion: Dress it up for parties or keep it simple for a comforting family dessert after a busy day.

Ingredients You’ll Need
- Cream Cheese: Brings that classic tangy richness and creamy foundation. Tip: Room temperature makes mixing a breeze and avoids lumps.
- Powdered Sugar: Adds sweet smoothness, perfectly blended with the cream cheese.
- 2% Milk: Loosens up the cream cheese layer for that silky texture. Whole milk or even half-and-half will make it even richer if you like!
- Cool Whip Whipped Topping: Delivers a light, airy texture that’s key for the cloudlike quality of this dessert. Real whipped cream works too, but Cool Whip stays stable longer.
- Pre-baked Angel Food Cake: Spongy, tender, and the ideal base. Pre-baked saves major time—grab one from the store!
- Cherry Pie Filling: Sweet, glossy cherries add color and the iconic finish. Can easily swap in another fruit if cherries aren’t your thing.
Note: You’ll find the complete list of ingredients, along with their exact measurements, in the printable recipe card at the bottom of this post.
Variations
Craving something a bit different? Here are some variations to play with:
- Use a Different Fruit: Blueberry, strawberry, or mixed berry pie filling creates a whole new experience.
- Add Crunch: Sprinkle slivered almonds or toasted coconut between the layers for a little texture.
- Chocolate Lover’s Twist: Drizzle a bit of chocolate sauce over the cherries for a decadent touch.
- Lighten It Up: Swap full-fat ingredients for lower-fat ones or use sugar-free pie filling if desired.
- Gluten-Free: Use a gluten-free angel food cake so everyone can enjoy.
How to Make Cherries in the Snow Dessert
Step 1: Prepare the Cream Layer
In a large bowl, whip the cream cheese and powdered sugar together until smooth and creamy. Pour in half the milk, blend, then add the rest and mix until completely smooth—no lumps allowed for this lush layer!
Step 2: Fold in the Whipped Topping
Gently fold in the Cool Whip whipped topping, taking care to keep everything airy and light.
Step 3: Add the Cake
Break the angel food cake into bite-size pieces with your hands (or a gentle knife if you prefer tidiness) and gently fold the cake pieces into the cream mixture. You want every piece coated but not crushed.
Step 4: Assemble
Spread the creamy cake mixture evenly in a 9×13 glass baking pan. Top with both cans of cherry pie filling, spreading it out so everyone gets cherries in each bite.
Step 5: Chill
Cover and refrigerate your dessert until serving time—this dessert is even better cold as the flavors meld and the texture becomes even dreamier.
Pro Tips for Making the Recipe
- Soften Cream Cheese: Let it sit out before mixing for the silkiest base.
- Be Gentle with Cake: Fold carefully to keep things fluffy; over-mixing can make it dense.
- Chill Well: Chill at least one hour for best results; overnight is even more delicious.
- Pan Choice Matters: A glass pan lets those pretty layers show off—great for presentation!
How to Serve

When it’s time to serve, a square of Cherries in the Snow is a delight all on its own, but there are ways to make it extra special:
- Garnish!: Add a dollop of extra whipped topping, a fresh cherry, or a sprinkle of finely grated white chocolate.
- Make it a Parfait: Serve in individual cups or parfait glasses for a beautiful presentation at parties.
- Pairing Ideas: Goes perfectly with a cup of coffee, hot tea, or even a scoop of vanilla ice cream for ultra indulgence.
Make Ahead and Storage
Storing Leftovers
Keep leftovers in an airtight container in the refrigerator for up to 4 days. The texture stays lovely and the flavors get even better.
Freezing
Not the best choice for freezing—whipped toppings tend to weep and cakes lose their fluffiness after thawing. If you must, freeze before adding the cherries, then thaw and add the topping fresh.
Reheating
No need to reheat—this dessert is best enjoyed cold, straight from the fridge.
FAQs
-
Can I make Cherries in the Snow Dessert ahead of time?
Absolutely, and it actually tastes even better after chilling for several hours or overnight. The flavors have time to meld and the cream layer sets up beautifully.
-
Can I substitute homemade whipped cream for Cool Whip?
Yes, homemade whipped cream works wonderfully but can be a tad less stable, so plan to serve soon after assembling if you go this route.
-
What if I can’t find angel food cake at the store?
You can use a homemade angel food cake, or as a shortcut, swap in pound cake or even sponge cake. Bear in mind, this will change the texture a bit—but it’s still delicious!
-
Can I use a different type of fruit topping?
Definitely! Blueberry, peach, or even lemon pie filling are tasty alternatives. Choose your favorite, or match the season for a personal twist.
Final Thoughts
Cherries in the Snow Dessert is the answer to those nights when you want something sweet, impressive, and fuss-free. It’s creamy, fruity, and feather-light—everything you love in a dessert with hardly any effort. Don’t hesitate to try it, play with flavors, and share it with friends. There’s nothing like serving up a slice of old-fashioned comfort that brings big smiles and zero stress!
Print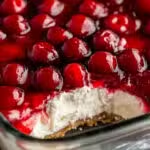
Cherries in the Snow Dessert Recipe
- Prep Time: 20 minutes
- Cook Time: 0 minutes
- Total Time: 20 minutes
- Yield: 15 servings
- Category: Desserts
- Method: No-cook
- Cuisine: American
- Diet: Vegetarian
Description
Cherries in the Snow Dessert is a light and fluffy no-bake treat featuring layers of creamy whipped mixture, angel food cake, and sweet cherry pie filling. Perfect for gatherings and holiday celebrations, this easy dessert comes together quickly and delivers a delicious combination of flavors and textures.
Ingredients
Creamy Whipped Mixture
- 8 ounces cream cheese, room temperature
- 1/2 cup powdered sugar
- 1/2 cup 2% milk, divided
- 12 ounces Cool Whip whipped topping, thawed
Cake Layer
- 1 (9-inch) pre-baked angel food cake
Topping
- 2 cans (21 ounces each) cherry pie filling
Instructions
- Cream the Cheese Mixture: In a large bowl, use a hand mixer to whip the cream cheese and powdered sugar together until creamy and smooth. Add in 1/4 cup of the milk, mixing until incorporated, then add the remaining 1/4 cup milk and mix again until smooth.
- Fold in Whipped Topping: Gently fold the thawed Cool Whip into the cream cheese mixture, ensuring an even, airy consistency throughout the mixture.
- Add Angel Food Cake: Break the angel food cake into small bite-sized pieces. Add the cake pieces into the creamy mixture, folding gently to coat all the cake with the whipped mixture.
- Assemble the Dessert: Spoon the cake and cream mixture into a 9×13-inch glass baking pan. Spread it evenly to create a uniform layer.
- Add the Cherry Topping: Evenly spread the cherry pie filling over the top of the cake mixture.
- Chill and Serve: Cover the dessert and refrigerate until ready to serve. Chilling allows the flavors to meld and gives the dessert its classic texture.
Notes
- Store leftovers in an airtight container in the refrigerator for up to 4 days.
- Nutrition values may vary based on brands; calories are estimated per slice based on 15 servings per pan.
- Let the dessert chill for optimal flavor and texture; best served cold.
- For best results, use room temperature cream cheese to avoid lumps.
Nutrition
- Serving Size: 1 slice (1/15th of pan)
- Calories: 230
- Sugar: 26g
- Sodium: 170mg
- Fat: 7g
- Saturated Fat: 5g
- Unsaturated Fat: 2g
- Trans Fat: 0g
- Carbohydrates: 37g
- Fiber: 1g
- Protein: 3g
- Cholesterol: 15mg


