
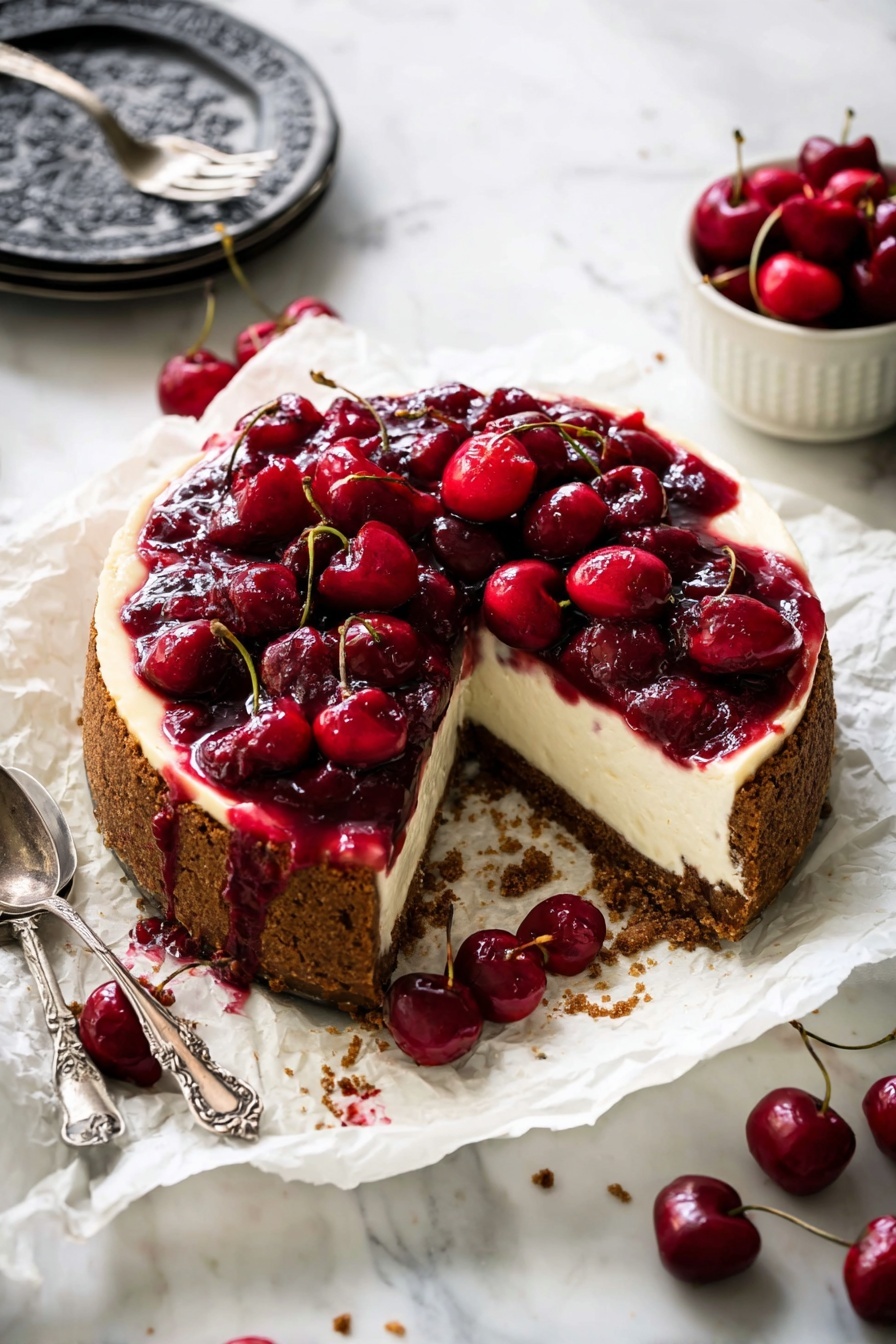
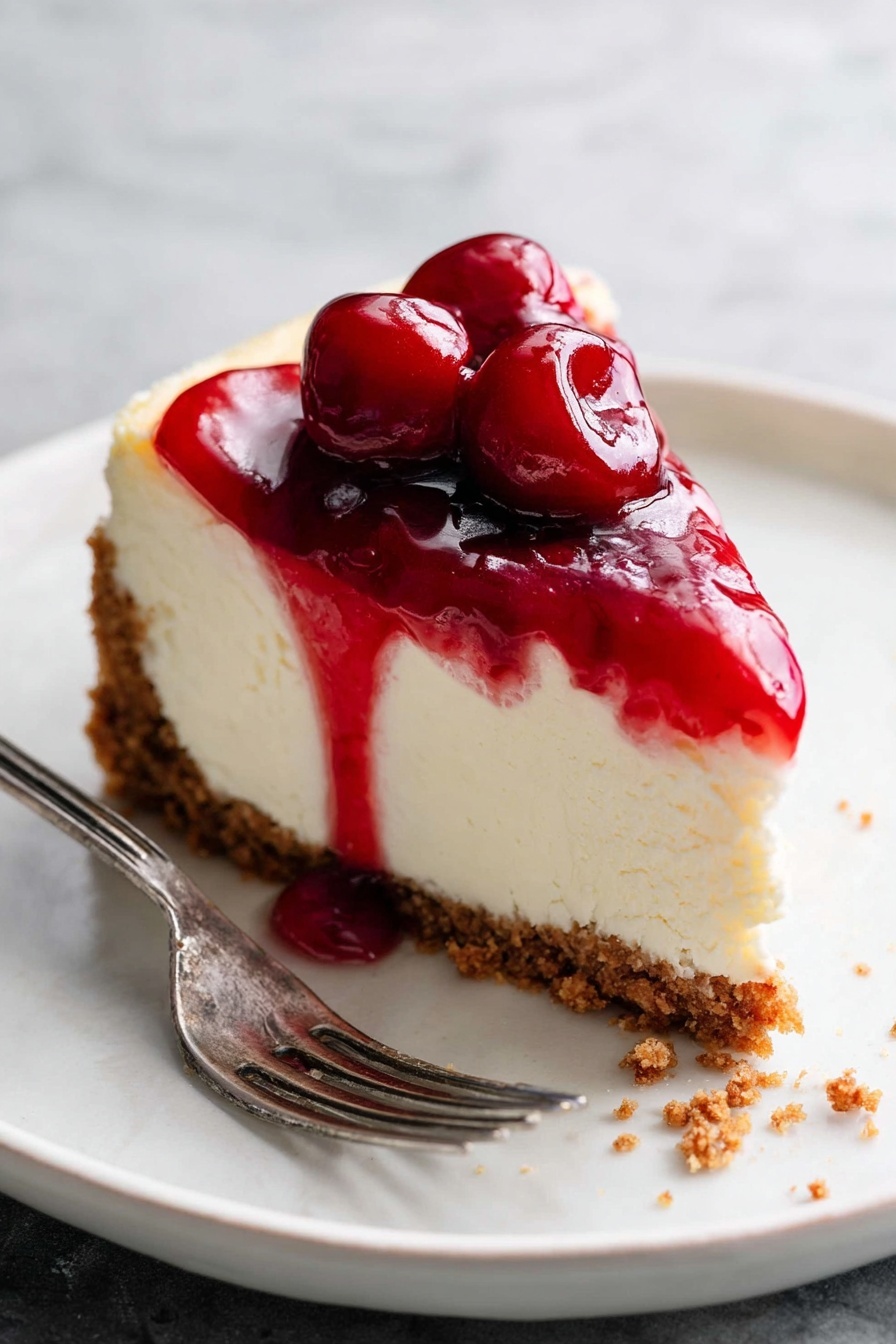
If you’re looking for a dessert recipe that’ll impress your guests and still feel totally doable, let me introduce you to my Cherry Biscoff Cheesecake Recipe. This creamy cheesecake, nestled in a crunchy Biscoff cookie crust and topped with a luscious homemade cherry topping, is pure magic on a plate. Trust me, once you try this, it’s going to become your new favorite way to enjoy cheesecake!
Why You’ll Love This Recipe
- Irresistible Flavor Combo: The spiced Biscoff crust paired with tangy cherries and rich cheesecake is unforgettable.
- Simple Yet Elegant: Even if cheesecake feels intimidating, this recipe breaks it down so you nail it every time.
- Made From Scratch Cherry Topping: The fresh cherry sauce is a game changer—no jarred preserves here!
- Perfect for Any Occasion: Whether it’s a weeknight treat or party dessert, this cheesecake stands out.

Ingredients You’ll Need
Let me tell you, the ingredients for this Cherry Biscoff Cheesecake Recipe come together beautifully. You’ll find every element plays a vital role—from the buttery, spiced crust to the silky cream cheese filling and vibrant cherry topping. Here are my go-to tips for picking the best components.
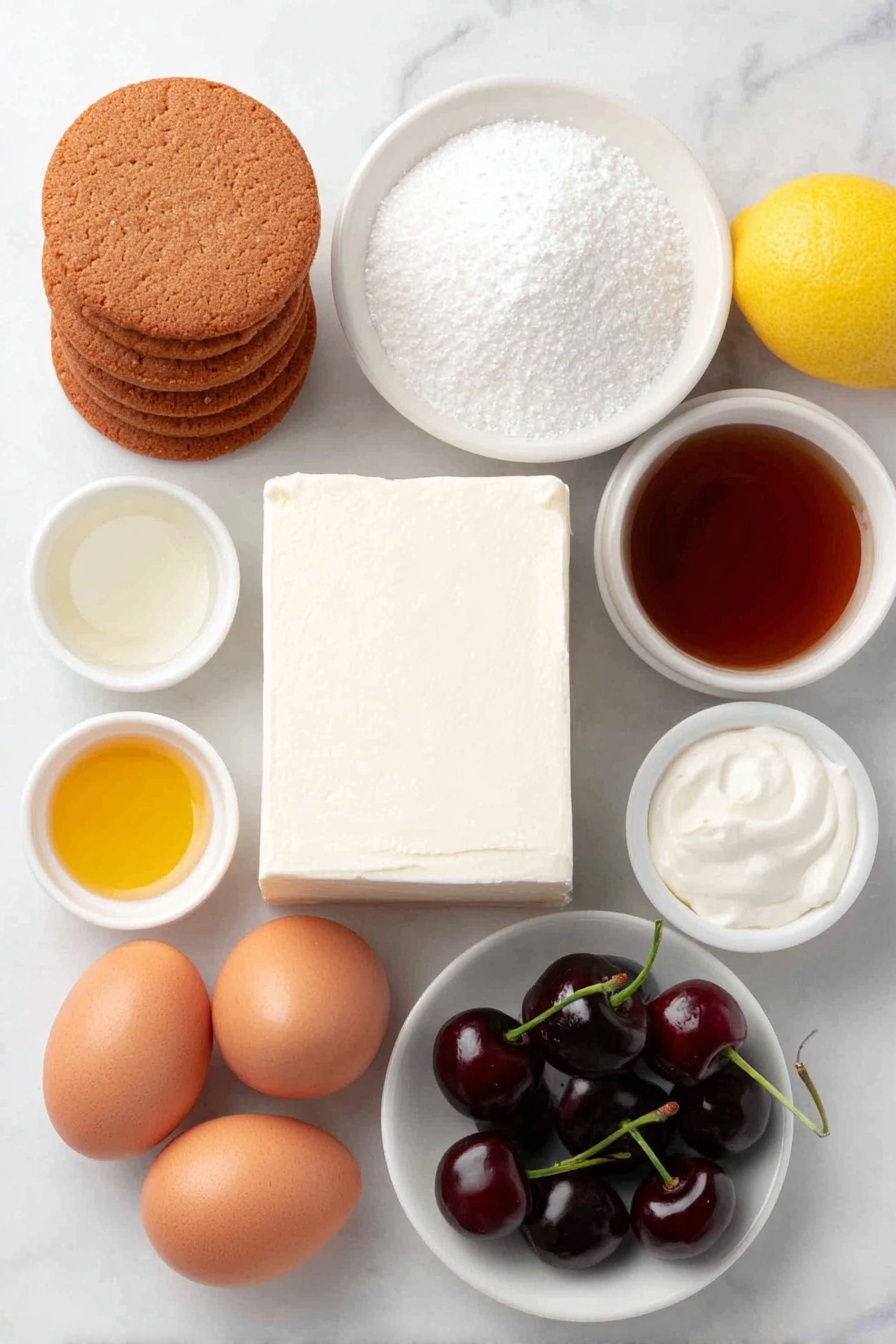
- Biscoff Cookies: These bring a warm caramel flavor with just the right crunch—look for crispy, fresh cookies for the best crust.
- Granulated Sugar: Used both in crust and filling, it balances the richness perfectly; make sure it’s fresh and dry.
- Salted Butter: Melted butter helps bind the crust and adds that rich mouthfeel—don’t skip the butter!
- Cream Cheese: Key to that creamy texture; soften it at room temp for smooth mixing and no lumps.
- Sour Cream: Adds tang and moistness; using it at room temperature helps the filling blend flawlessly.
- Pure Vanilla Extract: Boosts flavor depth—always opt for pure vanilla for the best aroma.
- Fine Sea Salt: Just a pinch enhances all the other flavors; it’s a small but mighty ingredient.
- Large Eggs: Bring structure; make sure they’re room temp to combine evenly and avoid cracking your cheesecake.
- Fresh Black Cherries: The star of the topping—choose ripe, juicy cherries for vibrant color and sweet-tart brightness.
- Lemon: Both zest and juice brighten the homemade cherry topping, cutting richness with a fresh tang.
- Cornstarch: Helps thicken the cherry topping to a perfect jam-like consistency without added pectin.
Variations
I love how flexible this Cherry Biscoff Cheesecake Recipe is—once you’ve got the base down, feel free to swap or add ingredients to suit your mood or occasion. Here are a few of my favorite tweaks.
- Swap Berries: I sometimes replace cherries with fresh raspberries or blueberries for a different fruity twist—just adjust sugar to taste.
- Dairy-Free Version: Use dairy-free cream cheese and vegan butter for a tasty alternative that doesn’t skimp on creaminess.
- Spice It Up: Add a pinch of cinnamon or cardamom to the crust mix for an extra layer of warmth, especially lovely in fall.
- Mini Cheesecakes: Make this recipe in muffin tins with liners for adorable individual servings, great for parties or gifts.
How to Make Cherry Biscoff Cheesecake Recipe
Step 1: Prepare the Biscoff Crust
Start by crushing your Biscoff cookies finely—either in a food processor or by placing them in a zip-top bag and pounding with a rolling pin. Mix the crumbs with the melted salted butter and a bit of sugar until everything looks evenly moistened. Press this mixture firmly into the bottom of a springform pan to form an even crust. I find using the bottom of a glass or measuring cup helps get that crisp, flat crust that holds up well. Pop this in the fridge while you work on the filling; chilling the crust helps prevent sogginess later on.
Step 2: Make the Creamy Cheesecake Filling
Next up: the filling. Beat your softened cream cheese until fluffy and smooth—this step is key to avoid lumps in your cheesecake. Gradually add sugar, then mix in the sour cream, vanilla extract, and salt. Incorporate the eggs one at a time, beating just until combined after each addition; overmixing can lead to cracks during baking. Pour the filling over the chilled crust and smooth the top with a spatula. I like to tap the pan gently on the counter to release any trapped air bubbles.
Step 3: Bake and Cool the Cheesecake
Bake your cheesecake at a moderate temperature, around 325°F (163°C), for about 60 minutes. The edges should look set but the center will have a slight jiggle—that’s perfect! Avoid opening the oven door too often as this can cause cracking. Once baked, turn off the oven and leave the cheesecake inside with the door slightly open for about an hour; this gentle cooling helps prevent the top from cracking. After that, chill it in the fridge for at least four hours, or preferably overnight, so it fully sets.
Step 4: Cook the Fresh Cherry Topping
While your cheesecake chills, prepare the cherry topping. Combine fresh pitted cherries, sugar, lemon juice and zest, and cornstarch in a saucepan. Cook over medium heat, stirring frequently until the mixture thickens and becomes glossy. The cornstarch is a secret weapon—it gives you a perfectly shiny topping that isn’t too runny. Let it cool completely before spooning it generously over your cheesecake.
Pro Tips for Making Cherry Biscoff Cheesecake Recipe
- Use Room Temperature Ingredients: It’s a game changer for smooth mixing and helps prevent lumps in your filling.
- Don’t Overbeat: Overmixing eggs can cause cracks—beat just until combined, especially after adding the eggs.
- Chill Crust Thoroughly: Popping your crust in the fridge before filling keeps it crisp and sturdy.
- Slow Cooling: Cooling cheesecake gradually inside the warm oven stopped my top from cracking multiple times.
How to Serve Cherry Biscoff Cheesecake Recipe
Garnishes
I’m a big fan of keeping it simple yet elegant—fresh whole cherries or a light dusting of powdered sugar over the cherry topping really enhances the look without overwhelming the flavors. Sometimes, I add a little dollop of whipped cream for extra creaminess or a sprinkle of crushed Biscoff cookies for texture contrast. These little touches make a big difference when presenting.
Side Dishes
This cheesecake stands beautifully on its own, but if you want to add a side, I like serving it with a small scoop of vanilla bean ice cream or a cup of freshly brewed coffee. For a brunch dessert, it pairs well with fresh fruit salad or light yogurt parfaits to balance the richness.
Creative Ways to Present
For special occasions, I’ve decorated this cheesecake with edible flowers and a drizzle of melted Biscoff spread to amp up the caramel notes. Another fun idea is to make mini cheesecakes in cute jars or ramekins topped with individual cherry compote servings—these always wow my guests!
Make Ahead and Storage
Storing Leftovers
I usually store leftover cheesecake covered tightly with plastic wrap or in an airtight container in the fridge. It keeps beautifully for up to 4 days without drying out. I’ve found that the flavors deepen and meld the next day, so leftovers are just as good—if not better!
Freezing
Freezing cheesecake can be tricky, but I wrap slices individually in plastic wrap and then foil to prevent freezer burn. Thaw overnight in the fridge before serving. The texture stays creamy and the cherry topping holds up surprisingly well, which means you can make this ahead for stress-free entertaining.
Reheating
I recommend enjoying this cheesecake chilled. If you want to serve it slightly warmer, let slices sit at room temperature for about 20 minutes before eating—it brings out the flavors without melting the topping.
FAQs
-
Can I use frozen cherries for the cherry topping?
Yes, frozen cherries work well when fresh aren’t available. Just thaw and drain excess juice before cooking the topping to avoid it becoming too watery.
-
How do I prevent my cheesecake from cracking?
Use room temperature eggs, don’t overmix the batter, and cool the cheesecake slowly by leaving it in the turned-off oven with the door ajar after baking. Also, avoid opening the oven during baking.
-
Can I substitute regular sugar with a sugar alternative?
You can swap granulated sugar for a granulated sugar substitute, but this may slightly affect texture and sweetness. I recommend trying it first with a small batch if you need a sugar-free option.
-
What pan size works best for this Cherry Biscoff Cheesecake Recipe?
A 9-inch springform pan is ideal to get the perfect thickness, but you can adjust baking time if using a different size—just keep an eye on the center for doneness.
Final Thoughts
This Cherry Biscoff Cheesecake Recipe has become my go-to dessert for celebrations and quiet nights alike. I absolutely love how the spiced crust pairs with the creamy filling and fresh cherry topping—it’s like a party in every bite. If you’re looking for a show-stopping, yet approachable cheesecake recipe, you’ll enjoy making this in your kitchen as much as your friends and family enjoy eating it. I can’t wait for you to try it and hear what you think!
Print
Cherry Biscoff Cheesecake Recipe
- Prep Time: 25 minutes
- Cook Time: 60 minutes
- Total Time: 7 hours 25 minutes (includes cooling and chilling time)
- Yield: 16 servings
- Category: Dessert
- Method: Baking
- Cuisine: American
Description
This Cherry Cheesecake features a rich and creamy vanilla cheesecake baked atop a crunchy biscoff cookie crust, finished with a luscious homemade sweet cherry topping made from fresh black cherries, sugar, lemon, and cornstarch. Perfectly balanced between sweet and tangy, this cheesecake is a delightful dessert ideal for special occasions or whenever you crave a decadent treat.
Ingredients
Crust
- 248 grams biscoff cookies (1 pack)
- 25 grams granulated sugar
- 113 grams salted butter, melted
Cheesecake Filling
- 681 grams cream cheese, softened
- 200 grams granulated sugar
- 170 grams sour cream, room temperature
- 1 tablespoon pure vanilla extract
- 1/4 teaspoon fine sea salt
- 3 large eggs, room temperature
Cherry Topping
- 1/2 lb fresh black cherries
- 25 grams granulated sugar
- 1 large lemon, juiced
- 5 grams cornstarch
Instructions
- Prepare the crust: Crush biscoff cookies finely and mix them with 25 grams of granulated sugar and melted salted butter until evenly combined. Press this mixture firmly into the base of a springform pan to create an even crust layer. Refrigerate to set while preparing the filling.
- Make the cheesecake filling: In a large mixing bowl, beat softened cream cheese until smooth. Gradually add 200 grams sugar, and mix well. Incorporate sour cream, vanilla extract, and sea salt, mixing until well combined. Add eggs one at a time, stirring gently after each addition until the mixture is smooth and creamy.
- Bake the cheesecake: Pour the filling over the prepared crust in the springform pan. Smooth the top with a spatula for an even surface. Bake in a preheated oven at 325°F (163°C) for about 60 minutes, or until the center is set but still slightly jiggly. Turn off the oven and leave the cheesecake inside with the door ajar for 1 hour to prevent cracking. Then remove and cool completely at room temperature.
- Prepare the cherry topping: While the cheesecake cools, pit and halve the fresh black cherries. In a saucepan, combine cherries, 25 grams sugar, lemon juice, and cornstarch. Cook over medium heat, stirring frequently, until the mixture thickens and becomes glossy, approximately 5-7 minutes. Let the topping cool.
- Assemble the cheesecake: Once the cheesecake is completely cooled, spread the cherry topping evenly over the surface. Refrigerate the cheesecake for at least 4 hours, preferably overnight, to fully set and develop flavors before serving.
- Serve: Release the cheesecake from the springform pan, slice into 16 pieces, and serve chilled. Enjoy the rich creamy texture combined with the sweet and tangy cherry topping.
Notes
- This cheesecake can be adapted to different pan sizes by adjusting ingredient quantities proportionally.
- Use room temperature ingredients for best mixing and texture results.
- Allow cheesecake to chill thoroughly before slicing to avoid cracking.
- The cherry topping can be made with frozen cherries if fresh are unavailable; just adjust cooking time slightly.
Nutrition
- Serving Size: 1 slice (approximately 125 grams)
- Calories: 234 kcal
- Sugar: 16 g
- Sodium: 475 mg
- Fat: 11 g
- Saturated Fat: 6 g
- Unsaturated Fat: 4 g
- Trans Fat: 0.2 g
- Carbohydrates: 26 g
- Fiber: 1 g
- Protein: 9 g
- Cholesterol: 57 mg


