

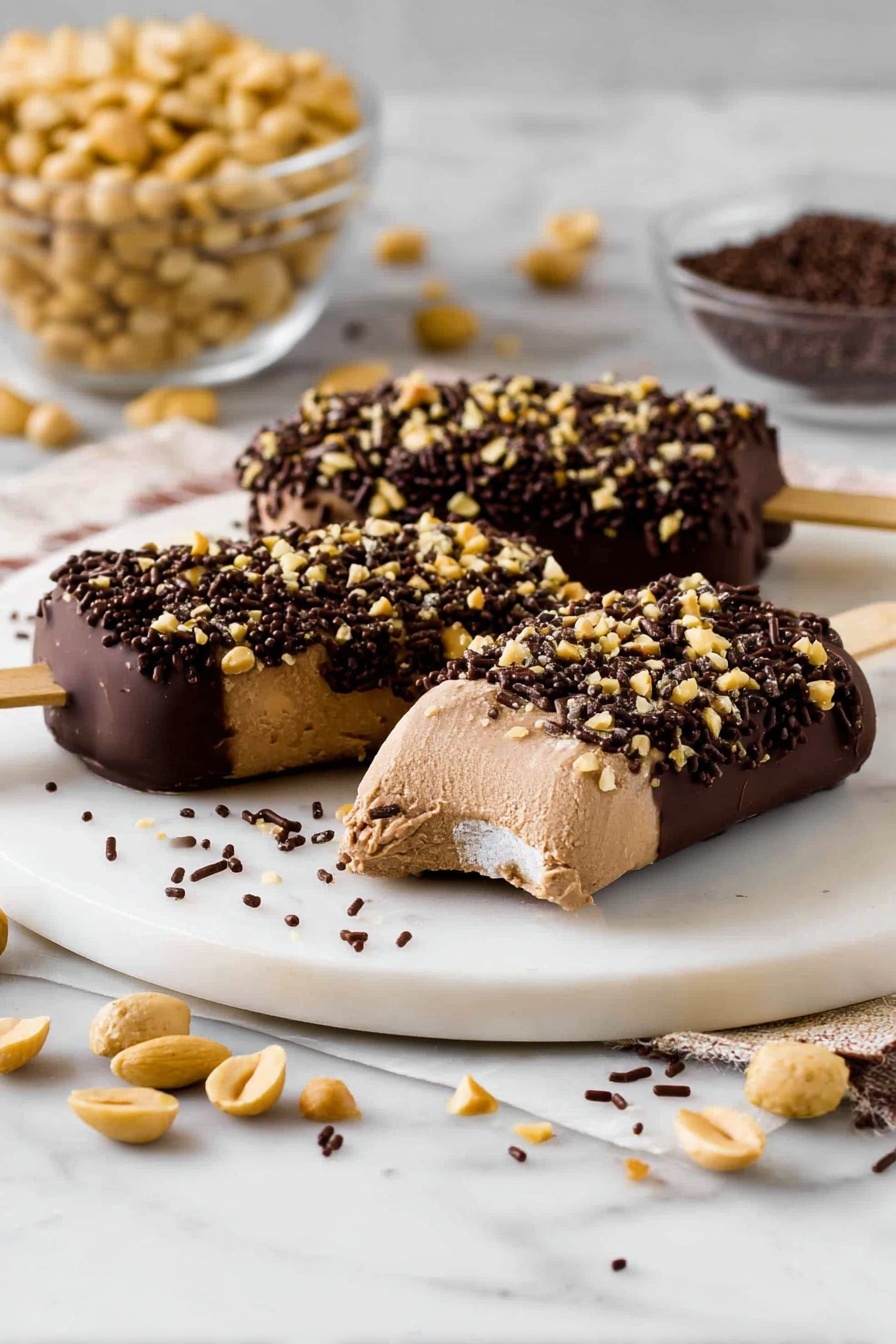
If you’re looking for a deliciously creamy but surprisingly wholesome treat, you’re going to want to try this Chocolate Peanut Butter Cottage Cheese Ice Cream Bars Recipe. I absolutely love how this comes together with simple ingredients that blend into a rich, satisfying dessert you can feel good about eating. Trust me, once you try these bars, they’ll become your new favorite snack or dessert, especially when you want something chocolatey but better than your usual ice cream. Stick with me, and I’ll walk you through every step to make sure yours turn out perfect.
Why You’ll Love This Recipe
- High Protein & Creamy: Thanks to the cottage cheese, you get creaminess and extra protein in every bar.
- Simple Ingredients: You probably have most of these staples in your kitchen already, making it easy to whip up anytime cravings hit.
- No Ice Cream Maker Needed: Just blending, freezing, and a quick chocolate dip, so no special equipment required.
- Perfect Balance of Flavors: The peanut butter and chocolate duo is classic, but the slight tang from cottage cheese adds a refreshing twist.

Ingredients You’ll Need
These ingredients work beautifully together to create a treat that’s creamy, nutty, and satisfyingly chocolatey. When shopping, try to pick the freshest cottage cheese you can find, and natural peanut butter without added sugar keeps it wholesome yet delicious.

- Cottage Cheese: I like to use low-fat or regular, just make sure it’s smooth for easier blending.
- Maple Syrup: This adds natural sweetness and pairs perfectly with peanut butter; you can swap with honey if you prefer.
- Vanilla Extract: A little flavour booster that rounds out the sweetness and chocolate.
- Salt: Just a tiny dash to heighten all the flavors without being salty.
- Natural Peanut Butter: Go for creamy and unsweetened to keep the texture smooth and the flavors balanced.
- Cocoa Powder: Use unsweetened for that deep, rich chocolate taste.
- Peanuts (Chopped): Adds a lovely crunch and extra peanut punch to the coating.
- Chocolate Sprinkles: For a fun, festive touch on the outside coating.
- Chocolate Chips: I prefer Hu No Added Sugar Chocolate Chips since they melt smoothly and keep it guilt-free.
Variations
I love playing around with this Chocolate Peanut Butter Cottage Cheese Ice Cream Bars Recipe depending on what’s in my pantry or my mood. Feel free to make it your own — swapping nuts, adding flavors, or adjusting sweetness is easy and fun!
- Add Fresh Fruit: Sometimes I throw in mashed banana or berries for extra natural sweetness and fruity bursts.
- Nut Butters Swap: Tried almond butter once, and it gave a lovely twist—totally worth experimenting if peanut butter isn’t your fave.
- Dairy-Free Version: Use a plant-based cottage cheese alternative and dairy-free chocolate chips to make it vegan-friendly.
- Spice it Up: A pinch of cinnamon or chili powder in the cocoa mix adds warmth and unexpected depth.
How to Make Chocolate Peanut Butter Cottage Cheese Ice Cream Bars Recipe
Step 1: Blend the Creamy Base
Start by combining the cottage cheese, cocoa powder, maple syrup, vanilla, and salt in a blender or Nutribullet cup. Blend until you get a completely smooth and creamy mixture with no lumps—this part is key for that perfect ice cream texture. I use my immersion blender sometimes, and it works just as well. The cottage cheese might seem unusual here, but once blended, you’ll hardly notice—just enjoy the creamy, rich base!
Step 2: Freeze in Molds
Pour the mixture into your favorite popsicle molds — I highly recommend silicone molds because they’re easy to fill and even easier to pop the bars out when frozen. Insert the sticks and cover with the silicone lid if available. Then, place them in the freezer for about 3 to 4 hours, or until they’re completely firm. I learned that patience is your friend here—the bars are best set solid so they dip nicely later.
Step 3: Prepare the Chocolate Dip
While the bars are freezing, melt your chocolate chips (with a little coconut oil if you like) in a microwave-safe bowl. I nuke mine for 30 seconds, stir, then repeat for another 30 seconds until silky smooth. Using high-quality chocolate like Hu No Sugar Added Chocolate Chips means the dip sets just right and tastes insanely good with all that peanut butter flavor.
Step 4: Dip and Coat the Bars
Once your bars are fully frozen, dip each one quickly into the melted chocolate, tilting to let excess drip off. Then, immediately roll them on plates filled with chopped peanuts and chocolate sprinkles to coat before the chocolate hardens. Set them on parchment paper to finish setting. This coating step adds the perfect crunchy shell that contrasts beautifully with the creamy center.
Pro Tips for Making Chocolate Peanut Butter Cottage Cheese Ice Cream Bars Recipe
- Blend Thoroughly: I discovered that blending until ultra-smooth eliminates any cottage cheese lumps, giving that classic ice cream feel.
- Freeze Long Enough: Let the bars freeze fully for 3-4 hours; dipping too early means the chocolate won’t harden properly.
- Work Quickly When Dipping: Chocolate sets fast, so have your nuts and sprinkles ready to coat immediately after dipping.
- Thaw Slightly Before Enjoying: If your bars get icy in the freezer, let them sit for 5-10 minutes before eating to soften into creamy perfection.
How to Serve Chocolate Peanut Butter Cottage Cheese Ice Cream Bars Recipe
Garnishes
I like to keep it simple with a sprinkle of extra crushed peanuts or a light dusting of cocoa powder for a fancy touch. Sometimes I add a drizzle of peanut butter or even a few sea salt flakes on top right after dipping—it brings all the flavors alive and makes them look extra tempting.
Side Dishes
These bars are pretty satisfying on their own, but I love serving them alongside fresh fruit like sliced strawberries or banana for a refreshing balance. Pairing with a light green salad or even a cup of black coffee can turn it into a fun dessert break.
Creative Ways to Present
For parties, I’ve dipped these bars in colored sprinkles or crushed freeze-dried berries for a festive look. You can place them upright in a fancy glass jar with some mint leaves for a cute display, or arrange them on a wooden board with assorted nuts and chocolates to wow your guests visually and tastefully.
Make Ahead and Storage
Storing Leftovers
I usually store any leftover bars in an airtight container lined with parchment to prevent sticking. Keep them in the freezer for up to a week, and be sure to separate layers with wax paper so they don’t clump together.
Freezing
Freezing these bars works great—you can prepare the base in advance and dip them right before serving if you want super fresh chocolate coating. Just keep the bars frozen solid until your dipping session for the best crisp shell.
Reheating
Since these are frozen treats, you won’t be reheating per se, but if they get too hard in the freezer, just let them sit out at room temperature for a few minutes to soften. Avoid microwaving or heating as it can melt the chocolate unevenly and affect texture.
FAQs
-
Can I use regular peanut butter instead of natural?
You can, but I recommend natural peanut butter because it’s less sweet and doesn’t contain added oils or sugars, giving your bars a cleaner, more authentic peanut flavor and smoother blending.
-
What if I don’t have popsicle molds?
No worries! You can pour the mixture into a shallow dish and freeze, then scoop or slice into bars—though they won’t have sticks, the taste will be just as amazing.
-
Can I make this recipe vegan?
Yes, by substituting cottage cheese with a vegan-friendly alternative like blended silken tofu or a plant-based yogurt, plus using dairy-free chocolate chips, you can enjoy a vegan version of these bars.
-
What’s the best way to prevent the bars from becoming icy?
Letting the bars thaw for 5-10 minutes before eating softens them to a creamy texture. Also, blending the base thoroughly helps reduce ice crystals during freezing.
-
How long can I store these bars in the freezer?
I recommend enjoying them within a week for optimal taste and texture. Beyond that, they can get icy or lose some flavor, though still safe to eat.
Final Thoughts
I can’t recommend this Chocolate Peanut Butter Cottage Cheese Ice Cream Bars Recipe enough if you’re craving something chocolatey with a wholesome twist. It’s become a favorite in my household because it’s easy, delicious, and guilt-free enough to enjoy anytime. Plus, experimenting with the chocolate coating and toppings always adds a bit of fun. Give this recipe a try—you’ll be amazed at how creamy and indulgent it feels, but with a protein-packed secret hiding inside!
Print
Chocolate Peanut Butter Cottage Cheese Ice Cream Bars Recipe
- Prep Time: 10 min
- Cook Time: 0 min
- Total Time: 4 hr 10 min
- Yield: 4 bars
- Category: Dessert
- Method: Freezing
- Cuisine: American
- Diet: Low Fat
Description
Delight in these creamy and delicious Chocolate Peanut Butter Cottage Cheese Ice Cream Bars that blend smooth cottage cheese, peanut butter, and maple syrup. These no-ice-cream-maker treats are frozen to perfection, then dipped in a rich chocolate coating sprinkled with crunchy peanuts and chocolate sprinkles for a satisfying texture and flavor combination.
Ingredients
Main Ingredients
- 1-1/4 cup cottage cheese (any variety)
- 2 tablespoons maple syrup (or honey)
- 1 teaspoon vanilla extract
- Dash of salt
- 1 tablespoon natural peanut butter
- 1 tablespoon cocoa powder
Toppings and Coating
- 2 tablespoons peanuts (chopped)
- 1 tablespoon chocolate sprinkles
- 1/2 cup chocolate chips (Hu No Added Sugar recommended)
- 1 teaspoon coconut oil (for melting chocolate)
Instructions
- Blend Ingredients: Combine the cottage cheese, cocoa powder, maple syrup, vanilla extract, peanut butter, and dash of salt in a blender or Nutribullet cup. Blend the mixture until it becomes smooth and creamy, ensuring all ingredients are fully incorporated.
- Freeze Ice Cream Bars: Pour the blended mixture into silicone popsicle molds. Insert popsicle sticks and cover with silicone lids. Freeze for 3-4 hours or until the bars are fully set.
- Prepare Chocolate Coating: In a microwave-safe bowl, combine the chocolate chips and coconut oil. Heat in the microwave for 30 seconds, stir gently, then microwave for another 30 seconds until smooth and melted.
- Dip and Decorate: Once the bars are frozen, dip each popsicle into the melted chocolate, letting excess drip off. Quickly roll or sprinkle with chopped peanuts and chocolate sprinkles before the chocolate sets. Place the coated bars on parchment paper to harden.
- Serve or Store: Enjoy immediately for a slightly soft texture or return to the freezer for later enjoyment. Allow bars to thaw 5-10 minutes before serving for a creamier consistency.
Notes
- No ice cream maker required, making this recipe incredibly simple.
- Silicone popsicle molds are recommended for easy removal.
- These bars can become icy if stored in the freezer for too long; thaw slightly before serving.
- Hu No Sugar Added Chocolate Chips are a preferred choice for the coating.
- Adjust sweetness by varying the amount of maple syrup or honey.
Nutrition
- Serving Size: 1 bar
- Calories: 300 kcal
- Sugar: 18 g
- Sodium: 209 mg
- Fat: 16 g
- Saturated Fat: 8 g
- Unsaturated Fat: 3 g
- Trans Fat: 0 g
- Carbohydrates: 13 g
- Fiber: 5 g
- Protein: 11 g
- Cholesterol: 11 mg


