

If you’re looking for a unique dessert that’s creamy, tangy, and unexpectedly delightful, I absolutely love sharing this Cottage Cheese Ice Cream Recipe with you. It’s one of those treats that surprises everyone who tries it, including me when I first made it! Creamy cottage cheese lends a fresh, rich texture that’s lighter than traditional ice cream but still incredibly satisfying. Stick with me, and I’ll walk you through exactly how to get this refreshing dessert just right at home.
Why You’ll Love This Recipe
- Creamy yet light: Cottage cheese creates a smooth texture that’s lower in fat than traditional ice cream.
- Easy to customize: You can add fruits, spices, or sweeteners to fit your cravings perfectly.
- Protein-packed treat: Unlike typical ice cream, this has some good protein from the cottage cheese.
- No fancy tools required: You don’t need an ice cream maker — just a blender and your freezer will do!

Ingredients You’ll Need
To make a divine batch of cottage cheese ice cream, you want simple, fresh ingredients that blend seamlessly. And trust me, once you have these basics, you can start experimenting to find your favorite flavor combo.
- Cottage Cheese: Opt for full-fat or 2% for the creamiest texture — fresh and plain is key!
- Sweetener (honey, maple syrup, or sugar): Choose your favorite; I love honey for its natural floral notes.
- Vanilla Extract: This adds that cozy, comforting background flavor that brings everything together.
- Heavy Cream or Milk: You can use dairy or plant-based milk depending on your preference — this helps smooth out the texture.
- Optional Mix-ins: Fresh berries, cocoa powder, or even a dash of cinnamon for a flavor twist.
Variations
One of the reasons I adore this Cottage Cheese Ice Cream Recipe is how easy it is to personalize. Whether you’re into fruity, nutty, or even a bit spicy, there’s room to customize and make it your own.
- Berry Burst: I like to blend in fresh strawberries or blueberries—adds a nice tartness that livens up the creaminess.
- Chocolate Swirl: Adding cocoa powder and a handful of mini chocolate chips made my family go crazy!
- Vegan Twist: Swap dairy milk and cream for coconut or almond milk, and use maple syrup to keep it vegan-friendly.
- Spiced Delight: A pinch of cinnamon or nutmeg gives a cozy warmth that’s especially nice in fall.
How to Make Cottage Cheese Ice Cream Recipe
Step 1: Blend It Smooth
Start by adding your cottage cheese, sweetener, vanilla extract, and cream or milk into a high-speed blender. I discovered that blitzing until completely smooth makes all the difference between grainy and silky. If it feels thick, add a splash more milk to loosen it up—but don’t overdo it; you want a creamy, not liquid, base.
Step 2: Chill Before Freezing
Pour the blended mix into a shallow, freezer-safe container. Cover it tightly and pop it in the fridge for about an hour before freezing. This helps the mixture cool evenly and speeds up the freezing process, which means less ice crystals—and a better texture!
Step 3: Freeze and Stir
Freeze your mixture for 2 to 3 hours, stirring every 30 minutes. This manual stirring is the secret I learned that mimics the churning of an ice cream maker and keeps your ice cream soft and creamy instead of icy and hard.
Step 4: Ready to Serve
Once the ice cream is firm but scoopable, it’s ready. Serve immediately for that perfect creamy chill or let it sit a few minutes at room temp if it’s frozen too solid to scoop.
Pro Tips for Making Cottage Cheese Ice Cream Recipe
- Use Full-Fat Cottage Cheese: I learned that low-fat versions turn out less creamy, so always pick full-fat for the smoothest texture.
- Sweeten to Taste: Sweetness can vary by personal preference and cottage cheese brand, so taste before freezing and adjust.
- Manual Churning Makes a Difference: Stir the mixture every 30 minutes while freezing to avoid icy chunks and achieve that soft-serve consistency.
- Don’t Skip the Chill: Letting the base chill in the fridge before freezing creates a smoother end result and prevents freezer burn.
How to Serve Cottage Cheese Ice Cream Recipe
Garnishes
I love topping this ice cream with fresh berries or a drizzle of honey for added sweetness and texture. Toasted nuts like sliced almonds or pistachios add a nice crunch, too. If you’re feeling indulgent, a dollop of berry compote takes it to the next level.
Side Dishes
This ice cream pairs surprisingly well with a warm slice of coffee cake or pound cake. I also enjoy it alongside fresh fruit salad to keep things light and refreshing.
Creative Ways to Present
For parties, I’ve served cottage cheese ice cream in hollowed-out fruit bowls like melon halves or pineapple boats—instantly festive and fun! You can also pipe it into mini tart shells and sprinkle with toasted coconut for a fancy bite-sized dessert.
Make Ahead and Storage
Storing Leftovers
I keep leftover ice cream in an airtight container to prevent freezer burn and always label it with the date. It stays fresh in the freezer for about a week before texture starts to degrade.
Freezing
This recipe freezes beautifully because of the cottage cheese base, but be mindful that the texture can get slightly icy if left longer than a week. I’ve found that frequent stirring during the first few hours of freezing really helps maintain the creamy quality.
Reheating
Since this is ice cream, you won’t want to reheat it. Instead, remove it from the freezer about 10 minutes before serving to soften slightly. This way, it’s perfect for scooping without losing that refreshing chill.
FAQs
-
Can I make Cottage Cheese Ice Cream Recipe without an ice cream maker?
Absolutely! One of the best things about this recipe is that you don’t need an ice cream maker. Simply freeze the mixture in a shallow container and stir every 30 minutes to prevent ice crystals, mimicking the churning process.
-
Is this ice cream suitable for a high-protein diet?
Yes! Cottage cheese is naturally high in protein, so this ice cream offers more protein per serving than typical ice creams, making it a great choice for anyone wanting a protein-packed treat.
-
Can I use flavored cottage cheese for this recipe?
I recommend sticking to plain cottage cheese because flavored versions often contain added sugars and ingredients that could affect texture and flavor. Plain cottage cheese gives you a fresh base to customize anyway you want.
-
How long does homemade cottage cheese ice cream last in the freezer?
For best results, enjoy it within 5 to 7 days. Beyond that, ice crystals might develop and texture can become icy or grainy. Keeping it airtight and stirring during freezing helps extend freshness.
Final Thoughts
I’m so glad you stuck around to learn this Cottage Cheese Ice Cream Recipe because it’s truly become a favorite in my kitchen. It’s a wonderful way to enjoy a creamy, homemade ice cream that’s a bit lighter and packed with protein—and I promise once you try it, you’ll look forward to making it over and over. Give it a go, experiment with your favorite flavors, and then let me know how your ice cream adventure turns out. Happy scooping!
Print
Cottage Cheese Ice Cream Recipe
- Prep Time: 5 minutes
- Cook Time: 40 minutes
- Total Time: 45 minutes
- Yield: 4 servings
- Category: Main Course
- Method: Stovetop
- Cuisine: Italian
- Diet: Vegetarian
Description
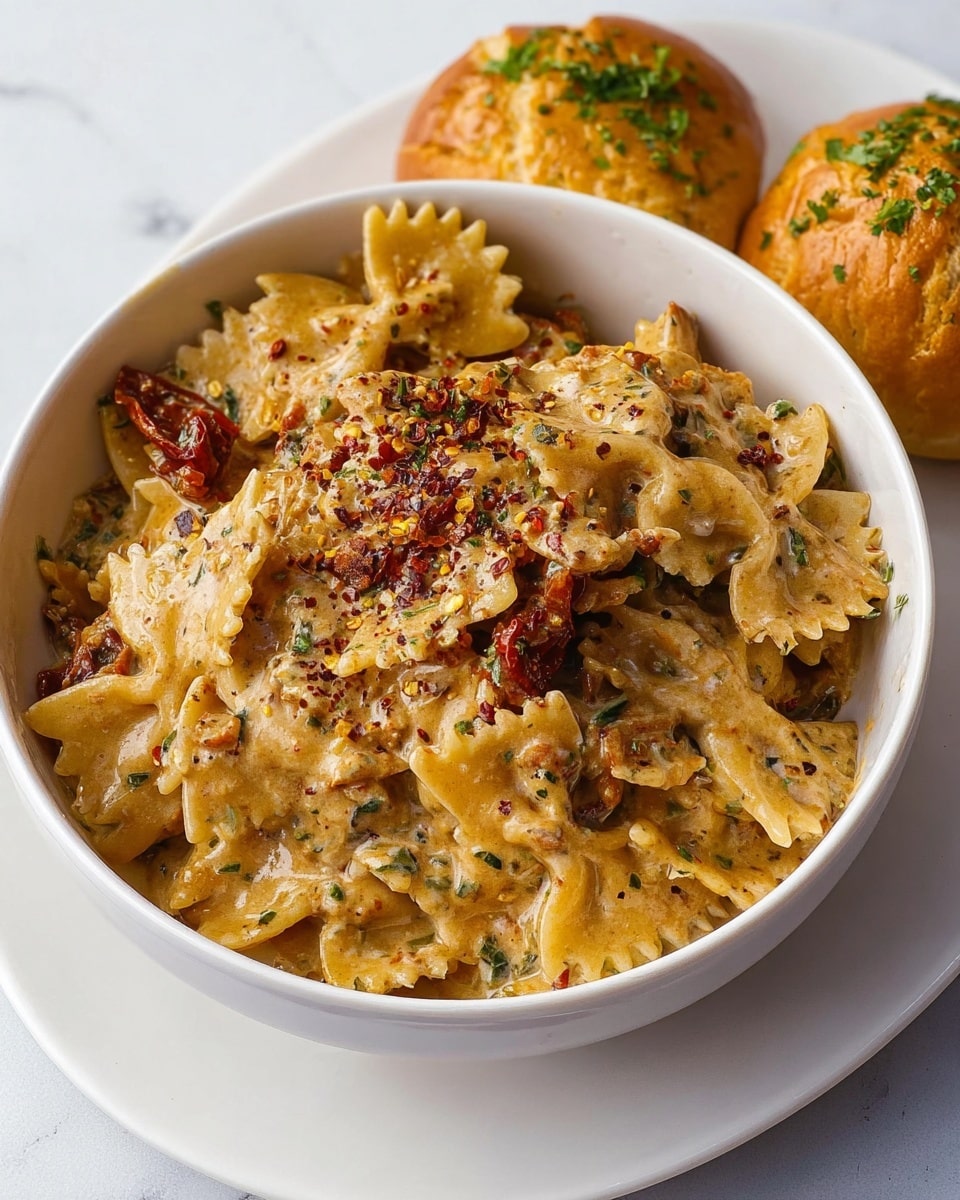
A rich and flavorful Caramelized Onion and Sun-Dried Tomato Pasta featuring sweet caramelized onions, tangy sun-dried tomatoes, fresh thyme, and creamy cashew cream sauce, tossed with farfalle pasta and spinach for a deliciously indulgent yet easy-to-make vegetarian meal.
Ingredients
For the Sauce:
- 1 tbsp olive oil (or water)
- 2 yellow onions (thinly sliced)
- 4 cloves garlic (minced)
- 6 sun-dried tomatoes (chopped)
- 1/2 tsp salt
- 1 tbsp fresh thyme
- 1/2 cup dry white wine
- 1 cup pasta water (reserved from cooking pasta)
- 1/2 cup cashew cream (or vegan cream)
- Salt and pepper (to taste)
For the Pasta:
- 12 oz farfalle pasta
- 1 handful spinach (or fresh basil as alternative)
Instructions
- Prepare the base: Heat olive oil or water in a non-stick pan over medium heat. Add the thinly sliced onions, minced garlic, and 1/2 teaspoon salt. Cook over medium to low heat for about 25 minutes, stirring occasionally until the onions are deeply caramelized and sweet.
- Cook the pasta: While the onions caramelize, bring a large pot of salted water to a boil and cook 12 oz farfalle pasta according to package directions until al dente. Reserve at least 1 1/2 cups of pasta water before draining.
- Deglaze and build the sauce: To the caramelized onions, add fresh thyme, chopped sun-dried tomatoes, and 1/2 cup dry white wine. Stir to deglaze the pan, scraping up any browned bits. Then pour in reserved pasta water and 1/2 cup cashew cream. Stir well until a creamy sauce forms.
- Combine pasta and sauce: Add the cooked pasta to the pan with the sauce, tossing to coat evenly. Add a handful of spinach leaves or fresh basil for freshness and wilt slightly in the heat.
- Season and serve: Taste and season the pasta with additional salt and freshly cracked black pepper as needed. Serve immediately for the best flavor and texture.
Notes
- This pasta dish is indulgent yet simple enough for any home cook.
- Using cashew cream makes this recipe vegan-friendly and adds a luscious texture.
- Sun-dried tomato oil can be used to add extra flavor, substituting for olive oil.
- Spinach can be swapped with fresh basil for a slightly different aromatic finish.
- Be patient caramelizing onions over low heat for the deepest flavor development.
Nutrition
- Serving Size: 1 serving
- Calories: 472.1 kcal
- Sugar: 11.7 g
- Sodium: 497.4 mg
- Fat: 6.6 g
- Saturated Fat: 2.3 g
- Unsaturated Fat: 3.8 g
- Trans Fat: 0 g
- Carbohydrates: 89 g
- Fiber: 2.4 g
- Protein: 15.7 g
- Cholesterol: 0 mg


