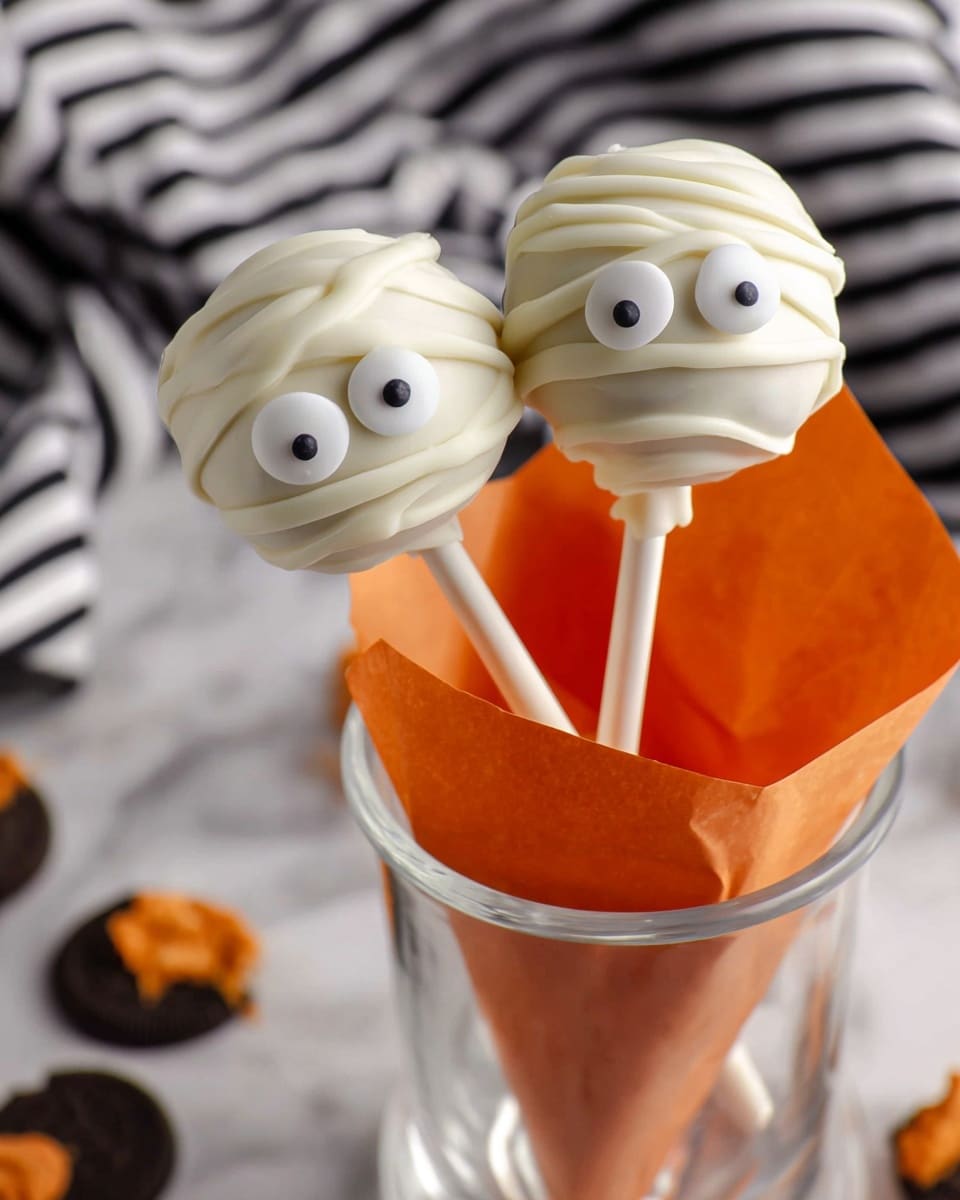
If you’re looking for a spook-tacular treat to impress your friends and family this season, I have just the thing for you. This Halloween Cake Pops Recipe is not only adorable and festive but also surprisingly simple to make. I absolutely love how these colorful bite-sized goodies bring a playful vibe to any party, and trust me, once you try them, you’ll see why they’re my go-to Halloween dessert.
Why You’ll Love This Recipe
- No Baking Required: You’ll save time by using a pre-baked angel food cake as your base.
- Fun and Customizable: You can dye the cake pops in cool Halloween colors easily and decorate however you like.
- Perfect Party Treat: These are easy to eat and share, making them a festive crowd-pleaser.
- Kid-Friendly Activity: Decorating these pops is a blast with the kids—great for crafting memories.
Ingredients You’ll Need
Choosing the right ingredients makes all the difference in this Halloween Cake Pops Recipe. The light angel food cake pairs perfectly with the creamy frosting, while the white chocolate allows you to control the colors and decorations.
- Angel Food Cake: Using a freshly baked or store-bought cake works well—just be sure it’s cooled and easy to crumble.
- Vanilla Frosting: Acts as the binder to hold your cake balls together; I prefer a creamy texture that’s not too sweet.
- Vanilla Extract: Adds a subtle warmth that balances the sweetness perfectly.
- White Chocolate Chips or Melting Chocolate: This is your coating and glue for the sticks—make sure it melts smoothly without burning.
- Food Coloring: Gel colors work best because they won’t thin the chocolate.
- Sprinkles, Crushed Oreos, Candy Eyeballs: For that extra Halloween flair and fun textures.
- Cake Pop Sticks: Essential for making these cute treats easy to hold and dip.
Variations
One of my favorite things about this Halloween Cake Pops Recipe is how easy it is to customize. Whether you want to go classic or think outside the box, the options are endless and really let you get creative.
- Spooky Shapes: I’ve tried shaping the balls into little pumpkins or ghosts by adjusting the rolling technique—kids loved helping!
- Dairy-Free Option: Swap out the white chocolate for dairy-free melts and use dairy-free frosting to suit dietary needs.
- Color Variety: Try adding glittery dusts or edible shimmer on top for a magical touch that impresses.
- Flavor Twist: Adding a bit of pumpkin pie spice or peppermint extract to the mix is a seasonal hit every time.
How to Make Halloween Cake Pops Recipe
Step 1: Crumble the Cake and Mix
Start by taking your baked angel food cake and breaking it down into tiny crumbles with your hands. I always find this part oddly satisfying! Next, add the vanilla frosting and vanilla extract. Use your hands to mix everything well—this way, you can feel when the texture is just right, kind of like a dough but softer. Be careful not to add too much frosting; you want the cake to stick together but not become gloopy.
Step 2: Add Color and Chill
Divide the cake mixture evenly based on how many colors you want—three is a great number for Halloween vibes. Drop in your food coloring, then mix thoroughly until you get vibrant shades. I love mixing colors little by little; sometimes, I add a few extra drops to deepen the color just right. Once done, pop the bowls in the freezer for about 15 minutes. This makes rolling the cake balls much easier!
Step 3: Roll, Stick, and Freeze
Roll your chilled cake dough into tight 1 ½-inch balls. Pro tip: keep your hands cool and use parchment paper as your rolling surface to prevent sticking. Place the balls on parchment-lined trays and freeze. Meanwhile, melt a portion of the white chocolate in short bursts, stirring well so it doesn’t burn. Dip the tip of your cake pop stick in the melted chocolate, then insert it halfway into each cake ball. This little “glue” step helps the sticks stay secure. Freeze the pops again for at least 15-20 minutes—or longer if you have time.
Step 4: Coat and Decorate
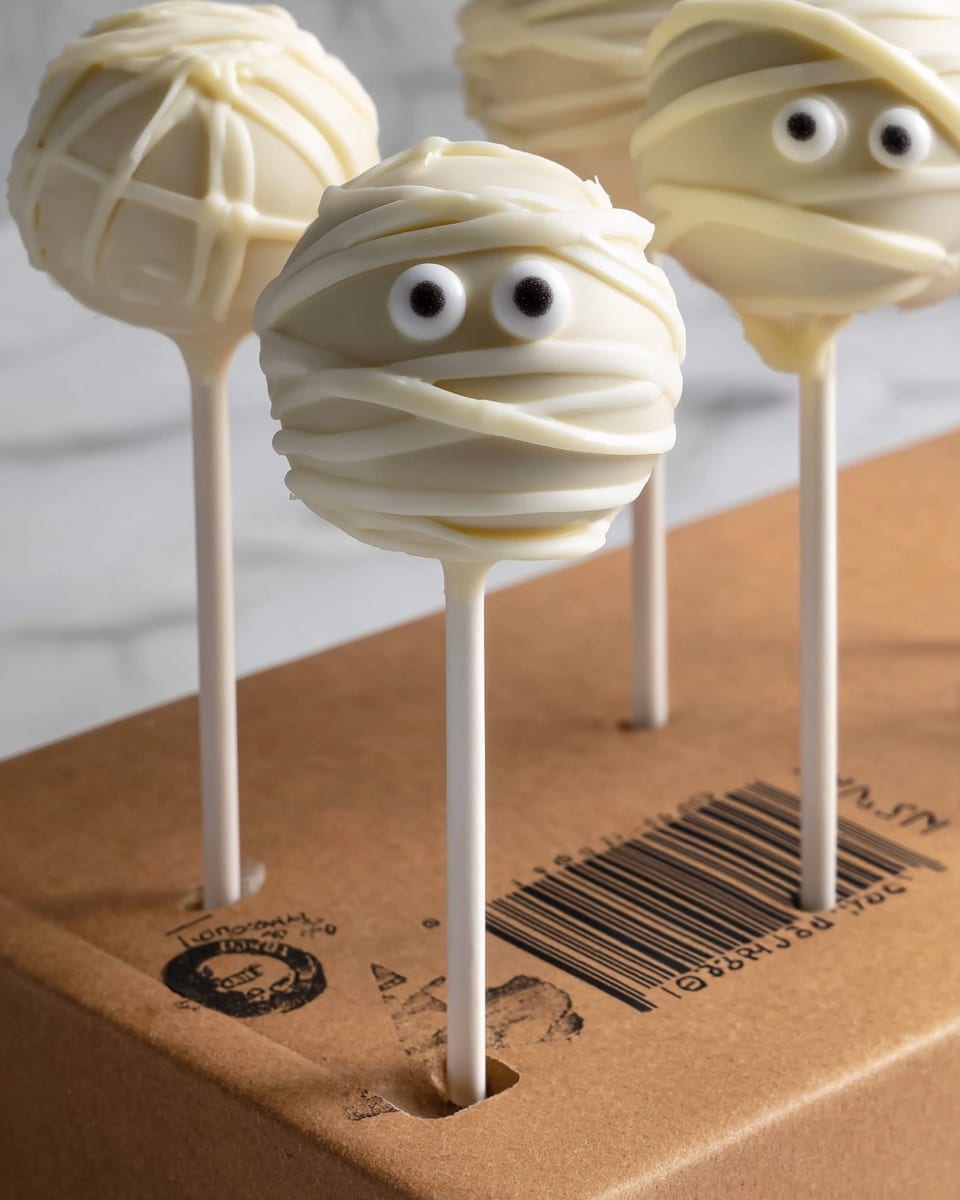
Once your cake pops are nicely chilled and the sticks are set, melt the remaining white chocolate. Dunk each cake pop straight down, then lift slowly allowing excess coating to drip off—patience here helps your coverage look smooth and even. Stand the pops upright to dry, using a box or styrofoam to hold them steady. Before the coating sets, go wild with sprinkles, crushed Oreos, candy eyeballs, or any fun Halloween goodies you have on hand. My family goes crazy for the eyeballs because they add just the right creepy factor!
Pro Tips for Making Halloween Cake Pops Recipe
- Chill, Chill, Chill: Freezing between steps ensures the pops hold their shape and the coating sets nicely.
- Use Quality Melting Chocolate: This creates a smoother, shinier coating that cracks less when drying.
- Control Your Color Intensity: Add food coloring gradually and mix thoroughly to avoid splotchy cake balls.
- Avoid Overheating Chocolate: Microwave in short bursts and stir well to prevent burning or grainy texture.
How to Serve Halloween Cake Pops Recipe
Garnishes
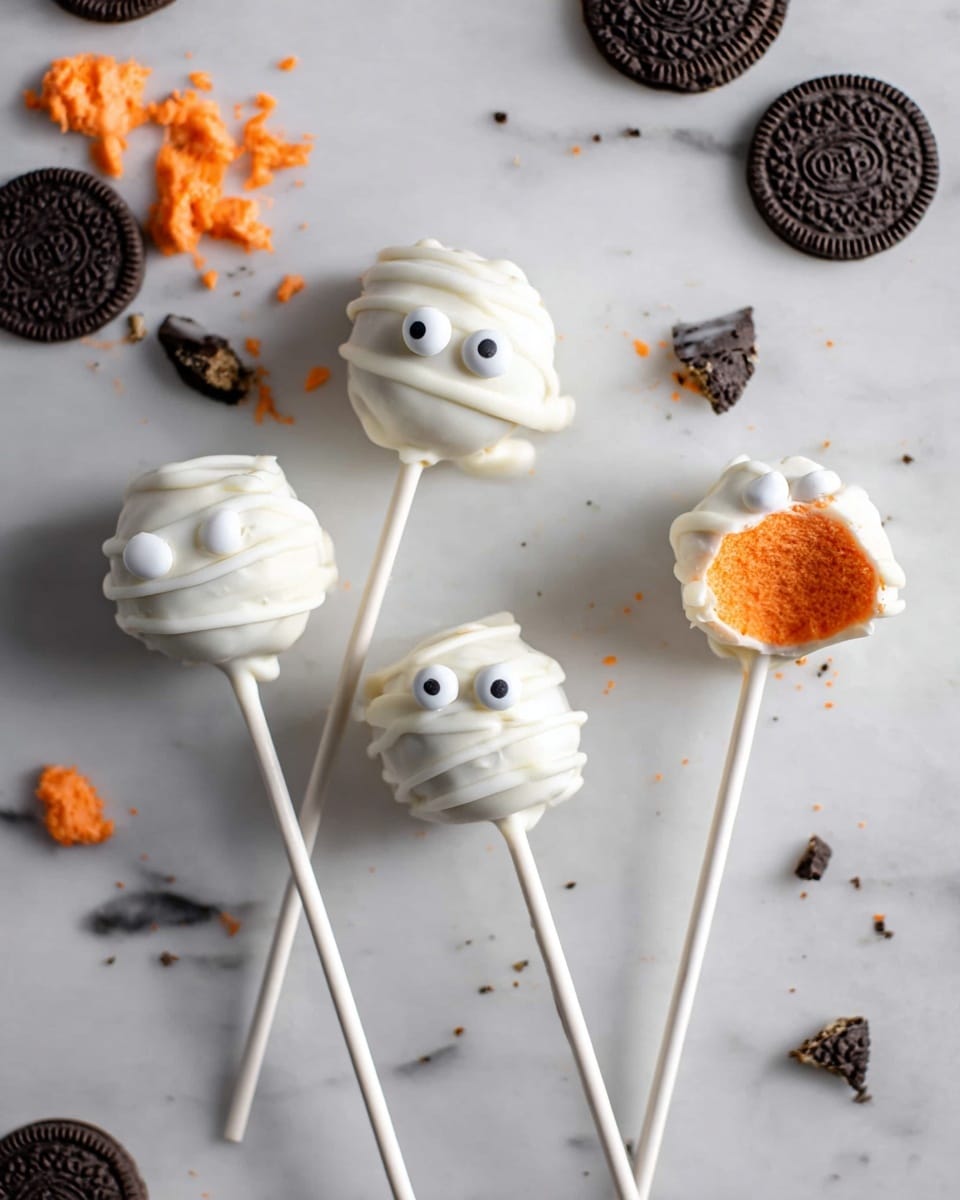
For garnish, I always grab candy eyeballs and festive sprinkles. They bring that extra bit of personality and fun to the pops. Crushed Oreos add a great texture contrast, plus the black color fits the Halloween theme flawlessly. For a personal touch, try piping little spiderweb patterns using colored icing—it’s easier than you might expect and looks amazing.
Side Dishes
Serve these alongside warm apple cider or a festive punch to complete the Halloween vibe. A light fruit platter or some caramel popcorn can balance the sweetness and keep your guests happily munching all night long.
Creative Ways to Present
I love arranging my cake pops in a tall glass jar filled with candy corn or black beans to keep them upright—this turns them into a cute centerpiece. For kids’ parties, setting up a “decorating station” with extra sprinkles and edible decorations makes the experience interactive and memorable. Gift them in cellophane bags tied with orange and black ribbons for Halloween party favors everyone will adore.
Make Ahead and Storage
Storing Leftovers
I store leftover Halloween cake pops in an airtight container in the fridge. They keep well for about a week, which is perfect if you want to make them ahead for a party or enjoy them slowly—although they rarely last that long in my house!
Freezing
Freezing cake pops works great if you want to prep in advance. Just wrap them individually in plastic wrap and then place in a freezer bag. When you’re ready to serve, thaw them in the refrigerator overnight to keep the texture perfect.
Reheating
Reheating isn’t really necessary with cake pops, but if the coating loses its shine, you can gently warm them at room temperature for about 30 minutes. Avoid microwaving as it can melt the coating and cause messiness.
FAQs
-
Can I use a different cake instead of angel food cake?
Absolutely! You can use any light, crumbly cake like yellow cake or vanilla sponge, but angel food cake works beautifully because it’s airy and absorbs the frosting well without getting too dense.
-
How do I prevent the cake pops from falling off the sticks?
Dipping the stick tips into melted chocolate before inserting into the cake balls acts as ‘glue’ to hold them firmly in place. Also, chilling the pops in the freezer before coating helps them set sturdily.
-
Can I make these gluten-free?
Yes! Just swap the angel food cake and any mix-ins for gluten-free versions. Make sure the frosting and chocolate you use are also gluten-free to keep the whole recipe safe.
-
What’s the best way to store cake pops overnight?
The best method is to keep them in an airtight container in the fridge to maintain freshness. If you have multiple layers, use parchment paper in between so the decorations don’t stick.
-
Can I use colored candy melts instead of white chocolate?
You can, but be aware that candy melts sometimes dry harder and may crack more easily. If you want vibrant colors with a smooth finish, coloring melted white chocolate with gel food coloring, as in this recipe, often gives better results.
Final Thoughts
This Halloween Cake Pops Recipe always brings such joy whenever I make it—from the fun of mixing and coloring the cake mixture to the excitement of decorating and sharing. It’s a playful project that turns into a delicious treat in every bite. I hope you’ll give it a try and see how much fun you can have with making festive desserts that everyone will remember. Trust me, these little pops of happiness will become a Halloween tradition in your household just like they are in mine!
Print
Halloween Cake Pops Recipe
- Prep Time: 30 minutes
- Cook Time: 0 minutes
- Total Time: 60 minutes
- Yield: 18 cake pops
- Category: Dessert
- Method: No-Cook
- Cuisine: American
Description
These Halloween Cake Pops are a festive and fun treat perfect for the spooky season. Made with crumbled angel food cake mixed with vanilla frosting, dyed in vibrant colors, and coated in white chocolate, they are easy to make and decorate with sprinkles, crushed Oreos, candy eyeballs, and more. A no-bake, kid-friendly dessert that is sure to be a hit at any Halloween party.
Ingredients
Cake Pop Base
- 1 Angel Food Cake, baked (12 oz.)
- ¾ cup vanilla frosting
- 1 tsp vanilla extract
Coating and Decorations
- 2 ½ cups white chocolate chips or melting chocolate
- food coloring (green, orange, purple)
- optional: sprinkles, crushed Oreos, candy eyeballs, etc.
- 18 – 20 cake pop sticks
Instructions
- Prepare the Cake Mixture: Place the baked angel food cake into a medium bowl and crumble it into very small pieces using your hands. Add the vanilla frosting and vanilla extract, then stir or mix with your hands until fully incorporated into a uniform dough.
- Color the Cake Dough: Divide the cake mixture evenly into 3 bowls (or according to the number of colors you want). Add about 25 drops of food coloring to each bowl—25 drops green for green, 13 drops yellow and 12 drops red for orange, and 13 drops red and 12 drops blue for purple. Stir the coloring well until you achieve the desired vibrant colors. Freeze the colored dough for at least 10-15 minutes to firm it up for shaping.
- Shape the Cake Pops: Roll the chilled cake dough into tight, 1 ½ inch balls. Place these balls onto parchment paper and freeze again. Meanwhile, melt one-third cup of white chocolate in the microwave in 15-20 second increments, stirring well between each to avoid overheating.
- Insert Sticks: Dip the tip of a cake pop stick into the melted white chocolate and then press it halfway into each cake ball. Repeat this for all cake pops. Place the cake pops back in the freezer for 15-20 minutes or longer to set.
- Coat the Cake Pops: When ready to coat, melt the remaining white chocolate in the microwave again using 15-20 second intervals, stirring thoroughly after each. Dip each cake pop straight down into the melted chocolate, slowly lifting it out to allow excess to drip off. Let the cake pop dry upright in a styrofoam block, box, or cup.
- Decorate: Sprinkle with sprinkles, crushed Oreos, candy eyeballs, or other desired decorations while the coating is still wet. Allow coating to set completely.
- Storage: Store the cake pops covered in the refrigerator for up to one week to keep them fresh and delicious.
Notes
- These cake pops are a no-bake treat making them perfect for quick and fun holiday desserts.
- Customize your colors and decorations to fit any Halloween theme or preference.
- Freezing the cake dough helps maintain shape during dipping and coating.
- If you don’t have white chocolate chips, melting chocolate or candy melts are a good alternative for coating.
- Make sure to stir the chocolate thoroughly between microwaving increments to prevent burning.
Nutrition
- Serving Size: 1 cake pop
- Calories: 223 kcal
- Sugar: 26 g
- Sodium: 136 mg
- Fat: 10 g
- Saturated Fat: 5 g
- Unsaturated Fat: 4 g
- Trans Fat: 0 g
- Carbohydrates: 32 g
- Fiber: 1 g
- Protein: 3 g
- Cholesterol: 5 mg

