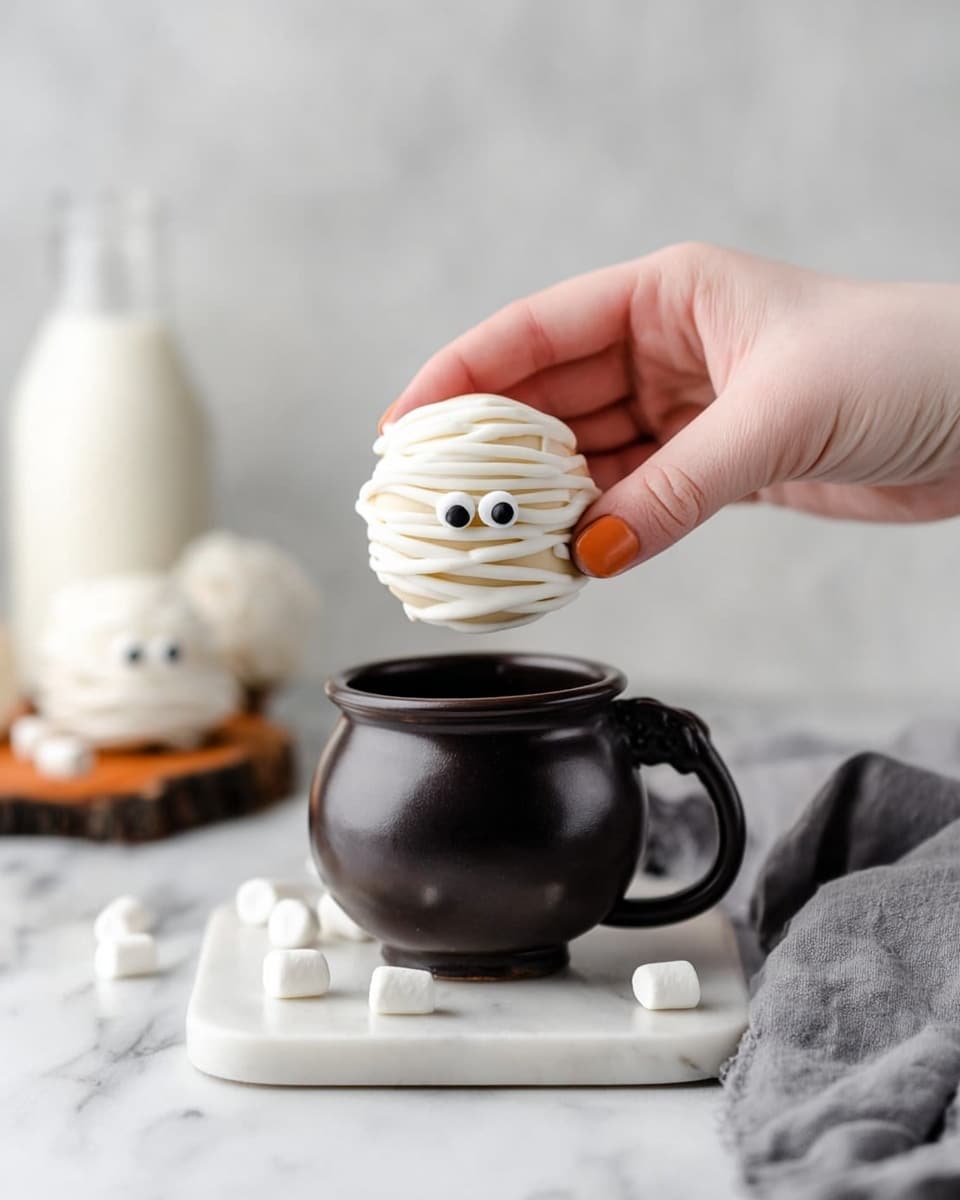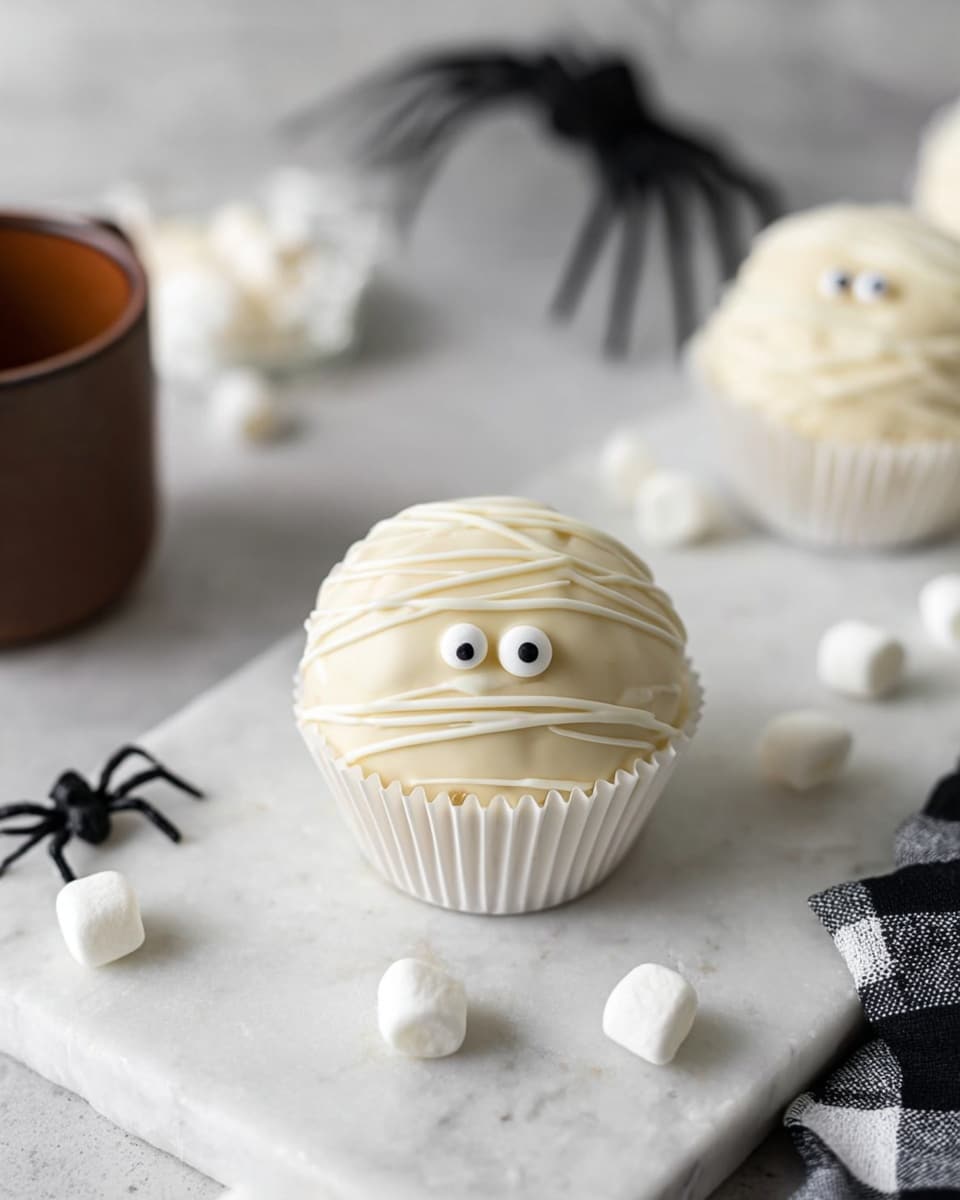
If you love a festive twist on a classic cozy drink, you’re going to absolutely adore this Halloween Hot Chocolate Bombs Recipe. I first made these little beauties a couple of falls ago, and let me tell you, my family goes crazy for them! The way they melt into a rich, chocolatey cup of warmth sprinkled with marshmallows is pure magic. Keep reading because not only will I walk you through every step, but I’ll share some of my favorite tips to make sure your bombs turn out perfectly spooky and delicious.
Why You’ll Love This Recipe
- Fun and Festive: These hot chocolate bombs bring that perfect Halloween vibe to your cup with candy eyes and spooky marshmallows.
- Impresses Guests: Whether it’s a party or a chilly night at home, these bombs wow everyone when they explode with cocoa goodness.
- Easy to Customize: You can tweak the fillings and decorations to suit your taste or any dietary needs.
- Perfect for Gift Giving: I love packaging these as little treats – they make such adorable and festive presents.
Ingredients You’ll Need
When I gather the ingredients for these Halloween Hot Chocolate Bombs Recipe, I always pick quality chocolate because it really makes a difference in taste and texture. The mini marshmallows add that nostalgic touch, and a few creative candy eyes bring the whole Halloween theme to life.
- Powdered sugar: Adds a touch of sweetness and helps the hot chocolate mix blend smoothly inside the bomb.
- Unsweetened cocoa powder: I prefer Dutch-process for its rich, mellow flavor that complements the sweetness of the white chocolate.
- Finely chopped white chocolate: Keeps the filling creamy and melts beautifully when you pour hot milk over the bomb.
- Mini marshmallows: You’ll want these inside the bomb for that fun, gooey surprise when you pour the milk.
- White chocolate bark or tempered white chocolate: This is the shell of your hot chocolate bomb – tempered chocolate makes it smooth and shiny.
- Hot chocolate powder (store-bought or homemade): The heart of the flavor – I share a mix here that gives the perfect balance, but you can use your favorite brand too.
- Candy eyes and extra white chocolate or bark: For decorating your bombs and giving them that festive Halloween look.
- Very hot milk: Pouring this over your bomb is the best part – watch the magic happen!
Variations
I love how flexible this Halloween Hot Chocolate Bombs Recipe is. You can really let your creativity run wild here, and I’ve tried quite a few versions that turned out amazing. Don’t be afraid to personalize it – it’s part of the fun!
- Dark chocolate bombs: I swapped the white for dark chocolate once and loved the richer, more intense flavor, especially with a sprinkle of cinnamon inside.
- Vegan option: Use dairy-free chocolate and mini marshmallows to make a plant-based version that everyone can enjoy.
- Spiced bombs: Adding a pinch of cayenne pepper or pumpkin pie spice inside takes the classic hot chocolate to a whole new level of cozy warmth.
- Peanut butter surprise: Place a tiny dollop inside for a creamy, nutty twist that’s a crowd-pleaser every time.
How to Make Halloween Hot Chocolate Bombs Recipe
Step 1: Prep Your Workspace and Mold
Start by cleaning your work surface and making sure the silicone bomb molds are dry and free of any dust. I like to wipe mine with a little rubbing alcohol if I haven’t used them in a while. This helps the chocolate stick nicely and avoids any weird spots. Keep your tempered white chocolate warm but not too hot, so it’s fluid enough to coat the molds evenly.
Step 2: Coat the Molds with Chocolate
Spoon a generous amount of your melted white chocolate into each mold and use a small offset spatula or the back of a spoon to spread it evenly up the sides. Don’t worry if it looks a bit thick; you want a sturdy shell. Pop the molds in the fridge for 15 minutes, then repeat a second coat to make sure your bomb shells won’t crack when you handle them.
Step 3: Add the Filling
Once your shells are set and firm, gently peel them out of the mold. Now pack the inside with your hot chocolate powder, some finely chopped white chocolate, and mini marshmallows – the perfect little surprise when the bomb melts. Be careful not to overfill; you want to leave enough space around the rim so they’ll stick together nicely.
Step 4: Seal the Bombs
Warm a plate in the microwave for 30 seconds, then carefully press the edges of two shell halves against the warm plate to slightly melt and seal them together. Hold them gently for a few seconds until they stick. If needed, use a little melted white chocolate as glue to close any gaps. I found this is the step where patience really pays off – rushing can cause cracks or leaks.
Step 5: Decorate Your Halloween Hot Chocolate Bombs
Once they’re fully sealed, go wild decorating! Melt some extra white chocolate and drizzle it on top. Then add your candy eyes, sprinkles, or edible glitter – whatever spells Halloween fun in your kitchen. This part always gets my kids excited to join in.
Step 6: Serving Your Bombs
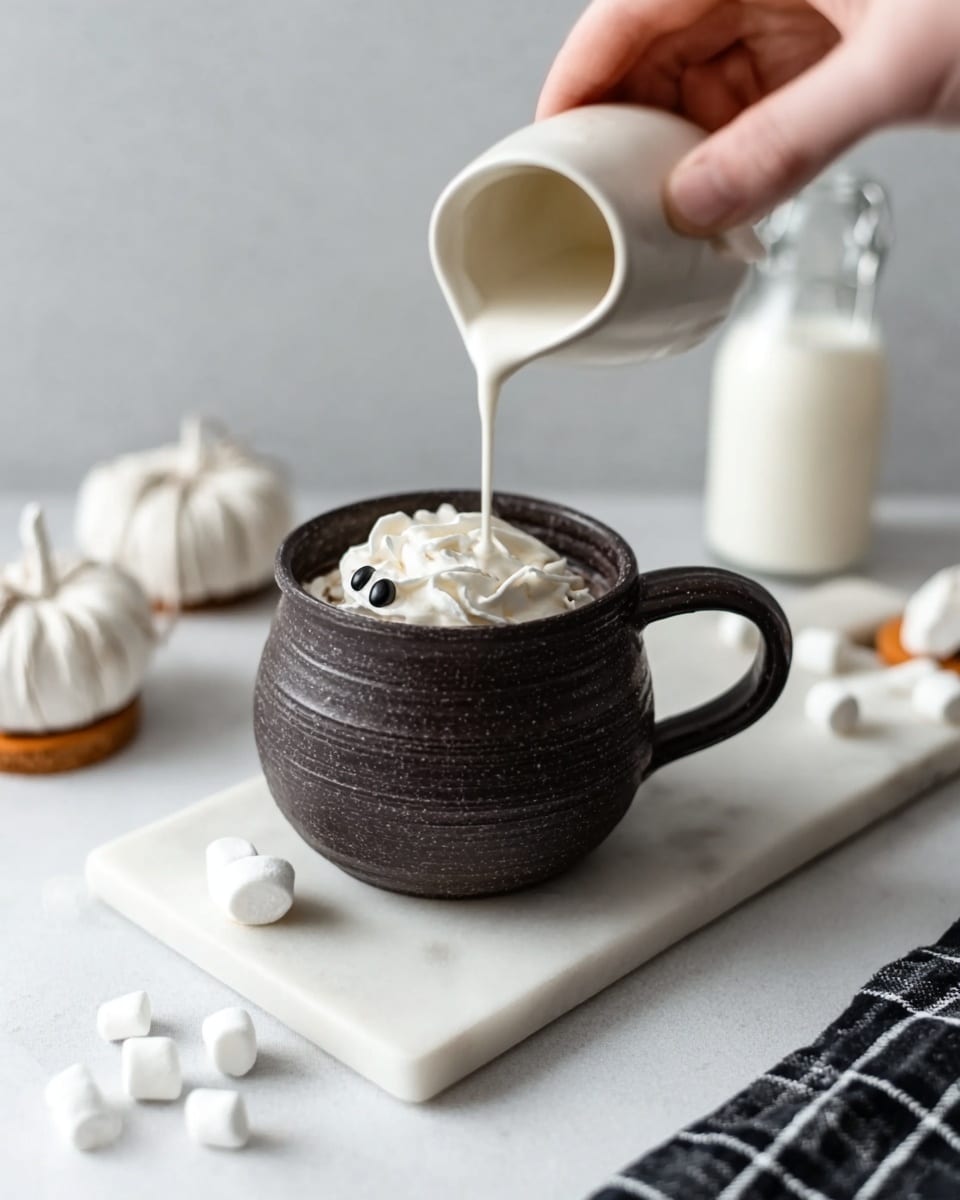
Heat your milk until it’s almost boiling, then pour it slowly over the bomb in a mug. Watch it melt and reveal the marshmallowy, chocolate surprise inside. Give it a gentle stir, and voila – the perfect cup of Halloween cheer!
Pro Tips for Making Halloween Hot Chocolate Bombs Recipe
- Tempering Chocolate: I learned that tempering your white chocolate or using good quality bark is key to getting smooth, glossy shells that don’t melt too fast in your hands.
- Sealing Trick: Heating a plate really helps seal those bomb edges perfectly – without it, I struggled with cracks and leaks.
- Decoration Patience: Let your decorations set at room temp – it keeps candy eyes glued perfectly without melting the chocolate underneath.
- Storage Tip: Keep your bombs in a cool, dry place – refrigeration causes condensation and can spoil the texture.
How to Serve Halloween Hot Chocolate Bombs Recipe
Garnishes
I usually grab extra mini marshmallows to sprinkle on top after pouring the hot milk – it adds a toasty, melty bonus every time. Sometimes, I toss a little whipped cream on top, or even a pinch of pumpkin pie spice for that fall warmth. Candy eyes aren’t just for the bombs; I like setting a few around the mug rim for fun!
Side Dishes
Pairing these Halloween Hot Chocolate Bombs with something like soft pumpkin cookies or cinnamon sugar doughnuts really rounds out the cozy vibe. I’ve even set up a hot chocolate bar with assorted toppings and snacks for weekend family fun.
Creative Ways to Present
For Halloween parties, I like placing each bomb in small clear boxes tied with orange and black ribbons – such a cute party favor! You can also nestle them in between fake spider web decorations or serve alongside glow sticks for a spooky touch that’s still kid-friendly.
Make Ahead and Storage
Storing Leftovers
I always store leftover bombs in an airtight container at room temperature, away from heat or moisture. They stay fresh and ready for up to two weeks this way, which is perfect for staggered enjoyment or impromptu Halloween treats.
Freezing
If you want to make a bunch ahead of time, freezing works well too! Just wrap each bomb in plastic wrap and place in a freezer-safe container. When you’re ready, thaw at room temperature to avoid condensation before serving.
Reheating
Since these aren’t reheated once mixed with milk, if you have leftover hot chocolate, gently warm it on the stove or microwave in short bursts. If you want to remake bombs, just prepare fresh hot milk and pour over new bombs for the best melt and flavor.
FAQs
-
Can I make Halloween Hot Chocolate Bombs Recipe without a mold?
While silicone molds make things easier and result in smooth, round bombs, you can get creative and use small plastic bowls or even chocolate cups to shape your hot chocolate bombs. Just be sure the chocolate hardens fully before attempting to fill and seal.
-
How do I prevent my hot chocolate bombs from melting before serving?
Store your bombs in a cool, dry place away from direct sunlight or heat sources, and avoid refrigerating them. Warm hands can also cause premature melting, so handle with care or use gloves when assembling.
-
Can I use regular chocolate instead of white chocolate for the bombs?
Absolutely! You can swap white chocolate for regular milk or dark chocolate, depending on your flavor preference. Just remember tempering dark chocolate might be a bit different, but the process of molding and assembling stays the same.
-
What can I use if I don’t have hot chocolate powder?
If you don’t have hot chocolate powder on hand, mix powdered sugar with cocoa powder and a pinch of salt to create a quick DIY version. Alternatively, many store-bought hot cocoa mixes work great for this recipe.
Final Thoughts
Honestly, I fell in love with this Halloween Hot Chocolate Bombs Recipe the moment I saw how simple ingredients could create such a memorable, festive experience. From the excitement of watching the chocolate shell melt, to the gooey marshmallow surprise, these bombs are more than just a treat—they’re a little Halloween party in a mug. I hope you give them a try this season; they’re guaranteed to bring a little extra warmth and joy to your chilly evenings.
Print
Halloween Hot Chocolate Bombs Recipe
- Prep Time: 20 minutes
- Cook Time: 15 minutes
- Total Time: 35 minutes
- Yield: 6 hot chocolate bombs
- Category: Baking
- Method: Baking
- Cuisine: American
Description
These Halloween Hot Chocolate Bombs are a festive and fun treat perfect for cozying up on a chilly fall evening. Made with creamy white chocolate shells filled with a rich homemade hot chocolate mix and mini marshmallows, they melt beautifully in hot milk to create a deliciously indulgent drink. Adorned with candy eyes for a spooky touch, they make perfect gifts or party favors for Halloween celebrations.
Ingredients
Hot Chocolate Mix
- 1/4 cup (40 grams) powdered sugar
- 2 tablespoons (15 grams) unsweetened cocoa powder (preferably Dutch-process)
- 1/4 cup (22 grams) finely chopped white chocolate
- 1/2 cup (30 grams) mini marshmallows
Chocolate Shell
- 2 pounds (907 grams) white chocolate bark or tempered white chocolate
Decoration and Additional Ingredients
- Store-bought hot chocolate powder (2/3 cup) or the homemade hot chocolate mix above plus 1/2 cup mini marshmallows
- Candy eyes
- Additional white chocolate or white chocolate bark for decorating
- 1-1 1/2 cups (240ml-355ml) very hot milk
Instructions
- Prepare the hot chocolate mix. In a bowl, sift together the powdered sugar and unsweetened cocoa powder. Stir in the finely chopped white chocolate and mini marshmallows. Set aside to use as the hot chocolate filling inside the bombs.
- Melt the white chocolate. Using a double boiler or microwave in short bursts, gently melt the white chocolate bark or tempered white chocolate until smooth and fluid. Be careful not to overheat the chocolate as it can seize or burn.
- Form the chocolate shells. Using a small spoon or silicone mold designed for chocolate spheres, coat the inside of half-sphere molds with the melted white chocolate, ensuring even coverage. Place the molds in the refrigerator or freezer to set the chocolate shells until firm.
- Fill the bombs. Once shells are set, carefully remove them from the molds. Place a spoonful of the hot chocolate mix and a few mini marshmallows inside one half of the shells.
- Seal the bombs. Warm a plate slightly and use it to gently melt the edges of an empty half-sphere shell. Quickly press it against the filled half to seal the two halves together, forming a complete bomb. Let them set in the fridge.
- Decorate the bombs. Melt a little additional white chocolate and use it as glue to attach candy eyes and create spooky faces or designs. Allow the decorations to set completely.
- Serve the hot chocolate bombs. Place one bomb in a mug and pour 1 to 1 1/2 cups very hot milk over it. Watch as the chocolate melts and the filling spills into the milk, then stir well to combine and enjoy a rich, creamy hot chocolate with marshmallows.
Notes
- Use Dutch-process cocoa powder for a richer, smoother flavor in the hot chocolate mix.
- Ensure chocolate is tempered or melted gently to avoid bloom or cracking in shells.
- If a mold is not available, carefully shaping shells with spoons and bowl edges can work.
- Store bombs in an airtight container in a cool place to prevent melting before use.
- Adjust sweetness by choosing your own hot chocolate powder or modifying sugar levels.
- Can be customized with food coloring or different candy decorations for other occasions.
Nutrition
- Serving Size: 1 hot chocolate bomb with milk
- Calories: 320 kcal
- Sugar: 28 g
- Sodium: 45 mg
- Fat: 18 g
- Saturated Fat: 11 g
- Unsaturated Fat: 6 g
- Trans Fat: 0 g
- Carbohydrates: 32 g
- Fiber: 2 g
- Protein: 4 g
- Cholesterol: 10 mg

