

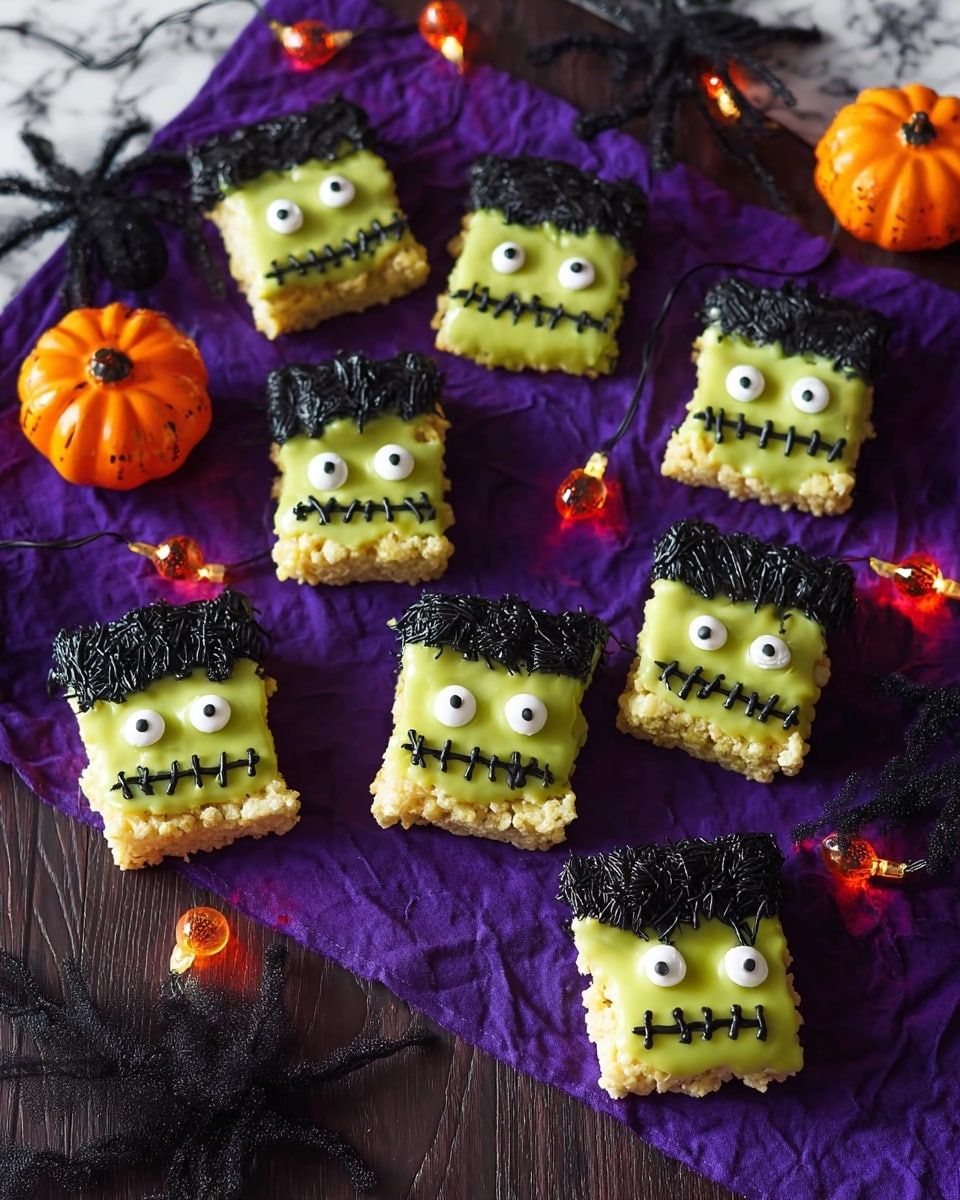
If you’re looking for a treat that’s not only super easy to whip up but also brings that perfect festive Halloween vibe, you’re going to absolutely love this Halloween Rice Krispie Treats Recipe. Trust me, once you make these, they’ll become a staple at every spooky gathering or just for that cozy night in. They’re chewy, sweet, and decorated with the cutest candy eyes that make them pop with Halloween spirit. So, grab your apron, and let’s dive into this fan-freaking-tastic treat!
Why You’ll Love This Recipe
- Super Simple: Just a handful of ingredients and a few minutes on the stove, making it perfect even if you’re short on time.
- Perfectly Festive: The bright candy melts and candy eyes turn classic Rice Krispie treats into cute Halloween characters everyone will adore.
- Kid-Friendly Fun: My kids love helping me press the treats into the pan and add the eyes—they think it’s pure magic.
- Customizable: Whether you want to swap candy melts for other colors or add sprinkles, this recipe adapts easily to your creative mood.

Ingredients You’ll Need
The magic of this Halloween Rice Krispie Treats Recipe comes from combining simple pantry staples with bright, colorful candy melts that really bring the spooky vibe to life. I always recommend using mini marshmallows—they melt evenly and give that perfect chew.
- Butter: Adds richness and helps melt the marshmallows smoothly without burning.
- Mini marshmallows: The secret to that classic chewy texture everyone loves.
- Salt: Just a pinch to balance sweetness—it really enhances the flavor!
- Vanilla extract: A little warmth and depth to the marshmallow mixture.
- Puffed rice cereal: The classic foundation for Rice Krispie treats, giving that crunchy chew.
- Bright/light green candy melts: These add fun color and help the treats stand out.
- Bright white candy melts: Perfect for eyes or accents when you want pops of brightness.
- Refined coconut oil (or shortening): Helps candy melts melt smoothly and keeps them shiny.
- Candy eyes: The cutest finishing touch that turns these treats into little Halloween characters.
- Black buttercream frosting: You’ll find my notes below on how to make this or what to substitute if you prefer.
Variations
I love switching things up depending on the vibe I’m going for or what ingredients I have on hand. The best part about this Halloween Rice Krispie Treats Recipe is you can customize it easily without sacrificing flavor or fun.
- Spooky Sprinkles: My family goes crazy for adding Halloween-themed sprinkles on top before the candy melts set—their crunchy texture is such a fun contrast.
- Dairy-Free Version: I swapped butter for coconut oil once, and it worked beautifully, especially with the coconut oil helping the candy melts melt evenly.
- Gluten-Free Treats: These are naturally gluten-free if you check your puffed rice cereal ingredients, which is great for parties with dietary restrictions.
- Different Colors: Try orange or purple candy melts instead of green for a different Halloween palette—I found purple melts to look super mysterious and fun!
How to Make Halloween Rice Krispie Treats Recipe
Step 1: Prep Your Pan and Ingredients
Start by lining a baking sheet with parchment paper and buttering or spraying a 9×13 baking dish—this helps prevent sticking and makes cleanup a breeze. I always lay out my candy melts and candy eyes before melting the marshmallows because it helps everything flow smoothly once the treats are ready.
Step 2: Melt Butter and Marshmallows
In a medium stockpot set over medium-low heat, melt 4 tablespoons of butter gently. Then add 7 cups of mini marshmallows, ¼ teaspoon salt, and ¼ teaspoon vanilla. Stir constantly to prevent scorching — I learned the hard way that patience is key here. You want the marshmallows completely melted and silky smooth before moving on.
Step 3: Mix in Cereal
As soon as your marshmallow mixture is melted, remove it from heat and stir in 6 cups of puffed rice cereal. Stir quickly but gently until every piece is evenly coated. Get ready for that instantly nostalgic, gooey goodness!
Step 4: Press and Cool
Transfer your Rice Krispie mixture into the prepared 9×13 pan. Use a buttered spatula or wax paper to press the mixture evenly and firmly into the pan—don’t press too hard or you might end up with dense, hard treats. Let it cool and set completely before cutting into 24 squares.
Step 5: Decorate with Candy Melts and Eyes
Melt 12 oz bright/light green candy melts with 2-4 tablespoons of refined coconut oil (or shortening) using either a double boiler or in short bursts in the microwave, stirring often. Dip your treats or drizzle the candy melts on top for a festive look. Use black buttercream frosting to add character and finish with candy eyes for that spooky, yet adorable touch.
Pro Tips for Making Halloween Rice Krispie Treats Recipe
- Don’t Rush the Melt: Always melt your marshmallows and butter on low heat to prevent burning, which can give a burnt taste and grainy texture.
- Use Coconut Oil for Candy Melts: A little coconut oil thins the melted candy melts so they coat smoothly and dry with a nice shine.
- Press Gently: When pressing the mixture into the pan, don’t overcompact or your treats lose that light, chewy texture everyone loves.
- Add Candy Eyes Last: Let the candy melts cool just a bit before placing eyes so they stick perfectly without sliding off.
How to Serve Halloween Rice Krispie Treats Recipe
Garnishes
I adore using those wacky candy eyes—they bring so much personality! Sometimes, I’ll pipe on little black buttercream mouths or squiggles for spider legs. Halloween-themed sprinkles or edible glitter add a fun sparkle if you’re feeling extra festive.
Side Dishes
These treats pair beautifully with warm apple cider or a creamy pumpkin spice latte to keep that autumn vibe going strong. For a party, throw in some popcorn tossed with Halloween M&Ms or caramel apples for mix-and-match fun.
Creative Ways to Present
Last year, I served these treats on black platters lined with orange tissue paper—such a simple trick that made them pop visually. You could even stack them into little pyramids or wrap each treat individually in clear cellophane tied with a themed ribbon for a cute party favor.
Make Ahead and Storage
Storing Leftovers
I like to store these treats in an airtight container at room temperature. They stay fresh and chewy for up to 3-4 days, which is usually perfect because they don’t last that long in my house! You can also layer parchment between them to prevent sticking.
Freezing
Freezing works great! I wrap individual squares tightly in plastic wrap and then store them in a freezer bag. They thaw in about an hour at room temp and keep their chewy texture perfectly — a lifesaver when I want to prep ahead for a party.
Reheating
If you want to soften frozen treats a bit or revive slightly stale ones, pop them in the microwave for 10-15 seconds. Just be careful not to overheat or they’ll get too gooey!
FAQs
-
Can I use regular-sized marshmallows instead of mini marshmallows?
You can, but mini marshmallows melt more evenly and quickly, which helps the treats have a smooth texture. If you only have regular marshmallows, cut them in half to mimic the melting speed of minis.
-
What if I don’t have candy melts? Can I use chocolate instead?
Chocolate can work but it behaves differently when melted and hardened. Candy melts are designed to give you that sturdy, colorful coating perfect for decorating. If you use chocolate, expect a softer finish that melts more easily in your hands.
-
How do I make black buttercream frosting?
Start with classic buttercream and add black gel food coloring slowly until you reach your desired shade. Sometimes using a mix of black and purple gel colors gives a richer, more natural black without the bitterness.
-
Why are my Rice Krispie treats sticky or too hard?
Sticky treats usually mean they didn’t cool fully before cutting or were over-pressed into the pan. Too-hard treats often come from overheating the marshmallow mixture or pressing too firmly. Aim for gentle pressing and allow full cooling time.
Final Thoughts
Honestly, this Halloween Rice Krispie Treats Recipe holds a special place in my heart because it brings my family together in the sweetest way. Every October, making these goofy, delicious treats with candy eyes becomes our little tradition—full of laughter, sticky fingers, and that warm feeling of simple joy. I hope you give this recipe a try and find the same happiness I do. You’ll impress your friends, delight the kids, and maybe even sneak a treat or two for yourself. Happy spooky baking!
Print
Halloween Rice Krispie Treats Recipe
- Prep Time: 5 minutes
- Cook Time: 10 minutes
- Total Time: 15 minutes
- Yield: 24 treats
- Category: Dessert
- Method: Stovetop
- Cuisine: American
Description
These Halloween Rice Krispie Treats are a festive and fun twist on the classic marshmallow and cereal snack. Perfect for parties, bake sales, or spooky-season treats, they combine crispy puffed rice cereal with melted marshmallows, then decorated with colorful candy melts, candy eyes, and black buttercream frosting for a playful Halloween look.
Ingredients
Main Ingredients
- 4 tablespoons butter
- 7 cups mini marshmallows
- 1/4 teaspoon salt
- 1/4 teaspoon vanilla extract
- 6 cups puffed rice cereal
Decorations
- 12 ounces bright/light green candy melts
- 6 ounces bright white candy melts
- 2-4 tablespoons refined coconut oil (or shortening)
- Candy eyes
- Black buttercream frosting (see notes on how to make or substitutions)
Instructions
- Prepare baking surfaces: Line a baking sheet with parchment paper and set aside. Butter or spray a 9×13 inch baking dish with non-stick cooking spray; set aside.
- Melt butter and marshmallows: In a medium stock pot over medium-low heat, melt the butter. Add the mini marshmallows, salt, and vanilla extract. Stir continuously until the marshmallows are fully melted and the mixture is smooth.
- Combine with cereal: Remove the pot from heat and immediately stir in the puffed rice cereal, ensuring all the cereal is evenly coated with the marshmallow mixture.
- Press into pan and cool: Transfer the mixture into the prepared 9×13 baking dish. Use a buttered spatula or clean hands to press the mixture evenly and firmly into the dish. Allow it to cool completely until set.
- Cut into squares: Once set and cooled, cut the Rice Krispie treats into 24 equal squares.
- Decorate: Melt candy melts with refined coconut oil or shortening according to package instructions for smooth dipping or drizzling. Decorate the squares with candy eyes and black buttercream frosting to create fun Halloween faces and designs.
Notes
- These treats are perfect for Halloween-themed parties or as fun spooky-season snacks.
- Black buttercream frosting can be made by tinting classic buttercream with black gel food coloring; alternatively, use store-bought black frosting or a chocolate frosting.
- Use refined coconut oil for smoother candy melts and better consistency when decorating.
- Press the mixture firmly in the pan to avoid crumbly treats.
- Store treats in an airtight container at room temperature for up to 3 days for best freshness.
Nutrition
- Serving Size: 1 treat
- Calories: 81 kcal
- Sugar: 8 g
- Sodium: 53 mg
- Fat: 2 g
- Saturated Fat: 1 g
- Unsaturated Fat: 1 g
- Trans Fat: 0 g
- Carbohydrates: 16 g
- Fiber: 1 g
- Protein: 1 g
- Cholesterol: 5 mg


