

If you’ve ever longed for the perfect little cookie that’s buttery, tender, and bursting with fruity jam goodness, today’s your lucky day! This Jam Thumbprint Cookies Recipe is exactly the kind of treat I love baking when I want something that’s both nostalgic and foolproof. These cookies manage to capture that cozy homemade charm with a crisp exterior, soft crumb, and a sweet dollop of jam baked right into the thumbprint. Trust me, once you try this recipe, you’ll be making them again and again for tea time, gift-giving, or just because.
Why You’ll Love This Recipe
- Classic Flavor: Buttery shortbread texture combined with your favorite jam makes these cookies irresistibly timeless.
- Simple Ingredients: You likely already have everything in your pantry, which means no last-minute grocery runs.
- Customizable: Easily swap your choice of jam to match seasons, holidays, or personal favorites.
- Baked-In Jam: Baking the jam right into the cookie keeps it from sliding off and adds a lovely caramelized flavor.

Ingredients You’ll Need
The magic of this Jam Thumbprint Cookies Recipe lies in simple, high-quality ingredients working together: rich butter, vanilla for warmth, and just enough jam to take every bite to the next level. Here’s a quick rundown of what you’ll use and why:

- Unsalted Butter: Using unsalted butter lets you control the salt perfectly and gives you that tender, crumbly cookie base.
- Caster (Superfine) Sugar: I prefer caster sugar because it dissolves easily, but regular granulated sugar works fine too.
- Vanilla Extract: Adds a cozy, aromatic depth that makes the flavor pop.
- Egg: Helps bind everything together and adds a lovely richness to the dough.
- Plain (All-Purpose) Flour: The foundation for that delicate texture you want in those shortbread cookies.
- Salt (Cooking or Kosher): Just a pinch to balance the sweetness and enhance the buttery flavor.
- Jam (Strawberry, Raspberry, or Your Favorite): Choose a flavor you love; I like strawberry for its brightness, but raspberry is a close second!
Variations
I love how versatile this Jam Thumbprint Cookies Recipe is—you can easily switch things up depending on your mood or dietary preferences. I’ve tried several variations that my family adores, and I encourage you to make it your own too!
- Almond Twist: Adding a bit of finely ground almonds or almond extract to the dough gives a lovely nutty aroma that pairs perfectly with apricot jam.
- Gluten-Free Version: Swap the all-purpose flour for a gluten-free flour blend, keeping an eye on dough consistency—you might need a touch less flour.
- Jam Combinations: Don’t hesitate to mix jams—try raspberry and blueberry for a burst of color and flavor.
- Decorative Sugar: Sprinkle coarse sugar or colored sugar crystals on top for a festive look before baking.
How to Make Jam Thumbprint Cookies Recipe
Step 1: Cream the Butter and Sugar
Start by beating the softened unsalted butter and sugar together until the mixture is light and fluffy. This usually takes about 3-4 minutes with a hand mixer or stand mixer. I’ve found this step crucial because it traps air, helping the cookies stay tender and evenly baked. Don’t rush here—if the butter is too cold, it won’t cream properly, so let it sit out for a bit before starting.
Step 2: Add Egg and Vanilla
Next, add in your room temperature egg and vanilla extract, mixing until just combined. The room temp egg blends more smoothly, giving you a uniform dough that’s easy to work with.
Step 3: Fold in the Flour and Salt
Sift the plain flour and salt together, then slowly mix them into your butter mixture. Use a spatula or low mixer speed to avoid overworking the dough, which can lead to tougher cookies. The dough should come together nicely and feel smooth but not sticky.
Step 4: Shape and Make Your Thumbprints
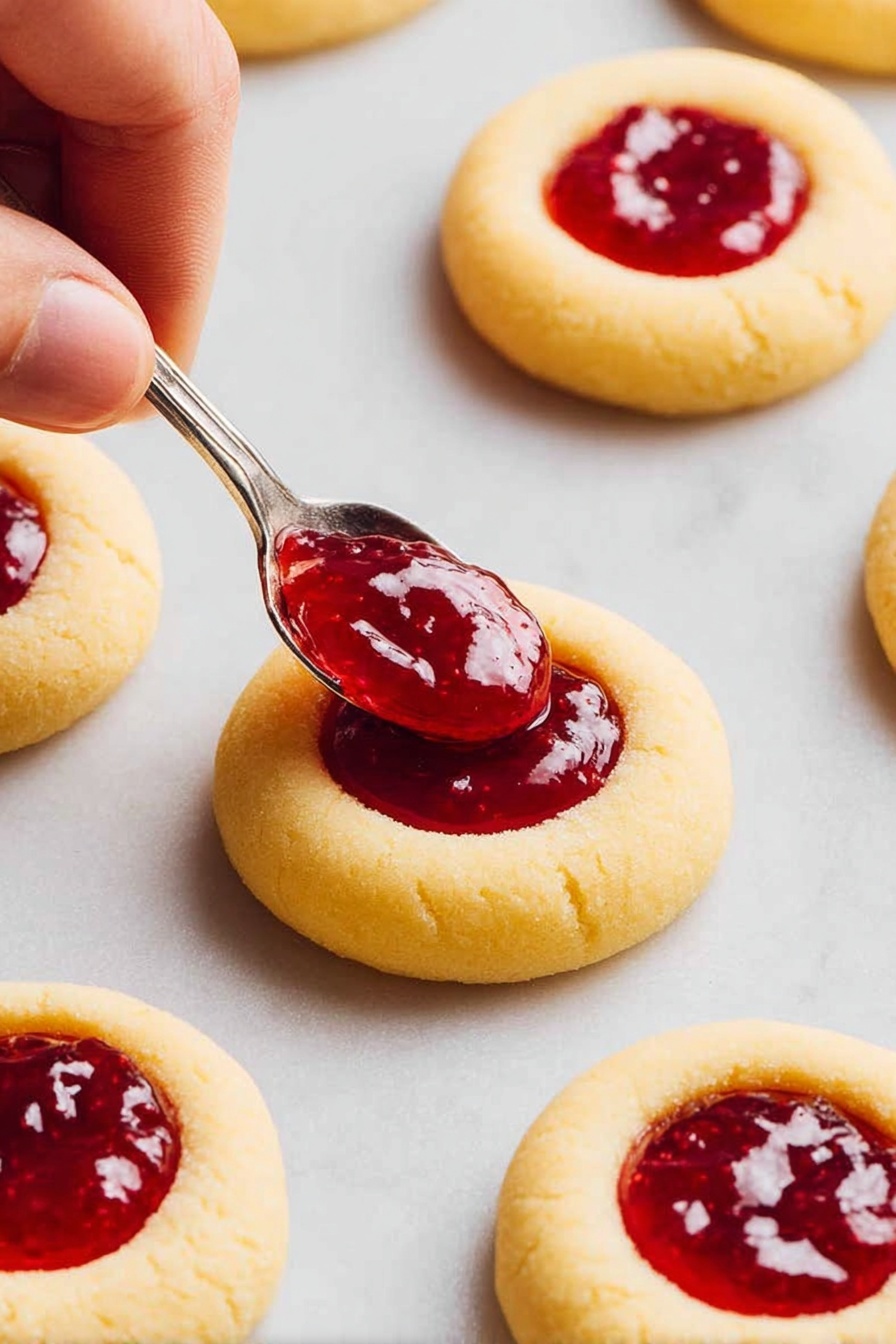
Roll the dough into walnut-sized balls and place them spaced on a baking sheet lined with parchment. Here’s the fun part: use your thumb to gently press an indentation into each ball without going all the way through. I discovered that warming your thumb by rubbing it on your wrist makes a smoother dent that holds jam well.
Step 5: Fill with Jam and Bake
Spoon a small amount of your chosen jam into each thumbprint. I like to mix the jam a bit beforehand to loosen it up, which helps it bake evenly. Bake in a preheated oven at 350°F (175°C) for about 12 to 14 minutes, or until the edges are just starting to turn golden. Don’t overbake—you want the cookies soft but set.
Pro Tips for Making Jam Thumbprint Cookies Recipe
- Butter Temperature: Make sure your butter is soft but not melted for the best dough texture.
- Room Temperature Egg: Cold eggs can cause dough to seize, so let it sit on your counter for 20 minutes before mixing in.
- Thumbprint Technique: Press firmly but gently with your thumb; too deep and the jam might spill over, too shallow and it won’t hold enough.
- Jam Choice: Avoid watery jams—they can spread too much; thick preserves work best for that lovely baked-in flavor.
How to Serve Jam Thumbprint Cookies Recipe
Garnishes
I often dust mine lightly with powdered sugar after they’ve cooled, adding a little extra sweetness and that classic bakery look. Sometimes I’ll sprinkle crushed nuts like pistachios or chopped almonds around the jam center before baking for a lovely crunch and pop of color.
Side Dishes
Jam Thumbprint Cookies are fantastic with a hot cup of tea or coffee—my go-to cozy combo. They also pair splendidly with vanilla or berry-flavored ice cream for a nostalgic dessert twist that impresses guests every time.
Creative Ways to Present
For special occasions, I arrange them on a tiered dessert stand with assorted jams to let guests mix and match. You can also gift these individually wrapped in cellophane with ribbon for a charming homemade present that everyone appreciates.
Make Ahead and Storage
Storing Leftovers
Jam Thumbprint Cookies store beautifully in an airtight container at room temperature for up to a week. I always make sure to layer them between sheets of parchment paper to keep them from sticking together and preserve that crisp edge.
Freezing
If you want to get ahead, you can freeze the shaped cookie dough balls before baking. Simply place them on a baking sheet until frozen, then transfer to a zip-top bag. Bake directly from frozen but add a couple extra minutes to the baking time. This trick saves me on busy days when I crave fresh-baked cookies without the wait.
Reheating
To refresh leftovers, pop a few cookies in a low oven (about 300°F/150°C) for 5 minutes. This warms the jam slightly and crisps up the edges, making them taste like they just came out of the oven.
FAQs
-
Can I use store-bought jam, or should I make my own?
You absolutely can use store-bought jam for convenience. Just choose one that’s thick and not overly watery, so it stays put in the cookie. Homemade jams work beautifully too if you want that fresh, personalized touch.
-
Why bake the jam into the cookie instead of adding it after?
Baking the jam right in creates a lovely caramelized flavor and ensures it sticks perfectly in the thumbprint without sliding off. Adding jam after baking tends to soften the cookie and can be messier when serving.
-
What’s the best way to make the thumbprints?
I recommend using your thumb as the name suggests—it’s soft, natural, and shapes the perfect dent that holds jam nicely. You can warm your thumb by rubbing it on your wrist to avoid cracks or uneven indentations.
-
Can I make these cookies gluten-free?
Yes! Substitute all-purpose flour with a gluten-free blend and adjust the dough consistency slightly, as some blends absorb more moisture. Many gluten-free blends work well, just check for xanthan gum or add it if your blend lacks it.
Final Thoughts
I absolutely love how this Jam Thumbprint Cookies Recipe brings a little slice of childhood (and plenty of joy) into my kitchen every time I bake it. There’s something special about biting into the buttery cookie that melts in your mouth, paired with just the right amount of jam sweetness. If you’re looking for a cookie that’s simple to make, endlessly customizable, and always a crowd-pleaser, this one’s for you. Really, try it out—I promise it’ll become a favorite you keep coming back to.
Print
Jam Thumbprint Cookies Recipe
- Prep Time: 26 min
- Cook Time: 14 min
- Total Time: 40 min
- Yield: 28 cookies
- Category: Dessert
- Method: Baking
- Cuisine: British
Description
Jam Drops, also known as Thumbprint Cookies, are buttery vanilla shortbread biscuits filled with luscious jam. This classic recipe features a tender, rich cookie base made with softened unsalted butter, caster sugar, and vanilla, shaped traditionally by pressing a thumbprint into the dough to create a well for the jam. Unlike some versions that add jam after baking, this recipe bakes the jam directly into the cookie, enhancing the flavor and texture. Popular jam choices include strawberry, raspberry, and apricot, making these cookies delightfully sweet and perfect for teatime or festive occasions.
Ingredients
Cookie Dough
- 225g (2 sticks) unsalted butter, softened
- 3/4 cup caster sugar / superfine sugar (regular granulated sugar is acceptable)
- 2 tsp vanilla extract
- 1 large egg, at room temperature (~50-55g/2oz)
- 2 1/2 cups plain flour (all-purpose flour)
- 1/4 tsp cooking salt / kosher salt
Filling
- 1/2 cup strawberry or raspberry jam (or any other flavor, mixed well to loosen)
Instructions
- Prepare the dough: In a large mixing bowl, cream together the softened unsalted butter and caster sugar until light and fluffy. Add the vanilla extract and the room temperature egg, beating well to combine fully.
- Mix dry ingredients: In a separate bowl, sift together the plain flour and salt. Gradually incorporate the dry ingredients into the wet mixture, mixing until a smooth, stiff dough forms. Do not overwork the dough to keep it tender.
- Chill the dough: Wrap the dough in plastic wrap and chill it in the refrigerator for at least 20 minutes. This helps the dough firm up, making it easier to handle and helps the cookies keep their shape during baking.
- Preheat the oven: Set your oven to 350°F (175°C) and line baking trays with parchment paper or a silicone baking mat to prevent sticking.
- Shape the cookies: Roll the dough into walnut-sized balls and place them evenly spaced on the prepared trays. Use your thumb or the back of a spoon to press a deep dent into the center of each ball, creating the “thumbprint.”
- Add the jam: Spoon about 1/2 teaspoon of the loosened jam into each thumbprint indentation. Be generous but avoid overfilling to prevent jam spilling during baking.
- Bake: Place the trays in the preheated oven and bake for approximately 14 minutes, or until the edges of the cookies are light golden brown and the jam is bubbling slightly.
- Cool: Remove the cookies from the oven and allow them to cool on the baking sheets for 5 minutes before transferring them to a wire rack to cool completely. This helps the cookies set and prevents breakage.
Notes
- Video demonstration is available above, showing the traditional thumbprint technique for shaping these cookies.
- The recipe uses a generous amount of jam baked directly into the cookie for optimal flavor contrast and moistness.
- Any jam flavor can be used, with strawberry, raspberry, and apricot being popular and classic choices.
- Using softened butter and room temperature egg is essential for proper dough consistency and texture.
- Chilling the dough before baking helps maintain cookie shape and texture.
- These cookies are inspired by traditional shortbread and are perfect for festive occasions or teatime treats.
Nutrition
- Serving Size: 1 cookie
- Calories: 139
- Sugar: 8 g
- Sodium: 77 mg
- Fat: 7 g
- Saturated Fat: 4 g
- Unsaturated Fat: 2.3 g
- Trans Fat: 0.3 g
- Carbohydrates: 18 g
- Fiber: 0.4 g
- Protein: 1 g
- Cholesterol: 23 mg


