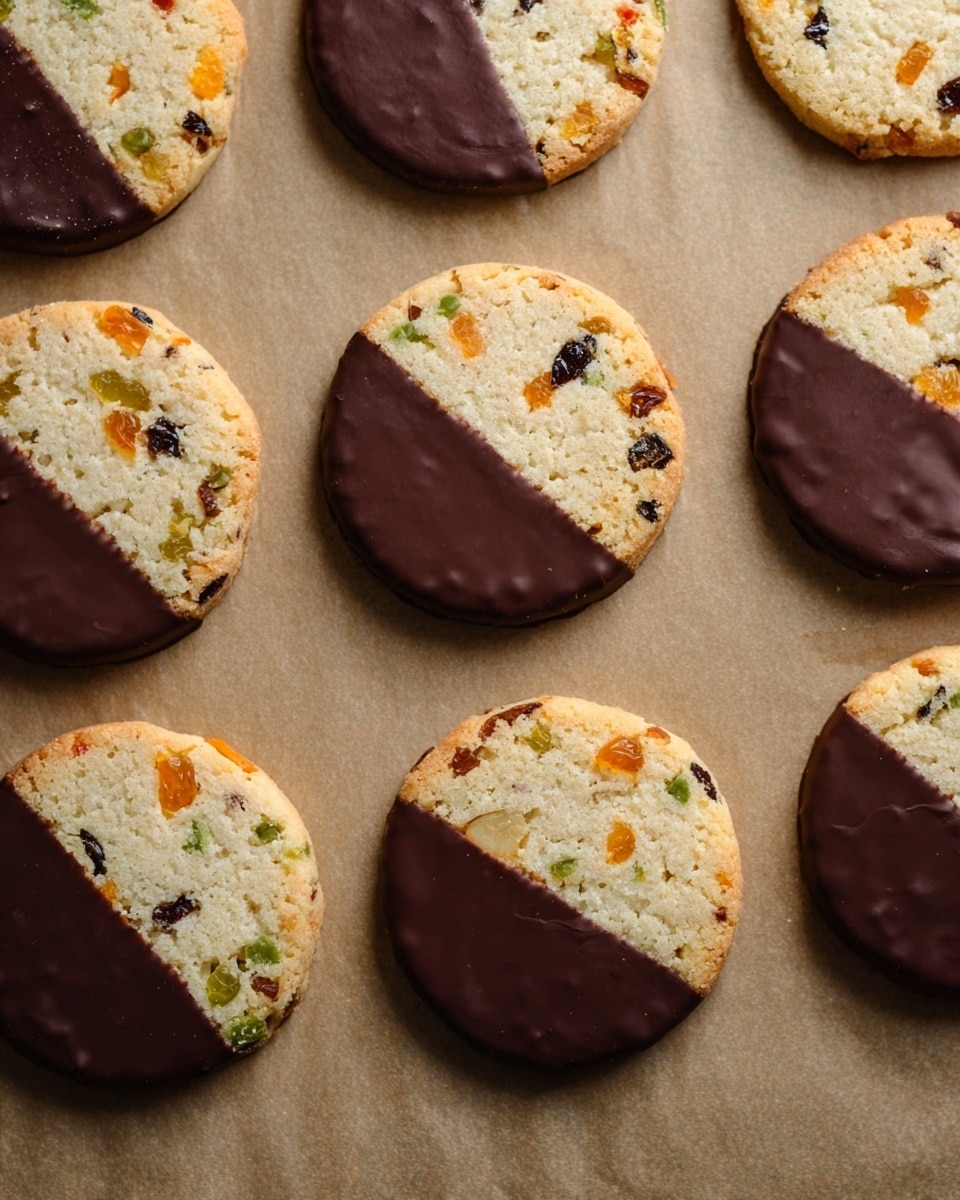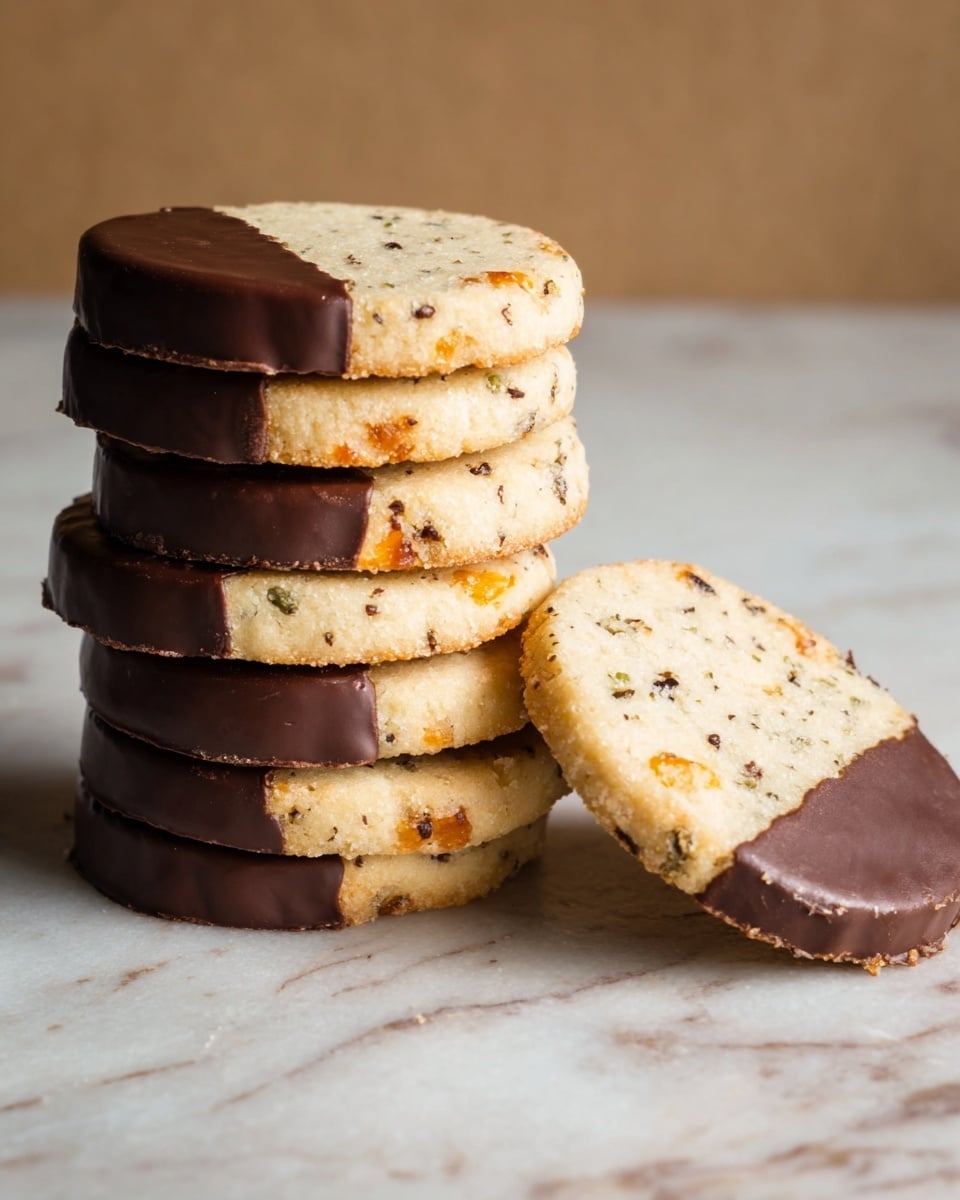
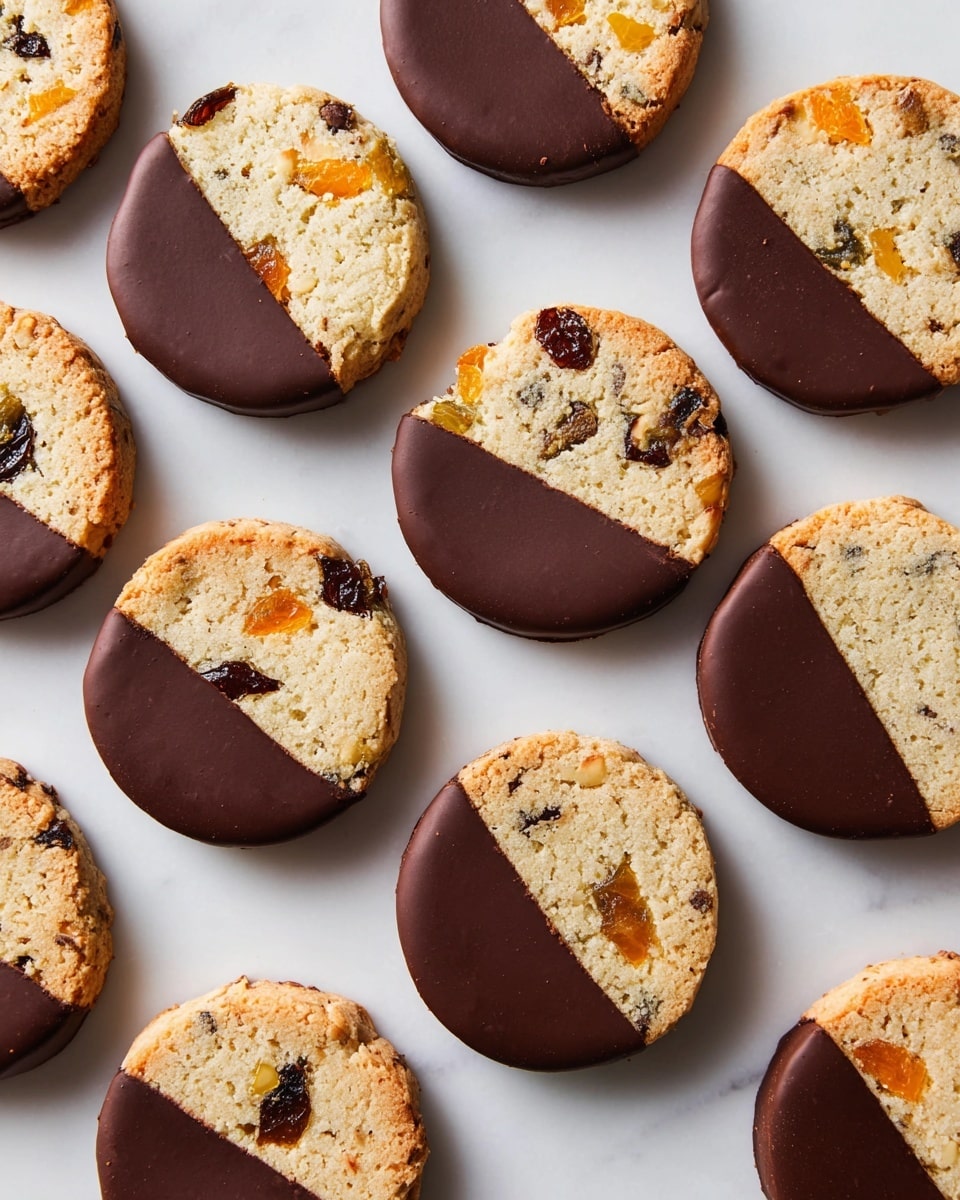
I absolutely love sharing this Jeweled Butter Cookies with Chocolate Glaze Recipe because it’s like a holiday party in cookie form! These cookies sparkle with vibrant dried fruits and crunchy pistachios while the buttery base melts in your mouth. You’ll find that their subtle orange zest adds a fresh twist, making them a standout treat anytime you want something a little special.
When I first tried this recipe, I was hooked by how the colorful jewels—the apricots, cherries, and pistachios—turn simple butter cookies into a feast for the eyes and the palate. They work beautifully for celebrations, gift-giving, or just a cozy afternoon tea. Plus, the chocolate glaze? Pure indulgence that brings everything together with a silky finish you didn’t know you needed.
Why You’ll Love This Recipe
- Beautifully Festive: The combination of dried fruits and pistachios gives these cookies a jewel-like sparkle that’s perfect for gifts or parties.
- Perfect Texture: Buttery and tender yet firm enough to hold the chocolate glaze without sogginess.
- Make Ahead Friendly: You can freeze the cookie dough cylinders and bake fresh slices anytime you want a quick treat.
- Chocolate Glaze Magic: The bittersweet coating adds richness without overpowering the delicate citrus and nutty flavors.
Ingredients You’ll Need
Each ingredient here plays a key role to make these cookies delightfully flavorful and textured. Take a moment to pick quality butter and fresh citrus zest for the best results—you’ll taste the difference immediately!
- Unsalted butter: Using room temperature butter helps create a fluffy cookie dough that’s easier to mix and bake evenly.
- Granulated sugar: Gives just the right amount of sweetness and crunch without overpowering the other flavors.
- Egg yolks: They add richness and help bind the ingredients for that classic buttery texture.
- Orange zest: Freshly grated zest infuses a bright citrus note that balances the sweetness perfectly.
- All-purpose flour: The base for the dough—make sure to measure it properly so your cookies aren’t too dense or crumbly.
- Baking powder: Just a touch to give the cookies a light lift while baking.
- Kosher salt: Enhances all the flavors and balances the sweetness beautifully.
- Pistachios: Roughly chopped for a satisfying crunch and an eye-catching pop of green.
- Dried apricots: Adds chewy sweetness and vibrant color; chop them roughly to spread flavor throughout.
- Dried sour cherries: Their tart punch keeps the cookie bright and adds a lovely ruby jewel effect.
- Bittersweet chocolate: Melted for the glaze, it adds an indulgent, slightly bitter contrast that pairs perfectly with the fruit and nuts.
- Neutral oil (coconut or vegetable): Mixed into the chocolate glaze to make it smooth and glossy.
Variations
I love getting creative with this Jeweled Butter Cookies with Chocolate Glaze Recipe. Whether you swap out the fruits or experiment with different nuts, you can easily make it your own—and your friends and family will never guess you mixed things up!
- Fruit Swap: I once replaced dried apricots with chopped dried mango, which gave a tropical twist my kids adored.
- Nut Variations: Think almonds or pecans instead of pistachios for a different crunch and flavor profile.
- Spice It Up: A pinch of cinnamon or nutmeg blends beautifully with the orange zest and enhances that warm, cozy vibe.
- Gluten-Free Version: Using a gluten-free flour blend works well, just be sure to chill the dough thoroughly before slicing to prevent crumbling.
How to Make Jeweled Butter Cookies with Chocolate Glaze Recipe
Step 1: Cream the Butter and Sugar
Start by beating the unsalted butter and granulated sugar together on medium speed until the mixture is light and fluffy—this usually takes about 2 minutes. I find using an electric mixer makes this step a breeze and gives a smooth texture to the dough. Then add the egg yolks and freshly grated orange zest, mixing until everything is well combined and aromatic.
Step 2: Incorporate Dry Ingredients and Jewels
Mix in the all-purpose flour, baking powder, and kosher salt next, but be careful not to overbeat—just combine them on low to medium speed. Then fold in your chopped pistachios, dried apricots, and sour cherries. I usually give this part a gentle pulse with the mixer or even finish by hand to make sure those colorful “jewels” stay evenly scattered without breaking down.
Step 3: Shape and Chill
Divide your dough into two halves, then roll each half into a 2-inch cylinder using plastic wrap to get a smooth, even shape. Trust me, handling two smaller cylinders makes slicing easier and neater than one giant log. Pop them in the freezer for 2 to 4 hours until they’re nice and firm—this chilling step is key for slicing perfect cookies that won’t lose their shape during baking.
Step 4: Slice and Bake
Preheat your oven to 350°F (175°C). Using a sharp knife (a serrated one can work wonders here), slice ¼-inch thick pieces from one frozen dough cylinder. Line a baking sheet with parchment paper and place the slices on it, leaving a little space between. Bake for about 15 minutes or until the edges turn light golden—your kitchen will start smelling amazing! Let the cookies cool completely on a rack before glazing.
Step 5: Dip in Chocolate Glaze
While your cookies cool, melt the bittersweet chocolate gently (a microwave in short bursts or a double boiler works great). Whisk in a teaspoon of neutral oil like coconut or vegetable to give the glaze a luscious shine and smooth texture. Transfer the warm glaze to a container wide enough to dip the cookies halfway, then carefully dunk each cookie and lay it on parchment paper to set. You can leave them at room temperature or speed things up by chilling in the fridge.
Pro Tips for Making Jeweled Butter Cookies with Chocolate Glaze Recipe
- Roll Evenly: Use plastic wrap to shape smooth cylinders so your slices are uniform, which helps cookies bake evenly.
- Freeze Thoroughly: Don’t rush the freezer step; firm dough slices maintain their shape better and prevent spreading in the oven.
- Sharp Knife Slicing: A really sharp knife or a serrated blade cuts cleanly through frozen dough, avoiding ragged edges.
- Chocolate Tempering Avoidance: Adding oil to the melted chocolate keeps it glossy and prevents it from hardening too stiff or dull.
How to Serve Jeweled Butter Cookies with Chocolate Glaze Recipe
Garnishes
I love sprinkling a few finely chopped pistachios or a light dusting of powdered sugar over the chocolate glaze before it sets. It adds a nice touch of elegance and a little extra crunch that complements the cookie’s textures beautifully.
Side Dishes
These cookies pair wonderfully with a warm cup of chai tea or a frothy cappuccino. For holiday gatherings, I like serving them alongside a cheese board featuring mild cheeses and fresh fruit, which balances their sweetness perfectly.
Creative Ways to Present
For special occasions, I arrange these jeweled cookies on a tiered dessert stand surrounded by fresh edible flowers or citrus slices. Wrapping individual cookies in decorative cellophane bags tied with ribbon also makes a heartfelt homemade gift that friends and family rave about every year.
Make Ahead and Storage
Storing Leftovers
I store leftover Jeweled Butter Cookies with Chocolate Glaze in an airtight container at room temperature, layering parchment paper between them to keep the chocolate intact. They usually last up to a week without losing that fresh-baked charm.
Freezing
Freezing the dough cylinders is my favorite trick for having cookies ready on demand. You can also freeze fully baked and glazed cookies on a baking sheet, then transfer them to a freezer bag once solid. Just thaw at room temperature before serving for best taste.
Reheating
If you want to refresh slightly stale cookies, popping them in a low oven (around 275°F) for 5-7 minutes or warming gently in the microwave for 10-15 seconds works wonders. Just be careful not to melt the chocolate glaze during reheating.
FAQs
-
Can I use other types of dried fruit in the Jeweled Butter Cookies with Chocolate Glaze Recipe?
Absolutely! Feel free to substitute the apricots and sour cherries with dried cranberries, raisins, or chopped dried figs. Just ensure the pieces are roughly chopped so they distribute evenly without making the dough too wet.
-
What if I don’t have pistachios—can I omit or replace them?
You can replace pistachios with other nuts like walnuts, almonds, or pecans depending on your taste preference. If you need to omit nuts altogether, just increase the dried fruit slightly to keep that “jeweled” look and texture.
-
Is it necessary to add oil to the chocolate glaze?
Adding a little neutral oil helps the melted chocolate become glossy and easier to dip your cookies smoothly. It also prevents the glaze from hardening too stiff or cracking when it sets, which can happen with plain melted chocolate.
-
Can I make this recipe vegan or dairy-free?
To make it vegan, you can substitute the butter with a plant-based spread and replace egg yolks with flaxseed meal mixed with water or a commercial vegan egg replacer. For the glaze, use dairy-free chocolate. The texture may vary slightly, so chilling the dough well before baking is crucial.
-
How do I ensure the cookies don’t spread too much during baking?
Chilling the dough cylinders thoroughly before slicing and baking is key. This firms up the butter and helps the cookies keep their shape in the oven instead of melting into flat discs.
Final Thoughts
This Jeweled Butter Cookies with Chocolate Glaze Recipe has become one of those comforting yet festive staples in my kitchen. I love how it brings so many textures and flavors together, making even ordinary days feel a bit more special. If you try it, I’m certain you’ll find these cookies are as charming to make and share as they are to eat—trust me, they always spark smiles and requests for seconds!
Print
Jeweled Butter Cookies with Chocolate Glaze Recipe
- Prep Time: 2 hours 10 minutes
- Cook Time: 15 minutes
- Total Time: 2 hours 25 minutes
- Yield: 3 ½ dozen cookies
- Category: Dessert
- Method: Baking
- Cuisine: American
Description
Jeweled Butter Cookies are a delightful treat featuring rich, buttery dough studded with vibrant pistachios, dried apricots, and sour cherries. Finished with a glossy bittersweet chocolate glaze, these cookies combine fruity tartness and nutty crunch with smooth chocolate, perfect for festive occasions or everyday indulgence.
Ingredients
For the Cookies:
- 1 cup (2 sticks) unsalted butter, at room temperature
- 3/4 cup granulated sugar
- 3 large egg yolks
- 1 teaspoon freshly grated orange zest
- 2 1/2 cups all-purpose flour
- 1/2 teaspoon baking powder
- 1/2 teaspoon kosher salt
- 1/2 cup pistachios, roughly chopped
- 1/2 cup dried apricots, roughly chopped
- 1/2 cup dried sour cherries, roughly chopped
For the Chocolate Glaze:
- 4 ounces bittersweet chocolate, melted
- 1 teaspoon neutral oil (such as coconut or vegetable)
Instructions
- Make the cookies: In a large bowl, with an electric mixer on medium speed, beat the unsalted butter and granulated sugar together until combined and fluffy, about 2 minutes. Add the egg yolks and freshly grated orange zest, beating until fully incorporated. Gradually beat in the all-purpose flour, baking powder, and kosher salt. Finally, fold in the roughly chopped pistachios, dried apricots, and dried sour cherries, mixing just until evenly distributed throughout the dough.
- Shape dough cylinders: Divide the cookie dough in half. Lay each portion onto a sheet of plastic wrap and roll into a 2-inch diameter cylinder. Creating two smaller cylinders makes handling easier than one large roll. Place the dough cylinders in the freezer and chill until solid, which will take approximately 2 to 4 hours.
- Bake the cookies: Preheat your oven to 350°F (175°C). Using a sharp knife, slice the frozen dough cylinders into 1/4-inch thick rounds. Arrange the slices on parchment-lined baking sheets, spacing them slightly apart. Bake in the preheated oven until they are set and lightly golden around the edges, about 15 minutes. Remove the cookies and transfer them to a wire rack to cool completely.
- Prepare and apply the chocolate glaze: Line two cookie sheets with parchment paper. Whisk the neutral oil into the warm melted bittersweet chocolate to create a smooth glaze. Pour the chocolate mixture into a narrow glass or ramekin wide enough to dip the cookies comfortably, ensuring at least 1 ½ inches of depth. Dip each cooled cookie into the chocolate glaze, coating it partially or fully as desired, then place it back onto the prepared sheets. Allow the chocolate to set at room temperature or refrigerate until firm.
- Storage: Once the chocolate glaze has set, store the cookies in an airtight container. They will keep fresh for up to one week.
Notes
- Freezing the dough is essential for easy slicing and maintaining cookie shape during baking.
- Using fresh orange zest adds a bright citrus note that complements the dried fruit.
- Chopped pistachios can be substituted with other nuts like almonds or pecans if preferred.
- For a smoother chocolate glaze, ensure the chocolate is melted gently and combined thoroughly with the oil.
- Cookies can be partially dipped or fully coated with chocolate depending on your presentation preference.
Nutrition
- Serving Size: 1 cookie
- Calories: 110
- Sugar: 5 g
- Sodium: 65 mg
- Fat: 7 g
- Saturated Fat: 3.5 g
- Unsaturated Fat: 3 g
- Trans Fat: 0 g
- Carbohydrates: 11 g
- Fiber: 0.7 g
- Protein: 1.5 g
- Cholesterol: 25 mg

