

If you’re on the hunt for a refreshing and totally irresistible dessert, you’ve got to try this Key Lime Pie Bars Recipe. It’s like all the best parts of a traditional key lime pie, but baked into easy-to-handle bars that are perfect for sharing or a little personal indulgence. Whether you’re new to key lime or a longtime fan like me, these bars deliver a creamy, tangy punch balanced with a buttery graham cracker crust that just clicks every time. I love this recipe because it’s straightforward, uses just a handful of ingredients, and you’ll find it’s perfect for both casual get-togethers and fancy summer dinners.
Why You’ll Love This Recipe
- Simplicity Meets Flavor: Only 7 key ingredients combine to create a dessert that’s bursting with bright, tangy lime goodness and creamy texture.
- No Fancy Equipment Needed: You can make the crust by hand with a rolling pin or use your food processor for ease.
- Perfect for Any Occasion: These bars travel well, chill beautifully, and slice easily for parties, picnics, or a weeknight sweet treat.
- A Crowd-Pleaser: My family goes crazy for these, and I guarantee your guests will too.

Ingredients You’ll Need
The magic behind these key lime pie bars lies in simple, fresh ingredients that balance richness and zing perfectly. Good quality butter and cream cheese really make a difference, and fresh key lime juice and zest bring that authentic, tropical brightness you’re craving.
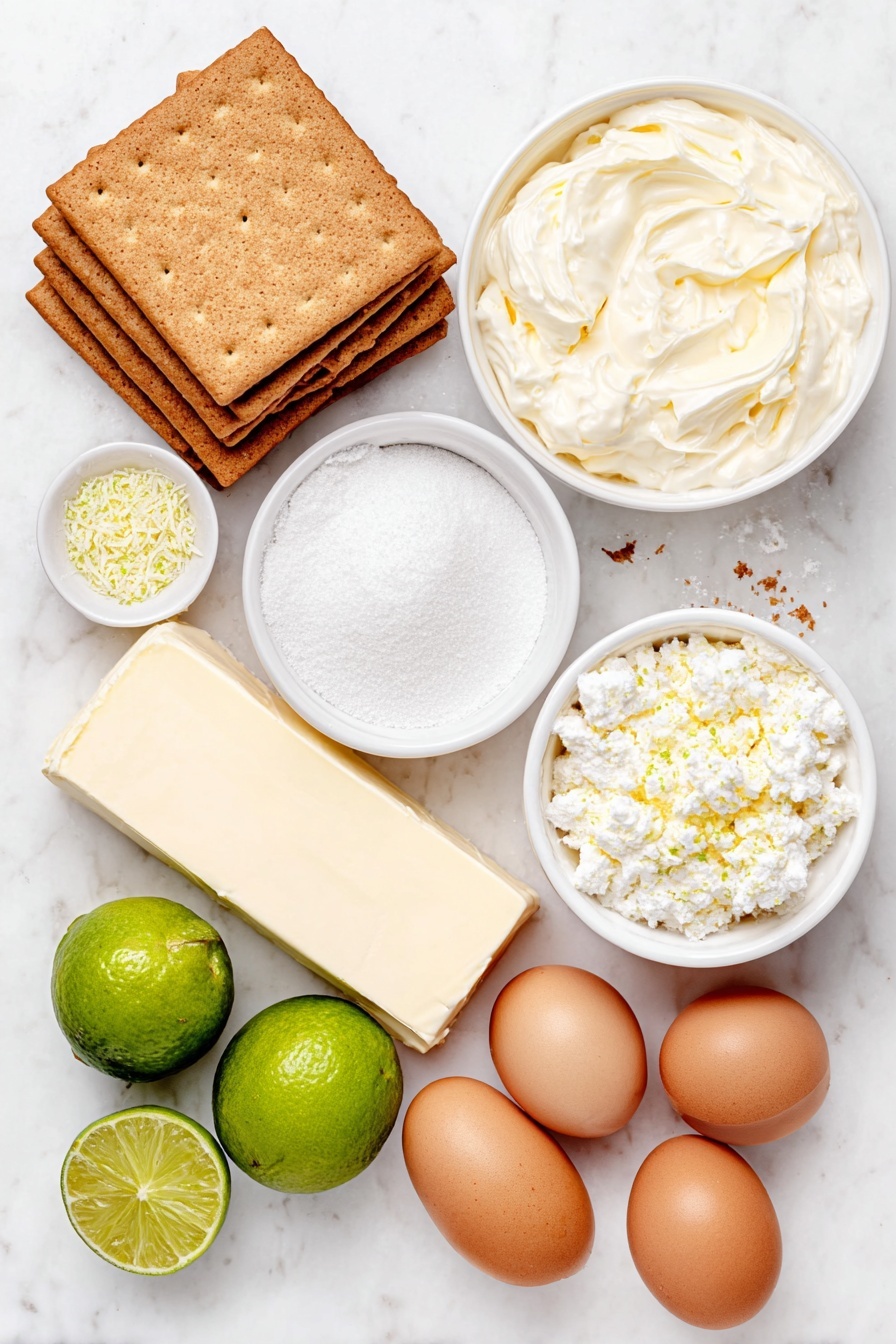
- Graham crackers: These form a crunchy, buttery crust that’s a classic base. I always opt for full sheet crackers for even crumbs.
- Unsalted butter: Melted is key to binding the crust — and it helps control the salt level.
- Granulated sugar: Adds just the right hint of sweetness in the crust and filling.
- Cream cheese: Make sure it’s softened to room temperature, or you risk lumps in your filling.
- Egg yolks: These add richness and help the filling set up nicely.
- Sweetened condensed milk: It gives the filling the perfect silky texture and sweetness without fuss.
- Key lime juice and lime zest: The stars of the show! Freshly squeezed key lime juice and zest pack a punch of citrusy tang.
Variations
I like to keep things classic most of the time, but feel free to get playful! This Key Lime Pie Bars Recipe is forgiving and totally perfect for adjustments if you want to match your taste buds or dietary needs.
- Make it vegan: Swap out the cream cheese for vegan cream cheese, use a plant-based butter, and try sweetened condensed coconut milk instead of dairy.
- Extra zing: Add a splash of fresh lemon juice along with the key lime for an extra citrusy kick—I discovered this trick when I had lemons but no extra limes on hand.
- Graham crust swap: Try crushed digestive biscuits or gluten-free crackers if you need a gluten-free option.
- Texture twist: Stir in some shredded coconut or finely chopped pistachios into the crust for a fun crunch.
How to Make Key Lime Pie Bars Recipe
Step 1: Prep the Crust with Love
Start by preheating your oven to 350°F (177°C) and lining a 9-inch square pan with parchment paper, making sure to leave an overhang—you’re going to love how easy it is to lift the bars out later. Next, crush those graham crackers into fine crumbs. If you don’t have a food processor handy, no worries! Toss them in a zip-top bag and crush them with a rolling pin. Mix the crumbs with granulated sugar and melted butter until you get a sandy, slightly thick mixture. Be sure to break up any clumps so it presses down evenly. Press the crust firmly into the bottom of your pan, trying not to leave gaps or loose spots. Bake for 10 minutes and let it cool while you prepare the filling.
Step 2: Whip Up the Creamy Filling
This is where everything comes together. Using a handheld or stand mixer fitted with a paddle or whisk attachment, beat the softened cream cheese on medium-high speed until it’s perfectly smooth—about a minute. Add the egg yolks, beating them in one at a time, and scrape down the bowl to avoid lumps. Pour in the sweetened condensed milk, fresh key lime juice, and zest, and mix until everything combines beautifully. I always finish off with a quick whisk by hand to be sure there are no hidden lumps from the cream cheese hiding at the bottom—trust me, it makes all the difference in that silky texture.
Step 3: Bake to Tangy Perfection
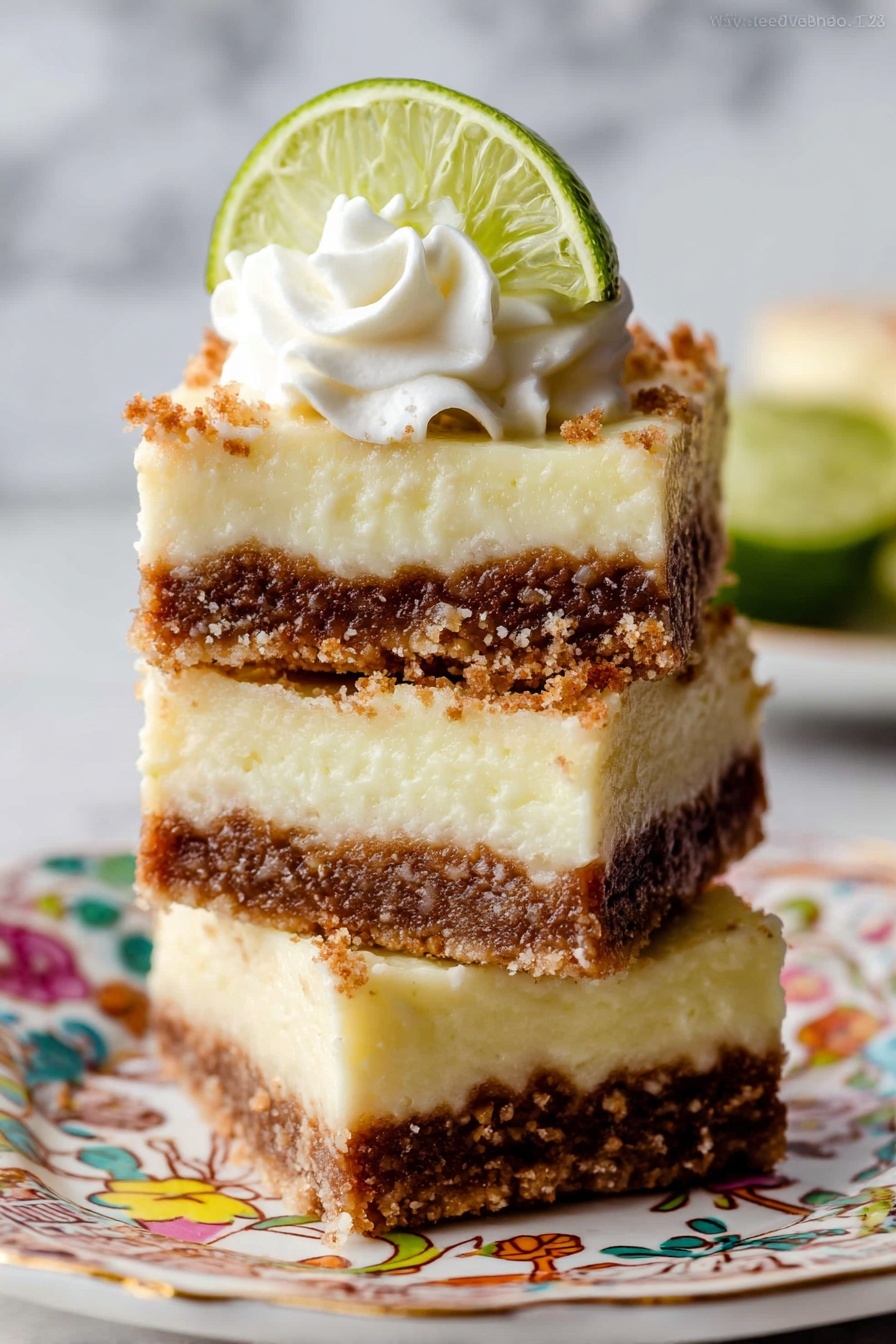
Pour the luscious filling over the warm crust, spreading it evenly. Pop the pan back into the oven and bake for about 18-20 minutes. The edges should look set and firm, but the center will still have a slight jiggly feel—that’s exactly what you want for that creamy texture once chilled. Resist the urge to overbake! Let the bars cool on a wire rack for about 30 minutes before transferring to the refrigerator to chill for at least 2-3 hours. This chilling step is crucial to help the bars fully set so you can cut clean squares.
Step 4: Cut, Garnish, and Enjoy!
Once chilled, use the parchment overhang to carefully lift the entire slab from the pan. Cut into bars and get creative with garnishes—my go-to is a swirl of whipped cream and a slice of fresh lime on top. I even like using a Wilton 1M piping tip for a pretty presentation when entertaining friends. Store leftovers in an airtight container in the fridge, and they’ll stay fresh for up to 5 days (if they last that long!).
Pro Tips for Making Key Lime Pie Bars Recipe
- Room Temperature Ingredients: Always soften your cream cheese fully to avoid lumps and ensure a smooth filling.
- Don’t Skip the Chill: Chilling the bars for several hours is what helps them slice cleanly and develop that perfect creamy texture.
- Press Crust Firmly: Use the bottom of a glass or measuring cup to press the crust firmly and evenly, so it holds together nicely after baking.
- Watch Your Bake Time: The center should still jiggle slightly when you pull the bars from the oven; this prevents a dry or cracked filling.
How to Serve Key Lime Pie Bars Recipe
Garnishes
I adore topping my key lime pie bars with freshly whipped cream and a thin slice of lime or extra lime zest to amp up the citrus aroma. For a little texture and flavor contrast, sometimes I sprinkle toasted coconut flakes or crushed pistachios on top. It’s simple but elevates the bars instantly!
Side Dishes
These bars shine on their own but paired with light, fresh sides like a mixed berry salad or even a chilled mint tea—they turn an ordinary dessert moment into something special. For parties, I also like serving them alongside a scoop of vanilla bean ice cream for extra indulgence.
Creative Ways to Present
When I want to wow guests, I arrange key lime pie bars on a pretty platter with dollops of whipped cream around each square, topped with tiny edible flowers or thin lime wheels. I once used clear mini cups to create individual “key lime pie bites” layered with whipped cream and crushed graham crumbs for a fun, no-mess option at a party. Trust me, presentation can be as refreshing as the dessert itself!
Make Ahead and Storage
Storing Leftovers
After making these bars, I store leftovers in an airtight container in the refrigerator. I’ve found they stay fresh and delicious for up to 5 days—which makes them perfect for prepping ahead of time. Just keep the garnish separate if you’re adding whipped cream or lime slices.
Freezing
I’ve had great luck freezing these bars wrapped tightly in plastic wrap and then foil for up to 1 month. When you’re ready, let them thaw overnight in the fridge. While the texture is slightly softer after freezing, the flavor stays vibrant and delicious—perfect for batch making ahead.
Reheating
Since these are dessert bars, I usually enjoy them straight from the fridge, but if you prefer them closer to room temperature, just leave them out for about 15-20 minutes before serving. Warming them isn’t necessary and can change the texture, so I don’t recommend microwaving or heating.
FAQs
-
Can I use regular limes instead of key limes for this recipe?
Absolutely! While key limes have a unique aroma and slightly more floral taste, regular Persian limes work just fine and are easier to find in most stores. You’ll still get that bright, tangy flavor that’s essential for these bars.
-
Why does the filling need to be slightly jiggly when I take it out of the oven?
The slight jiggle means the filling isn’t overcooked, ensuring it stays creamy and smooth once chilled. If you bake it until completely firm, you risk a dry, crumbly texture rather than a luscious pie-like finish.
-
Can I make the graham cracker crust gluten-free?
Yes! Simply substitute gluten-free graham crackers or any gluten-free crunchy cookie you like. Just be sure to adjust the amount slightly if your crumbs are finer or coarser.
-
How do I prevent cracking on the top of the bars?
Be careful not to overbake your bars and avoid opening the oven door too often while baking. The moist filling and proper chilling help keep the surface smooth and crack-free.
-
Can I double this recipe for a larger batch?
Definitely! Just double the ingredients and bake in a larger pan—like a 9×13-inch—and adjust baking times as needed. Start checking for doneness a few minutes earlier to avoid overbaking.
Final Thoughts
This Key Lime Pie Bars Recipe holds a special place in my heart because it’s the perfect blend of simplicity and show-stopping flavor. I’ve shared these bars at everything from backyard barbecues to holiday brunches, and every single time they’re the first dessert to disappear. I highly recommend you try making this for your next occasion or even just as a sweet way to brighten your day. Trust me—you’ll be hooked, and your friends and family will keep asking you for this recipe. Enjoy every tangy, creamy bite!
Print
Key Lime Pie Bars Recipe
- Prep Time: 15 minutes
- Cook Time: 30 minutes
- Total Time: 3 hours 30 minutes
- Yield: 16 bars
- Category: Dessert
- Method: Baking
- Cuisine: American
- Diet: Vegetarian
Description
These Key Lime Pie Bars offer a bright and creamy twist on the classic pie, featuring a buttery graham cracker crust and a tangy, smooth key lime filling. Perfectly balanced and easy to make, they’re an ideal refreshing dessert for any occasion.
Ingredients
Crust
- 12 full-sheet graham crackers (to yield 1 and 1/2 cups / 180g graham cracker crumbs)
- 6 Tablespoons (85g) unsalted butter, melted
- 1/4 cup (50g) granulated sugar
Filling
- 4 ounces (113g) full-fat brick cream cheese, softened to room temperature
- 4 large egg yolks
- 14-ounce (397g) can of sweetened condensed milk
- 1/2 cup (120ml) key lime juice
- 2 teaspoons lime zest (about 1 lime or 2 key limes)
Optional Garnish
- Whipped cream
- Lime slices
Instructions
- Preheat and Prepare Pan: Preheat your oven to 350°F (177°C). Line a 9-inch square baking pan with parchment paper, leaving an overhang on the sides for easy removal of the bars. Set the pan aside.
- Make the Crust: Grind the full graham crackers into fine crumbs using a food processor, blender, or by crushing in a zip-top bag with a rolling pin. In a medium bowl, combine the graham cracker crumbs and granulated sugar. Stir in the melted butter until the mixture is thick and sandy, breaking up any large chunks. Press this mixture evenly into the bottom of the prepared pan.
- Bake the Crust: Bake the crust for 10 minutes until slightly toasted. Remove from the oven and let it cool for a few minutes while you prepare the filling.
- Prepare the Filling: Using a handheld or stand mixer with a paddle or whisk attachment, beat the cream cheese on medium-high speed for about 1 minute until smooth. Add the egg yolks and mix until combined, scraping down the bowl as needed. Beat in the sweetened condensed milk, key lime juice, and lime zest until fully incorporated. Finish with a hand whisk to ensure there are no lumps.
- Assemble and Bake: Pour the filling evenly over the warm crust. Bake for 18-20 minutes, or until the edges are set and the center is slightly jiggly.
- Cool and Chill: Remove the bars from the oven and cool on a wire rack for 30 minutes at room temperature. Refrigerate for at least 2-3 hours to allow the bars to fully set.
- Serve: Use the parchment paper overhang to lift the bars out of the pan. Cut into 16 squares and garnish with whipped cream, lime slices, or extra lime zest if desired. Store leftovers in an airtight container in the refrigerator for up to 5 days.
Notes
- These bars require only 7 ingredients and are a handheld version of classic key lime pie.
- Be sure to cool and thoroughly chill the bars before cutting to ensure clean squares and proper set texture.
- The graham cracker crust can be made from full crackers crushed finely or pre-packaged crumbs.
- For a decorative touch, pipe whipped cream using a star tip like Wilton 1M before serving.
- The bars keep well refrigerated up to 5 days, making them great for make-ahead desserts.
Nutrition
- Serving Size: 1 bar (1/16th of recipe)
- Calories: 270
- Sugar: 23g
- Sodium: 140mg
- Fat: 15g
- Saturated Fat: 9g
- Unsaturated Fat: 5g
- Trans Fat: 0g
- Carbohydrates: 28g
- Fiber: 1g
- Protein: 4g
- Cholesterol: 95mg


