

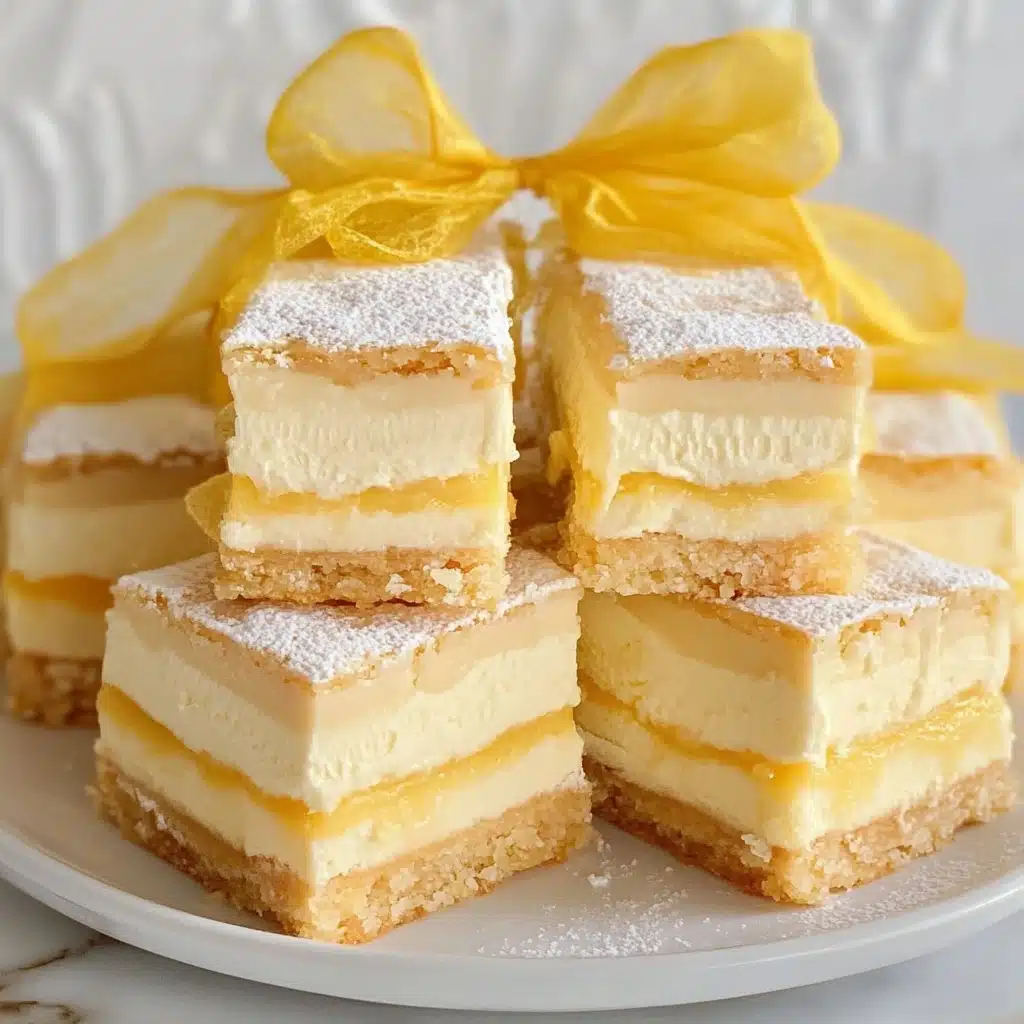
Ready for a burst of pure sunshine in every bite? These Lemon Ice Cream Bars are a dreamy mashup of bright, tangy lemon bars and ultra-creamy vanilla ice cream, all layered up into one hand-held, utterly refreshing treat. Trust me—whether you’re craving a summery dessert or just need a sweet pick-me-up, this easy recipe is destined to become a new favorite!
Why You’ll Love This Recipe
- The Best of Both Worlds: Enjoy the irresistible combination of zesty lemon bars layered with cool, creamy vanilla ice cream—no need to choose between your two favorite desserts!
- Ridiculously Easy: Thanks to a boxed lemon bar mix and store-bought ice cream, anyone can whip up Lemon Ice Cream Bars—even on a busy weeknight.
- Perfect for Sharing: These bars are made for slicing and serving at potlucks, birthdays, BBQs, or just whenever you want to brighten someone’s day.
- A Little Messy, A Lot of Fun: Embrace that playful, melty magic—these bars are meant for sticky fingers and big smiles.

Ingredients You’ll Need
This recipe proves you don’t need a mile-long grocery list for a showstopping treat. Every ingredient here works together to create Lemon Ice Cream Bars that are sweet, tangy, creamy, and full of sunny color—and you probably have almost everything on hand already!
- Krusteaz Lemon Bars Supreme Mix: This mix is the secret shortcut to perfectly tart, foolproof lemon bars every time—no fussy lemons or extra measuring required.
- Eggs & Water: Mixed into the filling to create that rich, custardy texture and help everything set up perfectly.
- Vanilla Ice Cream: The ultra-creamy layer that brings a sweet, cool contrast to the zingy lemon. Use your favorite brand—or homemade!
- Parchment Paper & Cooking Spray: Essential for fuss-free layering and lifting the bars out for easy cutting.
Variations
The beauty of Lemon Ice Cream Bars is how easy they are to personalize! Swap out ingredients or dress them up to suit any taste, occasion, or dietary need. Here are a few of the endless possibilities to inspire your next batch:
- Try a Graham Cracker Crust: For extra crunch and a classic flavor twist, use a graham cracker crust mix or make your own.
- Add Berry Swirls: Gently swirl in raspberry or blueberry jam between the lemon bar and ice cream layers for a sweet-tart berry boost.
- Swap the Ice Cream: Go for lemon, coconut, or even strawberry ice cream for a different flavor profile.
- Gluten-Free Option: Use a gluten-free lemon bar mix and double check your ice cream if you’re baking for a crowd with sensitivities.
How to Make Lemon Ice Cream Bars
Step 1: Prepare the Lemon Bar Batter
First, stir the provided lemon filling mix from the box with water and eggs in a bowl until there are no streaks left. You want it beautifully smooth—take a moment to whisk thoroughly. Set this aside while you prepare and bake the crust (trust me, letting it sit helps intensify the lemony flavor!).
Step 2: Press and Bake the Crust
Line a 13×9-inch baking pan with parchment paper, then give it a quick spray with nonstick cooking spray. Add the crust mix from your box and press it evenly into the bottom. Bake in a preheated 350°F oven for 8-10 minutes—just until set and still pale in color. This ensures your bars will hold up but stay tender after freezing.
Step 3: Pour on the Filling and Bake Again
Give your lemon batter one last stir, then pour it over the hot crust. Smooth the top gently. Return to the oven for about 25 minutes, until the edges are just starting to take on a golden hue. The center may look slightly soft, but it will set up as it chills. Cool completely, then refrigerate for 1–2 hours until firm enough to cut.
Step 4: Slice the Bars and Prep the Ice Cream
Once your lemon bars are thoroughly chilled, lift them from the pan using the parchment paper. Slice the entire slab horizontally through the middle, creating two even layers (this feels like dessert magic!). While you prep, let your vanilla ice cream soften at room temperature for 15–20 minutes—it should be spreadable, not melted.
Step 5: Assemble and Freeze
Place one lemon bar layer back in the pan or on a lined tray. Use a spatula to smooth a thick, even layer of softened vanilla ice cream on top, pressing all the way to the edges. Gently position the second lemon bar layer over the ice cream. Cover tightly with plastic wrap and freeze for at least 2–3 hours—this is what gives you those clean, ultra-satisfying slices!
Pro Tips for Making Lemon Ice Cream Bars
- Perfect Slice Every Time: Run your sharpest knife under hot water, dry it off, and cut the bars quickly for those clean, crisp edges (wipe the blade between cuts!).
- Layer Like a Pro: Use an offset spatula or the back of a large spoon to gently coax the ice cream to the pan’s corners without lifting the lemon bars below.
- Softening Done Right: Let the ice cream sit on the counter—we’re aiming for spreadable but not soupy, so check at 10-minute intervals.
- Chill for Real: Don’t rush the freeze! A full two hours in the freezer gives you bars that slice beautifully and hold their shape at the table.
How to Serve Lemon Ice Cream Bars
Garnishes
Dress up these bars with a sprinkle of powdered sugar, a scattering of fresh lemon zest, or even a few edible flowers! A handful of fresh berries on the side brings out the brightness and makes every plate look extra special.
Side Dishes
Lemon Ice Cream Bars are delightfully bold, so pair them with lighter fare like crisp fruit salads, iced herbal teas, or a simple platter of shortbread cookies. These combos keep the vibe fresh and summery, never overwhelming your tastebuds.
Creative Ways to Present
Try slicing the bars into mini squares and serving them on a chilled tray for a party, or cut them into popsicle-style rectangles and slip popsicle sticks in before freezing—kids and adults alike will adore this playful twist!
Make Ahead and Storage
Storing Leftovers
Layer any leftover Lemon Ice Cream Bars between sheets of parchment paper in an airtight container, then pop them straight back in the freezer. They’ll happily hang out for up to a week and taste just as fabulous every time.
Freezing
This recipe is built for freezing! Once assembled and fully set, you can keep the bars frozen for up to 1 month. Just cover tightly to ward off any pesky freezer odors and ice crystals.
Reheating
You won’t want to reheat these, but do let your Lemon Ice Cream Bars sit out for 5 minutes before serving. This softens both the ice cream and lemon layers for a bakery-style bite without melting too fast.
FAQs
-
Can I make Lemon Ice Cream Bars ahead of time?
Absolutely! These bars are the ultimate make-ahead dessert—assemble them a day or two in advance, store in the freezer, and just slice and serve when you’re ready. It doesn’t get more convenient than that!
-
What’s the best way to cut these bars cleanly?
For super neat slices, use a sharp knife dipped in hot water and wiped dry between cuts. This melts through the ice cream and lemon layers easily, giving you bakery-worthy edges.
-
Can I use a different ice cream flavor?
Definitely! Lemon pairs beautifully with everything from tangy raspberry to sweet coconut. Just pick your favorite ice cream and go wild—the bars are meant to be customized to your taste buds.
-
Do Lemon Ice Cream Bars need to be stored in the freezer?
Yes, since they’re part ice cream, these bars should be kept frozen until you’re ready to serve. Leave them out for just a few minutes beforehand for the perfect texture.
Final Thoughts
Give these Lemon Ice Cream Bars a try and watch every face around your table light up! Whether you’re feeding a crowd or sneaking a late-night treat (no judgment here), these bars will wrap you up in bright, creamy sweetness every single bite. Happy baking, and don’t forget to save yourself an extra slice!
Print
Lemon Ice Cream Bars Recipe
- Prep Time: 15 minutes
- Cook Time: 25 minutes
- Total Time: 40 minutes
- Yield: 16 bars
- Category: Dessert
- Method: Baking, Freezing
- Cuisine: American
- Diet: Vegetarian
Description
These Lemon Ice Cream Bars are a delightful summer treat that combines the zesty flavor of lemon bars with the creaminess of vanilla ice cream. A perfect dessert for hot days or any time you’re craving a refreshing and sweet indulgence.
Ingredients
Lemon Bars:
- 1 package Krusteaz Lemon Bars Supreme Mix, prepared as directed
Vanilla Ice Cream:
- 1/2 gallon vanilla ice cream
Instructions
- Prepare Lemon Bars: Stir together water and eggs until well blended. Add lemon filling mix and stir until smooth. Let sit while the crust is baking.
- Bake Crust: Press crust mix into the bottom of a 13×9-inch baking pan lined with sprayed parchment paper. Bake for 8-10 minutes at 350 degrees F until pale.
- Prepare Lemon Filling: Stir the filling mixture again and pour over the hot crust. Bake for 25 minutes or until edges begin to brown. Chill for 1-2 hours before cutting.
- Assemble Bars: Soften vanilla ice cream until spreadable. Cut the lemon bars into two layers. Spread ice cream over the bottom layer, then place the top layer on top. Freeze for 2-3 hours until firm.
Notes
- You can customize these bars by using different flavors of ice cream.
- For a shortcut, you can use store-bought lemon bars instead of making them from a mix.
Nutrition
- Serving Size: 1 bar
- Calories: 403 kcal
- Sugar: 48g
- Sodium: 208mg
- Fat: 17g
- Saturated Fat: 9g
- Unsaturated Fat: 5g
- Trans Fat: 0.003g
- Carbohydrates: 56g
- Fiber: 1g
- Protein: 5g
- Cholesterol: 83mg


