

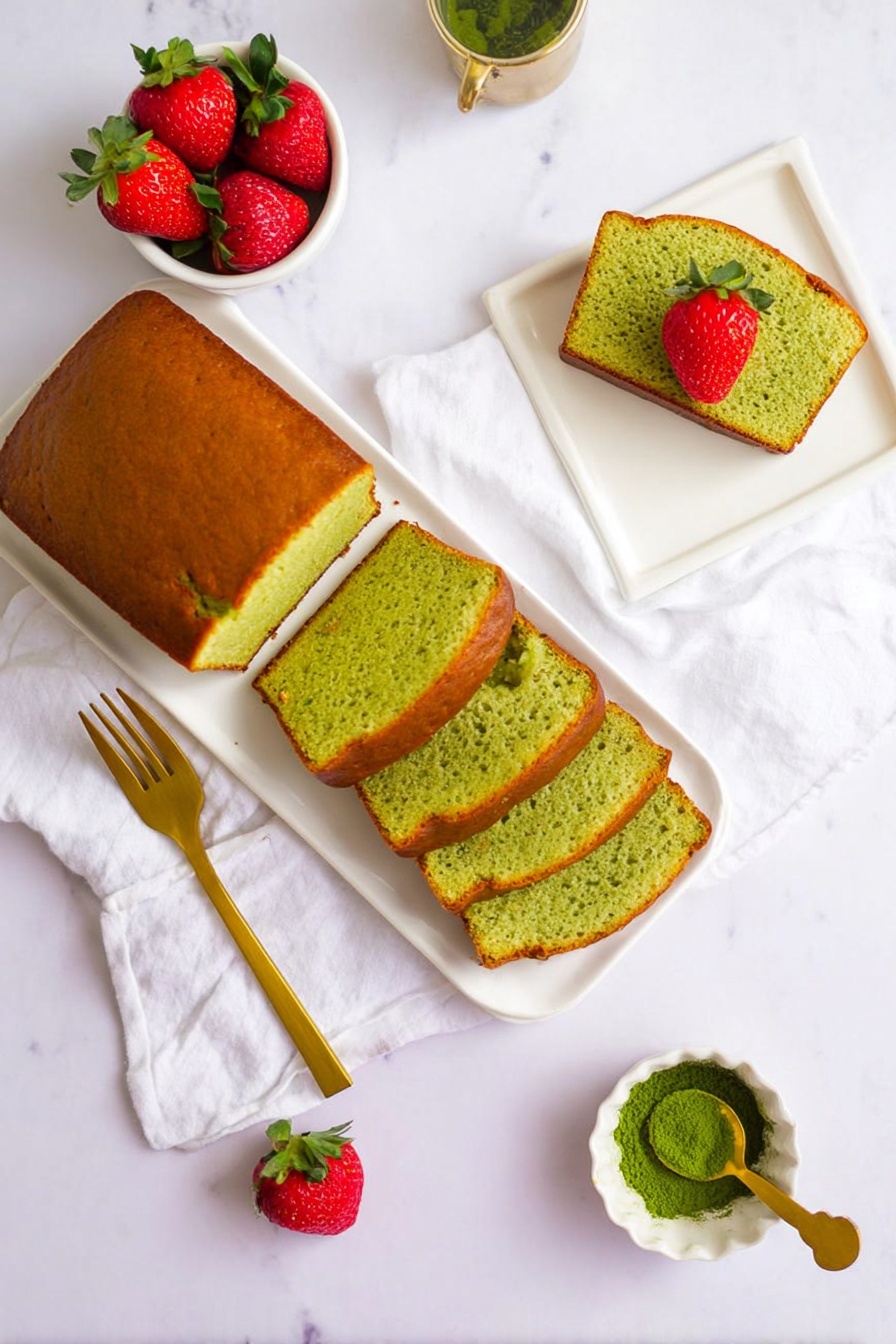
If you’re anything like me and can’t resist the earthy, gently sweet allure of green tea, then you absolutely have to try this Matcha Pound Cake Recipe. It’s one of those gems that balances the classic buttery richness of pound cake with that unique, slightly grassy flavor from matcha powder. I promise, once you bake this, you’ll want to make it again and again — it’s fan-freaking-tastic!
Why You’ll Love This Recipe
- Perfect Balance of Flavors: The bright, grassy notes of matcha blend beautifully with the rich, buttery base for a sophisticated taste.
- Light Yet Moist Texture: Using whipped egg whites gives the cake a fluffy, tender crumb rather than something dense and heavy.
- Simple Ingredients, Impressive Results: You don’t need anything fancy—just pantry staples and good quality matcha powder to shine.
- Reliable and Foolproof: I made this recipe dozens of times, and it never fails to turn out beautifully every single time.

Ingredients You’ll Need
These ingredients are super accessible and work together seamlessly. Using room-temperature eggs and butter really helps with the texture, and a good-quality matcha powder is the star that gives this cake its signature flavor and gorgeous green hue.
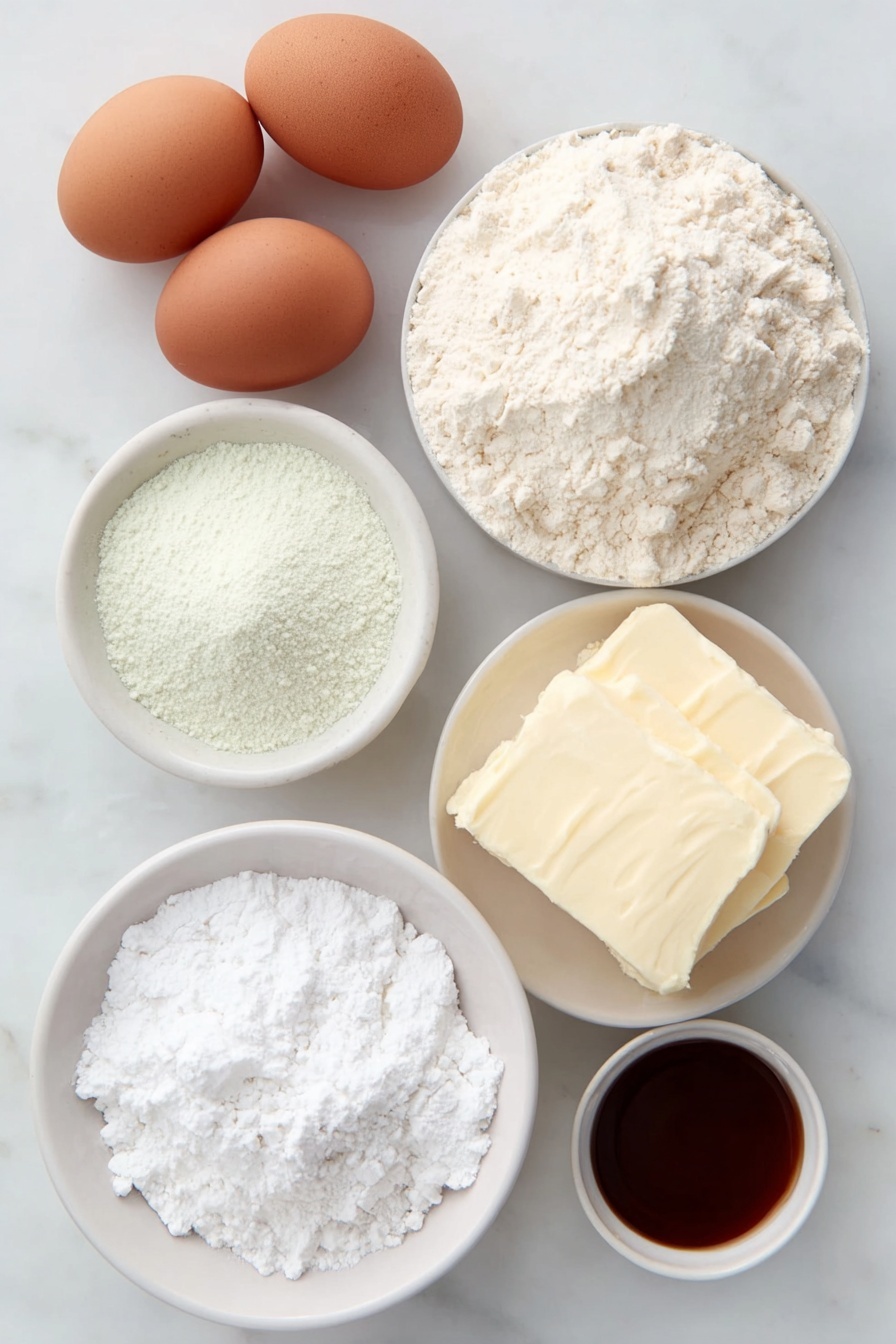
- Eggs: Separate whites and yolks while cold, then bring to room temperature for perfect whipping and emulsification.
- All-purpose flour: The base of our cake; the flour’s protein level helps keep the structure while staying tender.
- Cornstarch: This lightens up the flour for an extra soft crumb.
- Matcha powder: Choose a culinary grade or better for vibrant color and rich flavor – don’t use instant or overly bitter matcha.
- Baking powder: Gives just enough lift without overpowering the texture.
- Cream of tartar (or lemon juice): Stabilizes the egg whites when whipping for a fluffy meringue.
- Granulated sugar: Split into two portions for the perfect sweetness and meringue texture.
- Salted butter: Room temperature for easy creaming; adds richness and flavor.
- Whole milk: Balances the batter moisture and tenderness.
- Vanilla extract: A little extra warmth and depth of flavor that complements the matcha perfectly.
Variations
I love experimenting with this Matcha Pound Cake Recipe. You can personalize it depending on your mood or dietary needs, and every twist brings a new little delight.
- Matcha and White Chocolate: I once folded in some chopped white chocolate chunks before baking and it added an amazing creamy sweetness that balanced the matcha’s slight bitterness brilliantly.
- Gluten-Free Version: Swap all-purpose flour with a gluten-free flour blend, but make sure it includes xanthan gum to keep the structure intact.
- Dairy-Free: Replace butter with coconut oil and milk with almond milk. The cake comes out just as moist and with a lovely twist of flavor.
- Extra Green Tea Punch: Add a teaspoon of matcha powder to the sifted dry ingredients for a deeper green color and intensified flavor (just a bit more bitter).
How to Make Matcha Pound Cake Recipe
Step 1: Separate and Prep Your Eggs
This is a bit of a game-changer. I always separate the eggs while cold—a trick I learned for easier separation without any mess—and then bring whites and yolks to room temperature. It helps whiten the egg whites up nicely when you whip them, and the yolks blend smoother with your butter mixture.
Step 2: Mix the Dry Ingredients
In a large bowl, sift the flour, cornstarch, matcha, and baking powder together. Sifting is key here—it prevents lumps and ensures your cake will bake evenly with consistent color and texture. Set this aside for later.
Step 3: Preheat and Get Your Pan Ready
Heat your oven to 350°F (177°C), and line an 8″ by 4″ loaf pan with parchment. This size is perfect for the batter quantity, resulting in an ideal thickness and crumb. Plus, parchment lining guarantees your cake comes out clean every time.
Step 4: Whip Those Egg Whites to Perfection
Using a clean mixer bowl with a whisk attachment, start whipping your egg whites until foamy, then add the cream of tartar. This little acid boost helps stabilize the foam. Slowly add 50g of your sugar while whipping until you get stiff peaks—when you lift the whisk, they should hold a straight peak, no drooping. This gives your pound cake lift and lightness.
Step 5: Cream Butter and Sugar Like a Pro
Switch to a paddle attachment, add your softened butter and the remaining 100g sugar, and beat at high speed for 2 to 3 minutes, until the mixture looks pale and fluffy. This process incorporates the right amount of air and sweetness—don’t rush it!
Step 6: Add Egg Yolks, Milk, and Vanilla
Now, add the yolks one by one, beating well after each addition. Follow with the milk and vanilla extract. Don’t worry if the mixture looks a bit curdled here—that’s completely normal and will smooth out once you fold in the dry ingredients.
Step 7: Fold in Dry Ingredients and Egg Whites Carefully
Sift about a third of the dry flour mixture over the wet batter and fold gently with a spatula to combine. Then add about a third of the whipped egg whites and gently fold again. Alternate folding in the dry ingredients and egg whites until fully combined, making sure there are no streaks but being careful not to overmix or deflate the batter. This step is where your cake gets its wonderful texture.
Step 8: Bake Until Golden and Perfectly Moist
Pour the batter into your prepared pan, tap it gently to release any air bubbles, and bake for 60 to 65 minutes. You’ll know it’s done when the top turns golden brown and a toothpick inserted in the center comes out clean or with a few moist crumbs. Resist the urge to open the oven door too often, as this can cause your cake to sink.
Step 9: Cool Completely Before Slicing
Patience here pays off big time. Let the cake cool fully in the pan before slicing—it helps the crumb set nicely and prevents crumbling. Once cool, slice and get ready to enjoy a slice of matcha heaven.
Pro Tips for Making Matcha Pound Cake Recipe
- Perfect Egg Temperature: I swear by separating cold eggs and then warming them to room temp—it’s a simple step that makes whipping egg whites so much easier and your cake fluffier.
- Sifting is Non-negotiable: Always sift matcha with dry ingredients to avoid little green clumps, which can mess with the texture and look of your pound cake.
- Folding Method Matters: Folding gently but thoroughly keeps the air your egg whites trapped intact; that’s what gives lightness to this pound cake.
- Don’t Overbake: Keep a close eye around the 60-minute mark, as overbaking dries out the cake—better to check early than regret it later.
How to Serve Matcha Pound Cake Recipe
Garnishes
I usually keep it simple, topping slices with a dusting of powdered sugar or a light drizzle of white chocolate ganache. Fresh berries or a dollop of whipped cream take it up a notch, especially for afternoon tea or dessert — the tartness pairs beautifully with the matcha’s earthiness.
Side Dishes
One of my favorite pairings is a cup of jasmine or sencha green tea to echo the flavors, or even a scoop of vanilla ice cream for a decadent contrast. I’ve also served this with light fruit compotes – peach or raspberry works beautifully.
Creative Ways to Present
For special occasions, I’ve turned this into mini matcha pound cake slices arranged on a board with fresh fruits, edible flowers, and a few dipped white chocolate matcha cookies. It makes such a stunning display and always gets compliments!
Make Ahead and Storage
Storing Leftovers
I usually keep leftover slices wrapped in an airtight container at room temperature for up to three days. The cake stays moist and flavorful, and I find it still tastes fresh without refrigeration in that time.
Freezing
This pound cake freezes beautifully. I slice and wrap each piece tightly in plastic wrap, then pop them into a freezer bag. It’s perfect for prepping in advance or saving for a craving later. Just thaw at room temperature for about 15-20 minutes before serving.
Reheating
If you want your leftovers warm, I recommend a quick zap in the microwave for 15-20 seconds or a gentle heat in a toaster oven. It revives the softness and brings back that freshly-baked feeling better than storing it straight in the fridge.
FAQs
-
Can I use matcha green tea powder from the grocery store for this recipe?
Yes, but for the best flavor and color, I recommend using culinary-grade matcha specifically meant for baking or cooking rather than drink-only grades. This ensures your cake has a vibrant green color and rich flavor without bitterness.
-
Why do I need to separate the eggs?
Separating eggs lets you whip the whites into a stable meringue that provides the lift and airy texture in the final cake. Mixing yolks separately with butter creates a smooth rich base that blends better with the other ingredients.
-
Can I make this recipe gluten-free?
Absolutely! Substitute the all-purpose flour with a gluten-free blend that contains xanthan gum or another binder to maintain the cake’s structure. The texture will be slightly different but still delicious.
-
How should I store leftover Matcha Pound Cake?
Store leftovers in an airtight container at room temperature for up to three days. For longer storage, refrigerate for up to one week or freeze slices wrapped securely for up to two months.
-
Can I add other flavors to this Matcha Pound Cake Recipe?
Yes! Vanilla is classic, but you can enhance the flavor with white chocolate chunks, citrus zest, or a splash of almond extract. Just be mindful not to overpower the delicate matcha flavor.
Final Thoughts
This Matcha Pound Cake Recipe is one of those special treats I love to bake for both family and guests. It’s elegant yet unpretentious, with an effortless charm that comes straight from the kitchen to your heart. I really hope you give it a go—once you taste that silky crumb and earthy matcha flavor, you’ll understand why I’m such a fan. Trust me, it’s a recipe you’ll want to keep in your baking rotation!
Print
Matcha Pound Cake Recipe
- Prep Time: 20 minutes
- Cook Time: 65 minutes
- Total Time: 85 minutes
- Yield: 12 servings
- Category: Dessert
- Method: Baking
- Cuisine: Japanese-inspired
- Diet: Vegetarian
Description
This Most Delicious Matcha Pound Cake recipe delivers a moist, tender cake bursting with vibrant green tea flavor. Perfectly balanced with the earthiness of matcha and a light crumb, this cake is ideal for afternoon tea or a special dessert. The cake combines the richness of butter and eggs with a delicate sweetness, making it both indulgent and refreshing.
Ingredients
Dry Ingredients
- 155 g all-purpose flour
- 20 g cornstarch
- 9 g matcha powder (sifted)
- 3 g baking powder
Wet Ingredients
- 4 eggs, separated (whites and yolks, room temperature)
- 140 g salted butter (room temperature)
- 45 ml whole milk (room temperature)
- 4 ml vanilla extract
Other Ingredients
- 150 g granulated sugar (divided: 50g and 100g)
- 1/4 tsp cream of tartar (or 1 tsp lemon juice or white vinegar)
Instructions
- Separate eggs: Carefully separate the egg yolks from the whites, placing them into two separate bowls. Allow them to come to room temperature for best results.
- Prepare dry mix: In a large bowl, sift together the all-purpose flour, cornstarch, sifted matcha powder, and baking powder. Set aside.
- Preheat oven and prepare pan: Preheat your oven to 350°F (177°C). Line an 8″ by 4″ loaf pan with parchment paper to prevent sticking and set aside.
- Whip egg whites: Using a clean stand mixer bowl fitted with the whisk attachment, beat the egg whites until foamy. Add the cream of tartar and continue beating until numerous bubbles form.
- Add sugar to egg whites: Gradually incorporate 50 g of granulated sugar and whisk until stiff peaks form. The peaks should stand straight when the whisk is lifted.
- Set aside whipped whites: Transfer the stiff egg whites to a large clean bowl and set aside for folding later.
- Cream butter and sugar: Switch to the paddle attachment on your mixer and add the butter and the remaining 100 g granulated sugar. Cream on high speed for 2-3 minutes until light and fluffy.
- Add egg yolks and liquids: Gradually add in the egg yolks one at a time, then slowly mix in the milk and vanilla extract. Beat until fully combined. The batter might look curdled at this stage, which is normal.
- Incorporate dry ingredients and whites: Remove the bowl from the mixer. Sift about one-third of the dry ingredients over the batter and gently fold in with a spatula. Then fold in one-third of the whipped egg whites. Repeat this process alternating dry ingredients and egg whites until everything is combined without white streaks, being careful not to overmix to preserve volume.
- Fill pan and bake: Pour the batter into the prepared loaf pan. Tap the pan gently a few times to release trapped air bubbles. Bake for 60-65 minutes, or until the top is golden brown and a toothpick inserted comes out clean or with just a few moist crumbs.
- Cool and serve: Allow the cake to cool completely in the pan before slicing. This helps the crumb set firmly for clean slices.
- Storage: Store the cake in an airtight container at room temperature for up to 3 days or refrigerate for up to 1 week. For longer storage, wrap slices individually in plastic wrap and freeze for up to 2 months. Thaw by leaving at room temperature for 15-20 minutes before serving.
Notes
- This matcha pound cake is lightened up yet richly flavored with green tea essence.
- Using room temperature ingredients ensures better mixing and texture.
- Be careful not to deflate the egg whites when folding to maintain cake fluffiness.
- Line the loaf pan with parchment paper for easy removal.
- Adjust baking time slightly if using a different pan size.
- Storing cake properly helps maintain freshness and flavor.
Nutrition
- Serving Size: 1 slice (approx. 1/12 of the cake)
- Calories: 187 kcal
- Sugar: 13 g
- Sodium: 102 mg
- Fat: 10 g
- Saturated Fat: 6 g
- Unsaturated Fat: 3 g
- Trans Fat: 1 g
- Carbohydrates: 23 g
- Fiber: 1 g
- Protein: 3 g
- Cholesterol: 25 mg


