

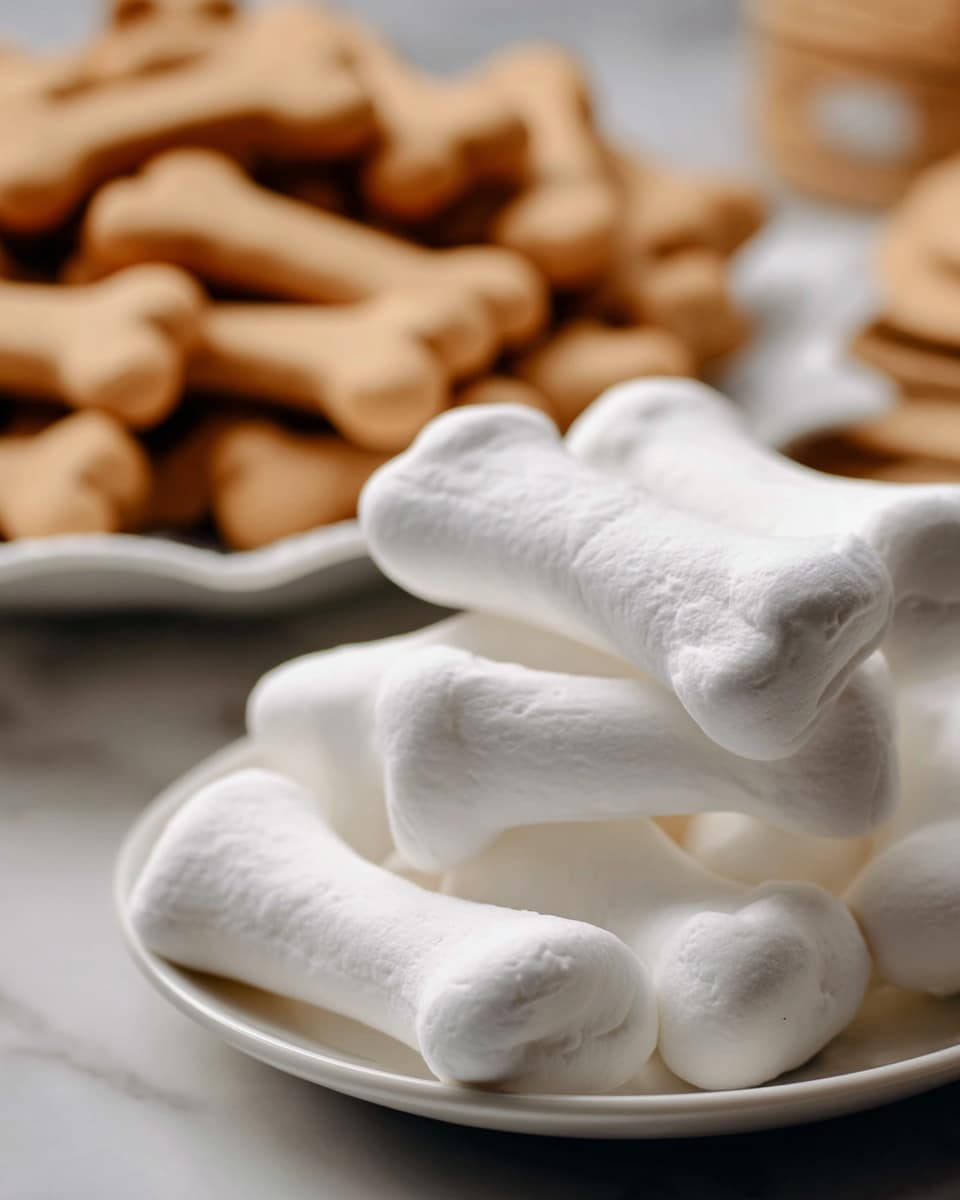
If you’re on the hunt for a delightfully spooky treat that’s as fun to make as it is to eat, you’re in for a real treat. I’ve got a recipe that’s light, crisp, and perfect for Halloween parties or just a quirky snack— Meringue Bones: A Fun Halloween Treat Recipe. These little edible bones are charmingly eerie yet sweet and melt in your mouth. Trust me, once you try this recipe, it will become a Halloween staple you’ll find yourself coming back to year after year!
Why You’ll Love This Recipe
- Easy and Accessible: Only five simple ingredients you probably already have in your kitchen.
- Perfect for Halloween: The bone shapes add a spooky-but-sweet charm everyone will adore at parties.
- Light and Crispy Texture: Unlike heavy Halloween treats, these melt in your mouth with just a hint of vanilla sweetness.
- Kid-Friendly Fun: Get the whole family involved with piping and shaping these meringue bones.

Ingredients You’ll Need
For this recipe, choosing quality ingredients is key to getting those perfect crispy, airy meringue bones. The eggs should be fresh — I always find that fresher eggs give the best volume when whipping whites. Also, fine sugar helps the meringue dissolve evenly for a smooth texture.
- Eggs: Use large eggs separated carefully so no yolk contaminates the whites, which prevents them from whipping properly.
- Cream of Tartar: This stabilizes the egg whites and helps create fluffy, stiff peaks.
- Fine Salt: A tiny bit enhances the flavors without overpowering the sweet vanilla.
- Sugar: Use fine granulated sugar for smoothness; I found that superfine sugar works even better if you have it on hand.
- Vanilla Extract: Adds a comforting sweetness that brings warmth to the airy meringue.
Variations
I’ve played around with this recipe a bit, and the great thing is how easy it is to customize. You can flavor your meringue bones in subtle ways to fit your vibe or dietary needs — it’s all about making it fun and your own!
- Flavor Swap: I once added a drop of almond extract instead of vanilla for a lovely twist that still complemented the sweetness perfectly.
- Color Play: Sometimes I add a tiny bit of natural food coloring gel to the meringue before piping to give pastel or spooky tints — great for parties.
- Diet-Friendly: This recipe is naturally gluten-free and low-fat, so it suits most diets just as it is!
How to Make Meringue Bones: A Fun Halloween Treat Recipe
Step 1: Preheat and Prepare Your Baking Sheets
Start by setting your oven to a low temperature of 200 °F (93 °C). I find this is crucial for drying out the meringues without browning them too quickly. Line your cookie sheets with either parchment paper or brown paper bags – I’ve used both, and parchment is a bit more reliable and less likely to stick.
Step 2: Whip the Egg Whites
Separate three large eggs carefully, making sure no yolk gets into the whites. I love using an egg separator for this step because it makes mess-free work of it. Place the whites in a medium bowl along with ¼ teaspoon of cream of tartar and a tiny pinch (⅙ teaspoon) of fine salt.
Beat these on high speed until you get a fluffy, foamy texture. This can take a few minutes, so patience is key. The mixture should hold soft peaks before you slowly add the sugar.
Step 3: Sweeten and Flavor
Gradually add ⅔ cup of sugar, a little at a time, while continuing to whip on high speed. This slow addition helps create a glossy, stiff meringue. Then, mix in ½ teaspoon of vanilla extract and beat for another minute to make sure it’s well incorporated.
Step 4: Pipe Your Bone Shapes
Fill a piping bag fitted with a plain tip, or simply snip the corner off a large plastic bag for easy piping. I like that using a tip makes it a bit easier to shape the bones, but the corner-cut method works in a pinch.
Pipe out three-inch long bone shapes onto your prepared sheets, spacing them well because they don’t spread much but still need room.
Step 5: Bake and Dry
Bake the meringue bones for 1 hour at 200 °F. When the timer goes off, don’t rush to take them out—instead, turn off the oven and let them dry inside for another hour. This drying phase gives you that perfect crisp texture without any cracks or burnt edges.
Step 6: Store for Freshness
Once fully dried and cooled, gently remove the meringue bones and store them in an airtight container. This keeps them crunchy and prevents them from absorbing moisture. You should get about 4-5 dozen, making plenty to share or stash!
Pro Tips for Making Meringue Bones: A Fun Halloween Treat Recipe
- Use Room Temperature Eggs: I discovered this trick early on—egg whites whip better and achieve more volume when not too cold.
- Don’t Rush the Sugar Addition: Adding sugar too quickly can deflate the egg whites, so slow and steady wins the race for perfect peaks.
- Piping Practice Makes Perfect: Practice your bone shapes on spare parchment before piping on the main sheets to get comfortable with the motion.
- Avoid Humidity: Meringues hate moisture! Make sure your kitchen is dry because humidity can cause them to weep or stay sticky.
How to Serve Meringue Bones: A Fun Halloween Treat Recipe
Garnishes
For a little extra flair, I love dusting meringue bones lightly with edible glitter or a little cocoa powder for a ‘dusty old bones’ effect. Occasionally, I use black food coloring gel to paint tiny cracks or “age” them for that eerie touch.
Side Dishes
These are fantastic alongside a rich chocolate dip or a cup of warm spiced cider. During Halloween, I like serving them by a cauldron of hot cocoa or a spooky punch bowl to keep that festive vibe going.
Creative Ways to Present
My favorite presentation trick is to place them sticking out of a “graveyard dirt” pudding—just chocolate pudding topped with crushed cookies—so the bones look like they’re emerging from the earth. It’s always a big hit with both kids and adults!
Make Ahead and Storage
Storing Leftovers
These crunchy treats keep wonderfully well in an airtight container at room temperature for up to a week. I usually store mine in a glass jar with a tight lid, which preserves their texture beautifully without any sogginess.
Freezing
Freezing meringue bones isn’t really necessary because they keep so well, but I tried it once: just wrap them carefully in plastic wrap and place them in a freezer bag. When thawed, they retain most of their crispness, but I prefer fresh for the best texture.
Reheating
If they lose a bit of their crispness over time, pop them in a low oven (about 200 °F) for 5-10 minutes to refresh their crunch. Just watch closely so they don’t brown or burn.
FAQs
-
Can I use powdered sugar instead of granulated sugar for the meringue?
Powdered sugar can be used, but it contains cornstarch which may slightly affect the crisp texture. I recommend fine granulated sugar or superfine sugar to ensure your meringue bones come out light and crisp.
-
What happens if my meringue bones come out sticky?
Usually sticky meringues mean the oven temperature was too high or the drying time wasn’t sufficient. Make sure you bake low and slow and let the bones dry in the turned-off oven for the extra hour to achieve that perfect crunchy texture.
-
Can I make meringue bones ahead of time before my Halloween party?
Absolutely! These keep well stored in airtight containers for several days. Making them a day in advance helps reduce stress on the day of your party and they stay fresh and crisp.
-
Is it necessary to use cream of tartar?
Cream of tartar helps stabilize the egg whites, ensuring your meringue holds its shape and volume. If you don’t have it, lemon juice or white vinegar can sometimes be used as a substitute, but for best results, I recommend sticking to cream of tartar.
Final Thoughts
I absolutely love how these meringue bones turn out every year—they’re light, festive, and such a conversation starter. When I first tried making them, I was surprised at how simple and fun they were to create, even for a beginner. I hope you enjoy whipping up your own batch of Meringue Bones: A Fun Halloween Treat Recipe as much as my family and I do. So grab your mixing bowl, get those piping bags ready, and dive into this charming Halloween treat—you’re going to wow your guests and maybe make a few little ghosts and goblins very happy!
Print
Meringue Bones: A Fun Halloween Treat Recipe
- Prep Time: 25 minutes
- Cook Time: 60 minutes
- Total Time: 1 hour 25 minutes plus 1 hour drying (2 hours 25 minutes total)
- Yield: 60 meringue bones
- Category: Dessert
- Method: Baking
- Cuisine: American
- Diet: Vegetarian
Description
Meringue Bones are a light and airy Halloween treat made from whipped egg whites and sugar, shaped into fun bone shapes and baked low and slow to achieve a crisp texture. Perfect for a spooky party snack, these festive meringues are easy to make with just five simple ingredients.
Ingredients
Egg Whites Mixture
- 3 large eggs, separated
- ¼ teaspoon cream of tartar
- ⅛ teaspoon fine salt
Sweeteners and Flavoring
- ⅔ cup fine sugar
- ½ teaspoon vanilla extract
Instructions
- Preheat Oven: Set your oven to 200 °F (93 °C) to prepare for slow baking the meringues.
- Prepare Baking Sheets: Line cookie sheets with brown paper bags or parchment paper to prevent sticking.
- Separate Eggs: Use an egg separator to carefully separate the egg whites from the yolks; set the yolks aside for another use.
- Beat Egg Whites: In a medium bowl, beat the egg whites along with ¼ teaspoon cream of tartar and ⅙ teaspoon salt at high speed until fluffy and soft peaks form.
- Add Sugar and Vanilla: Gradually add ⅔ cup sugar into the egg whites while continuing to beat. Then add ½ teaspoon vanilla extract and beat for an additional minute to fully incorporate.
- Pipe Meringue Bones: Transfer the meringue mixture into a piping bag fitted with a plain tip or a plastic bag with a small snipped corner. Pipe out three-inch bone shapes onto the prepared baking sheets.
- Bake the Meringues: Bake the piped bones in the oven for one hour at 200 °F (93 °C).
- Dry the Meringues: Turn off the oven and leave the bones inside to continue drying for another hour to achieve a crisp texture.
- Store Properly: Once cooled and dried, store the meringue bones in an airtight container to prevent them from becoming soggy.
- Serve: Enjoy around Halloween or any time you want a light, festive treat. This recipe yields about 4 to 5 dozen meringue bones.
Notes
- Meringue Bones make an excellent and spooky Halloween snack or dessert garnish.
- They are made with just five simple ingredients and require minimal equipment.
- Use fine sugar for best results to ensure smooth meringue texture.
- Ensure the egg whites are free of any yolk to achieve a good meringue lift.
- Store meringue bones in airtight containers to maintain their crispness.
Nutrition
- Serving Size: 1 piece
- Calories: 12 kcal
- Sugar: 2 g
- Sodium: 8 mg
- Fat: 1 g
- Saturated Fat: 1 g
- Unsaturated Fat: 2 g
- Trans Fat: 1 g
- Carbohydrates: 2 g
- Fiber: 0 g
- Protein: 1 g
- Cholesterol: 8 mg


