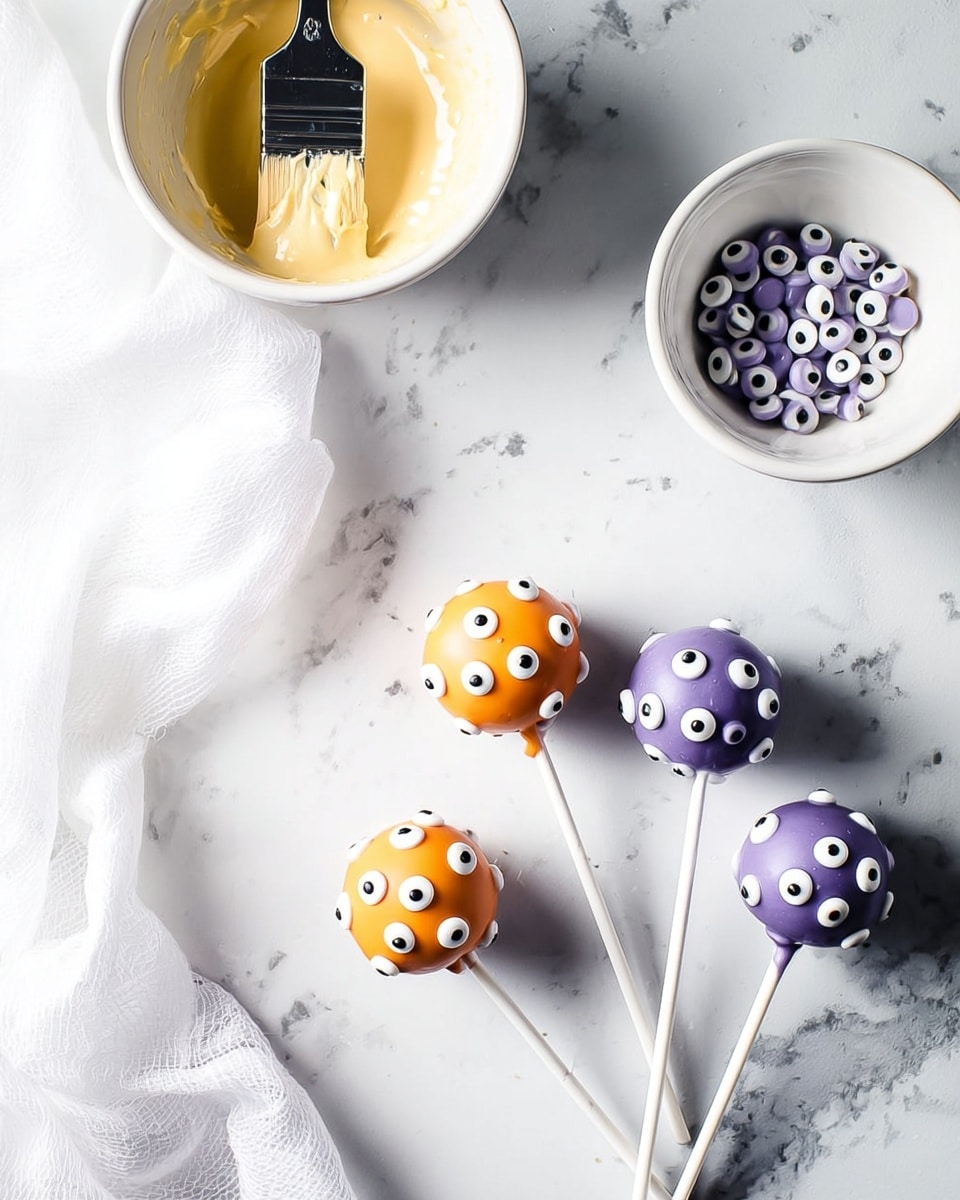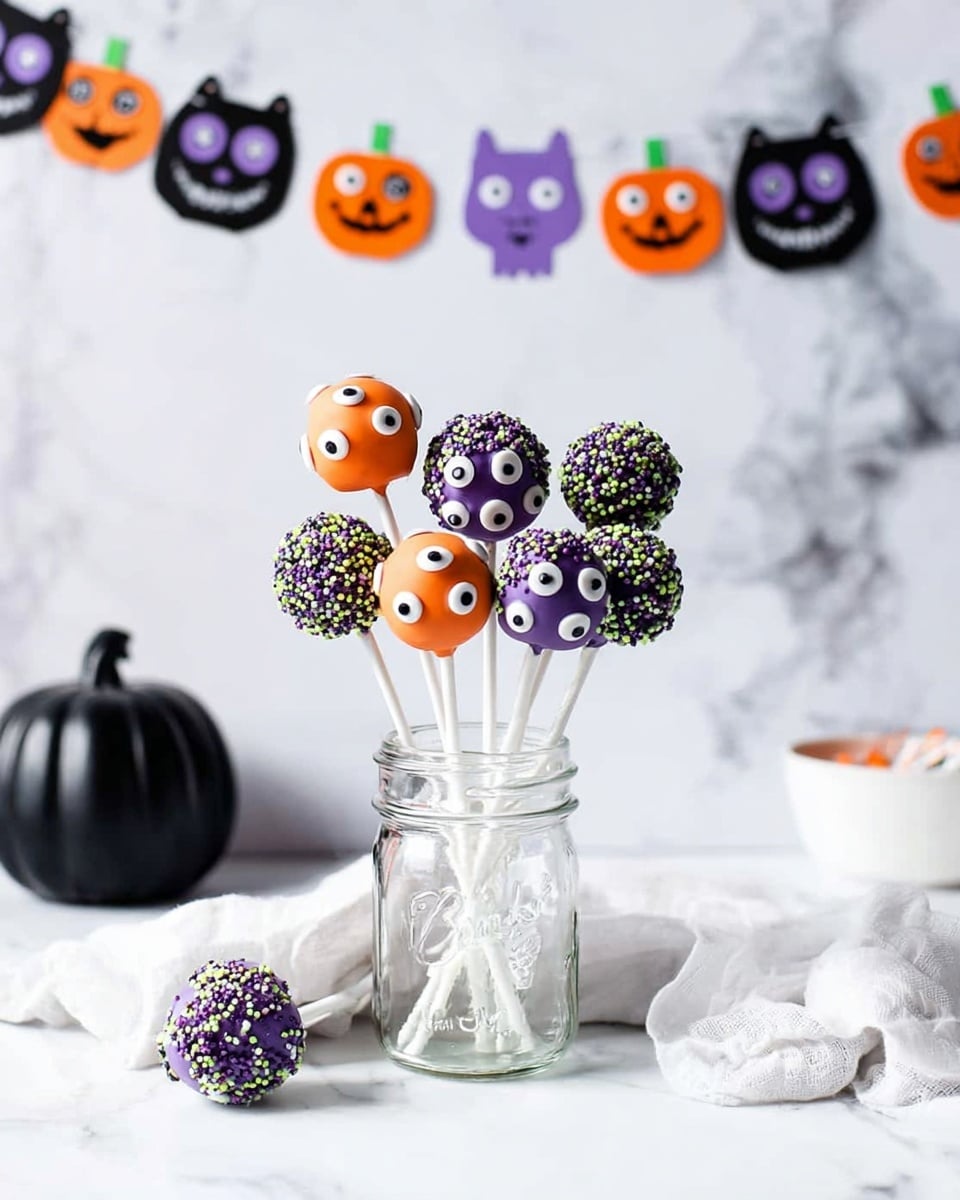
If you’re on the hunt for a fun and spooky treat that’s as delicious as it is adorable, you’ve come to the right place! I absolutely love sharing this Monster Cake Pops Recipe because it brings a smile to everyone’s face—kids and adults alike. These little monsters are packed with chocolatey goodness and decorated with playful candy eyes that make each bite a mini celebration. Trust me, once you try these, they’ll become a favorite for Halloween parties or anytime you want a quirky, tasty dessert!
Why You’ll Love This Recipe
- Super Easy to Make: You don’t need fancy ingredients or complicated steps to whip up these delightful cake pops.
- Customizable and Fun: Play with colors, eyes, and shapes to create your own monster army.
- Perfect for Any Occasion: Great for Halloween, themed parties, or just a whimsical treat for family and friends.
- A Crowd Pleaser: My family goes crazy for these and always asks me to make more!
Ingredients You’ll Need
To make your monster cake pops pop with flavor, you’ll want to gather a mix of simple pantry staples and colorful decorations. Choosing good-quality chocolate and candy melts really makes a difference in the ease of coating and the final taste.
- Water: This helps melt the chocolate smoothly and adds moisture to the batter.
- Semi-sweet chocolate chips: Adds depth to the chocolate flavor and richness.
- Egg: Acts as a binder and adds structure to your cake.
- Vegetable oil: Keeps the cake tender and moist without heaviness.
- Granulated sugar: Sweetens and balances the cocoa bitterness perfectly.
- Milk: Adds creaminess and helps blend the batter.
- Baking cocoa: Use a good quality for that bold chocolate punch.
- Flour: Provides the cake’s body—make sure it’s well sifted for a lighter mix.
- Baking soda: Helps your cake rise nice and fluffy.
- Frosting: Mix it with the crumbled cake to make a moldable dough—cream cheese or buttercream work great!
- Candy melts: These come in bright colors and melt easily to cover the pops.
- Royal icing eyes: You can buy these or make your own—they’re the stars that bring the monsters to life.
Variations
The fun thing about this Monster Cake Pops Recipe is how you can make it your own. I often swap in different candy melt colors or add fun mix-ins to the cake to suit whatever occasion or mood I’m in. Don’t be shy about experimenting!
- Chocolate Lovers’ Version: Adding mini chocolate chips right into the batter amps up the chocolatey goodness.
- Nut-Free: Simply avoid nut-flavored frostings and double-check candy melts for allergens—perfect for school parties.
- Spooky Themes: Use green or purple candy melts and add edible glitter or cotton candy for a ghostly effect.
- Vegan Adaptation: I’ve tried replacing the egg with flaxseed and used plant-based milk, and it works surprisingly well with a bit more frosting to bind.
How to Make Monster Cake Pops Recipe
Step 1: Bake the Perfect Chocolate Cake Base
Start by preheating your oven to 350°F and lining a 9-inch round cake pan with parchment paper—this will keep the cake from sticking and make cleanup a breeze. In a small bowl, mix your chocolate chips with boiling water until smooth and melted. This trick creates an extra moist, fudgy base. In a large bowl, beat the egg until it’s light and frothy, then add the oil, mixing until everything’s combined. Next, whisk in your sugar, flour, cocoa, baking soda, and that lovely chocolate mixture with milk. Pour this beautiful batter into your prepared pan and bake for about 25 to 30 minutes. You’ll know it’s done when a toothpick poked into the center comes out clean, which I always double-check—it’s the best way to avoid a soggy center!
Step 2: Transform Your Cake into Monster Dough
Once your cake has cooled completely, crumble it into a big bowl. It’s one of my favorite steps because it feels like magic turning crumbly cake into pop-ready dough. Add a couple of tablespoons of frosting at a time and mix well. You want the mixture to hold together without being sticky—not too dry, not too gooey. If it feels crumbly, add a little more frosting; if it’s too sticky, a pinch of cake crumbs can help balance it out.
Step 3: Shape and Chill Your Cake Pops
Roll the cake-frosting mixture into quarter-sized balls and place them on a parchment-lined cookie sheet. Here’s a tip I picked up: before sticking in your lollipop sticks, dip the end of each stick into melted candy melts—it works like glue and keeps the stick firmly inside the cake ball. Pop the tray into the freezer for a few minutes to let everything set up nicely. This chilling phase is key because it prevents your pops from falling apart when you dip them.
Step 4: Dip, Decorate, and Bring Your Monsters to Life
Using a double boiler, melt your first color of candy melts until smooth. Carefully dip each cake pop into the melted candy, turning it so it’s fully coated. Let any extra drip off before setting them back on parchment. While the coating is still wet, add your royal icing eyes with tweezers—it’s the fun part where your little monsters really start to take shape. Once the first color is dry, you can repeat with other candy melt colors for a multi-hued monster collection. I love how colorful and playful these turn out!
Pro Tips for Making Monster Cake Pops Recipe
- Don’t Skip Chilling: Freezing the cake balls before dipping helps maintain their shape and makes dipping easier.
- Use Toothpicks First: If you’re worried about the lollipop sticks staying put, securing them with toothpicks before dipping works wonders.
- Temper Candy Melts Gently: Too much heat can make the candy melts gritty—low and slow melting leads to a silky coating.
- Placing Eyes Quickly: Work one or two cake pops at a time to stick on the eyes before the coating hardens, or they won’t stick right.
How to Serve Monster Cake Pops Recipe
Garnishes
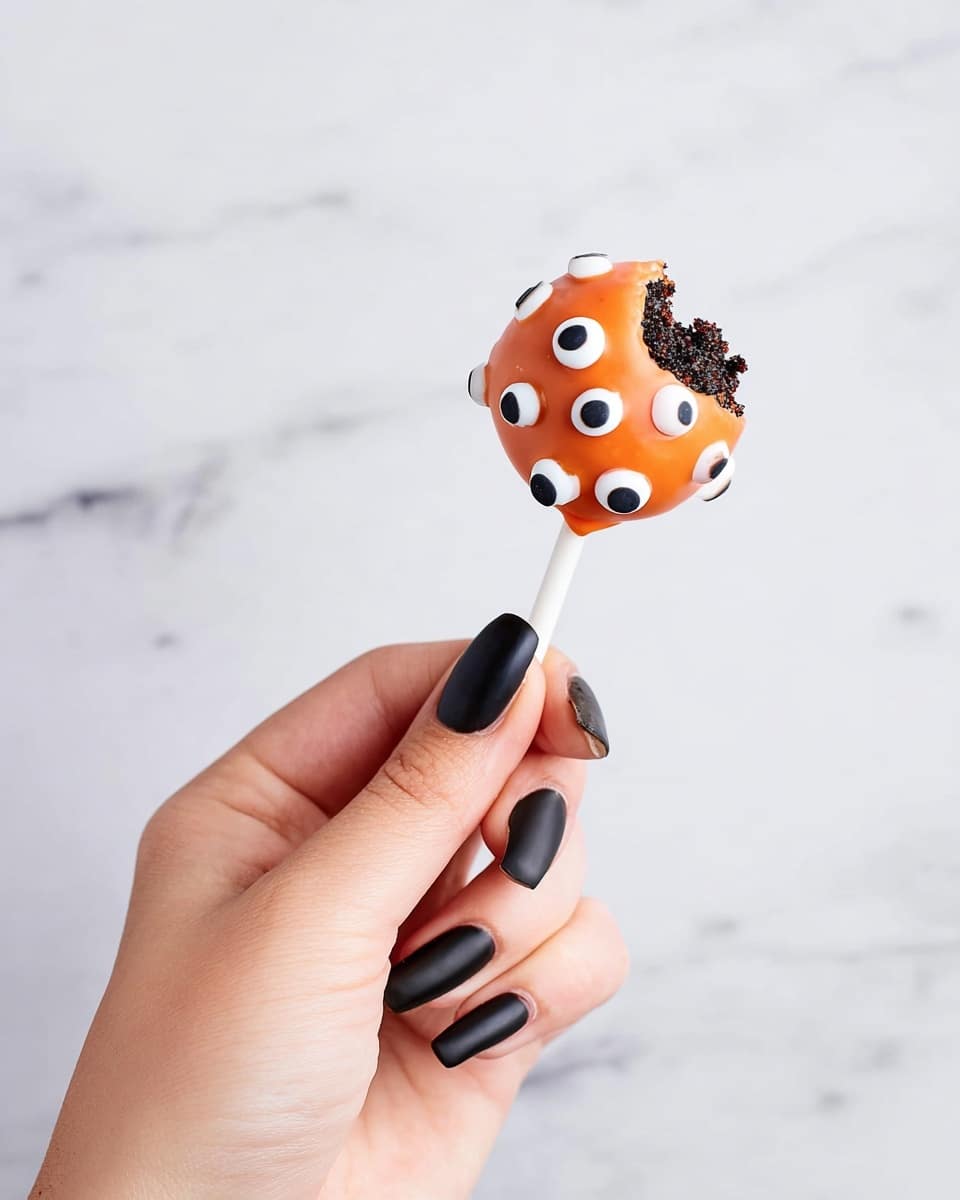
I love using royal icing eyes because they’re expressive and instantly bring the monsters to life. Sometimes I add sprinkles or edible glitter on top of the candy melt coating for extra whimsy. A tiny dab of colored frosting can be used to add monster mouths or other facial features. You can really get creative here to make each pop its own personality.
Side Dishes
These monster cake pops make a perfect sweet companion to fresh fruit platters or simple vanilla ice cream. If you’re throwing a party, I often pair them with a variety of other finger foods like popcorn, mini sandwiches, or fun themed punch to balance out the sweetness.
Creative Ways to Present
One of my favorite presentation ideas is to stand the monster cake pops upright in a styrofoam block covered with decorative tissue or crushed candy sprinkles. You can also arrange them in small mason jars tied with ribbons for party favors. For Halloween, I once placed them in a bowl filled with “eyeball” jelly candies which looked super spooky and was a total hit with the kids.
Make Ahead and Storage
Storing Leftovers
I usually store leftover cake pops upright in an airtight container in the fridge. Separating layers with parchment paper keeps them from sticking together. They hold up well for up to 3 days, though the candy coating can sometimes soften a bit depending on humidity.
Freezing
Freezing these pops is totally doable! I arrange them on a baking sheet first to freeze them individually, then transfer into a sealed freezer bag. When frozen, they last about a month. When you’re ready to enjoy, just thaw them in the refrigerator overnight for best texture.
Reheating
No need to reheat cake pops, but if you want that just-made softness, let them sit at room temperature for 15-20 minutes. Avoid microwaving as it can melt the candy coating unevenly.
FAQs
-
Can I use a boxed cake mix for this Monster Cake Pops Recipe?
Absolutely! While I love making the cake from scratch for that homemade touch, a chocolate boxed cake mix works perfectly if you’re short on time. Just bake it according to box instructions, crumble, and mix with frosting like the recipe suggests.
-
What if I don’t have royal icing eyes?
You can get creative here: use mini candy eyeballs, draw eyes with edible markers, or even pipe small dots with white and black icing. I’ve even cut tiny circles from fondant before for a fun DIY option.
-
How do I prevent the cake pops from falling off the sticks?
The key is to dip the end of each stick into melted candy before inserting it into the cake ball. This acts like glue and holds the stick securely when it hardens. Also, chilling the pops before dipping helps keep everything firm.
-
Can I make these cake pops in advance?
Definitely! You can make the cake, mix, and form the pops a day ahead and keep them chilled until you’re ready to dip and decorate. Just avoid adding candy coating eyes more than a few hours before serving to keep everything fresh.
Final Thoughts
I love how this Monster Cake Pops Recipe lets me bring a little whimsy and chocolatey joy to my kitchen with minimal fuss. These treats never fail to impress guests with their playful look and rich taste. Whether you’re baking with kids or planning a spooky party, giving these monster pops a try is well worth your time. So grab your candy melts and get ready to craft some fun—you’ll be amazed at how much joy a little cake on a stick can bring!
Print
Monster Cake Pops Recipe
- Prep Time: 1 hr
- Cook Time: 30 min
- Total Time: 1 hr 30 min
- Yield: 24 cake pops
- Category: Dessert
- Method: Baking
- Cuisine: American
- Diet: Vegetarian
Description
These Monster Cake Pops are a fun and festive Halloween treat made from rich chocolate cake crumbled and mixed with frosting, then coated in colorful candy melts and decorated with royal icing eyes. Perfect for parties and delighting kids and adults alike with their spooky, playful appearance.
Ingredients
Cake Batter
- 1/2 cup water
- 1 oz semi-sweet chocolate chips
- 1 egg
- 1/4 cup vegetable oil
- 1 cup granulated sugar
- 1/2 cup milk
- 2 oz baking cocoa
- 3/4 cup flour
- 1 tsp baking soda
Cake Pops Assembly
- 1-3 tbsp frosting
- 1 lb candy melts in assorted colors
- Royal icing eyes (store bought or homemade)
Instructions
- Preheat Oven and Prepare Pan: Preheat your oven to 350°F and line a 9-inch round cake pan with parchment paper to ensure easy removal of the cake after baking.
- Melt Chocolate: In a small bowl, combine the semi-sweet chocolate chips and boiling water. Stir continuously until the chocolate has completely melted and the mixture is smooth.
- Beat Egg and Oil: In a large mixing bowl, beat the egg until it becomes light and frothy. Gradually add the vegetable oil and continue beating until fully combined.
- Combine Dry Ingredients and Chocolate Mixture: Whisk together the sugar, flour, baking cocoa, and baking soda. Then add the melted chocolate mixture and milk into the mixing bowl with the egg and oil, stirring until the batter is smooth and well incorporated.
- Bake the Cake: Pour the batter into the prepared cake pan. Bake in the preheated oven for 25-30 minutes, or until a toothpick inserted in the center comes out clean. Once done, allow the cake to cool completely.
- Prepare Cake Ball Mixture: Crumble the cooled cake into a large bowl. Add a few scoops of frosting and mix thoroughly. Continue adding frosting incrementally until the mixture clumps together but remains slightly firm to the touch, not overly sticky.
- Form Cake Balls: Roll the cake mixture into quarter-sized balls and place them on a baking sheet lined with parchment paper.
- Melt Candy Melts: Using a double boiler, gently melt the first color of candy melts until smooth, stirring frequently to avoid burning.
- Insert Lollipop Sticks: Dip the end of each lollipop stick into the melted candy melts, then insert it halfway into each cake ball to secure the stick inside the cake pop.
- Freeze Cake Pops: Place the lollipop-lined cake balls in the freezer for a few minutes to firm up and ensure the sticks stay in place.
- Coat Cake Pops: Once firm, dip each cake pop into the melted candy melts, rotating to coat completely. Allow excess chocolate to drip off before placing them upright to set.
- Decorate: Before the candy coating dries, carefully place royal icing eyes onto each cake pop, using tweezers if needed for precise placement.
- Repeat Coating: Repeat dipping and decorating process with additional candy melt colors to create colorful and spooky monster designs as desired.
Notes
- These cake pops make a delightful and easy Halloween party treat that kids and adults will enjoy.
- Be sure not to add too much frosting when mixing cake balls to avoid overly sticky texture.
- Using a double boiler helps prevent candy melts from burning.
- Allow cake pops to chill well for easier dipping and decorating.
- Store finished cake pops in an airtight container at room temperature or refrigerated for longer freshness.
Nutrition
- Serving Size: 1 cake pop
- Calories: 182
- Sugar: 21.4g
- Sodium: 77mg
- Fat: 9.5g
- Saturated Fat: 4.2g
- Unsaturated Fat: 5.3g
- Trans Fat: 0g
- Carbohydrates: 23.7g
- Fiber: 0.6g
- Protein: 2.2g
- Cholesterol: 12mg

