
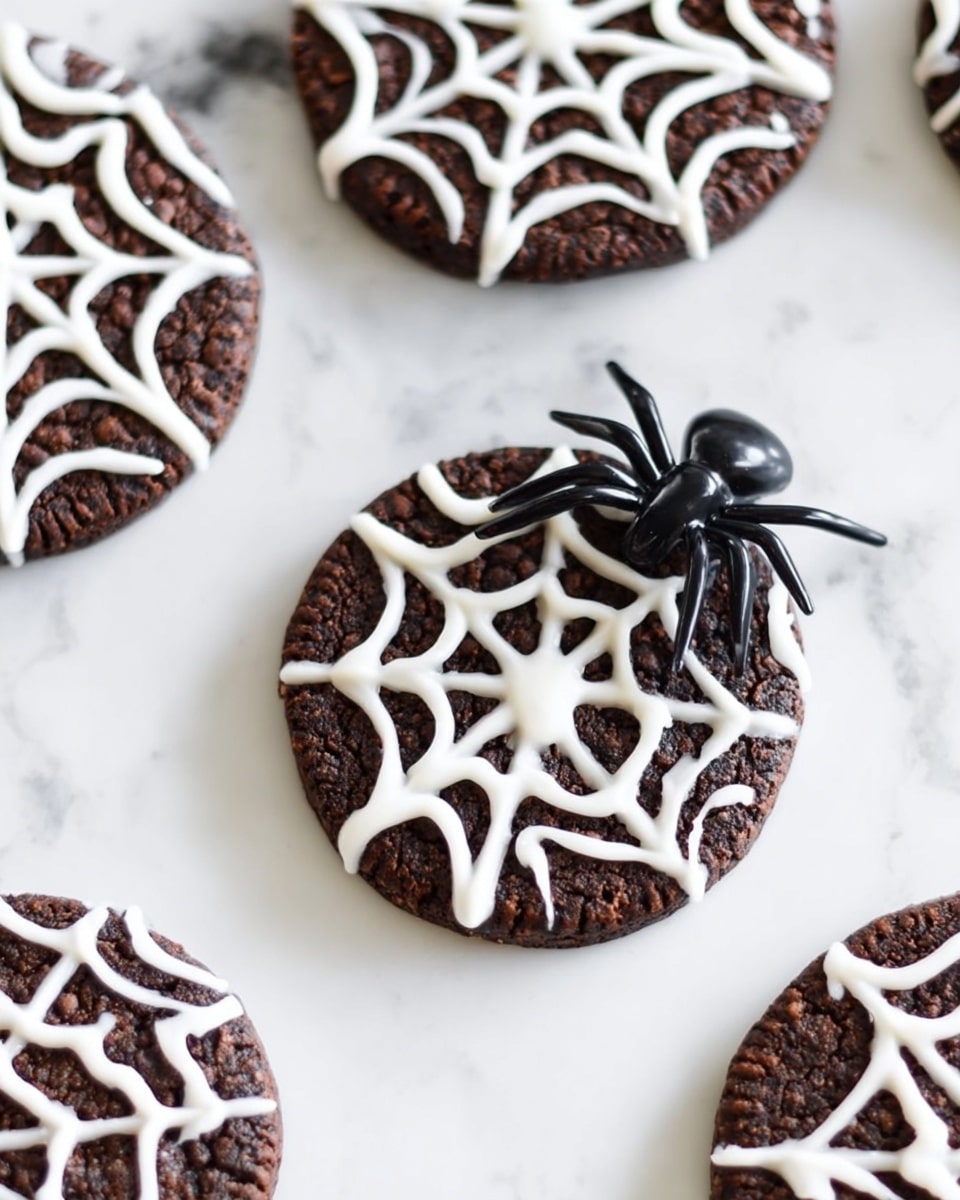
If you’re looking for a quick, spooky treat that’s as fun to make as it is to eat, you’re going to flip for this No Bake Oreo Spider Web Cookies Recipe. I absolutely love how effortlessly adorable these cookies turn out, and the best part? No oven required! Whether you’re throwing a last-minute Halloween party or just want a sweet twist on a classic cookie, these spider web Oreos are guaranteed to impress and delight.
Why You’ll Love This Recipe
- Super Quick and Easy: You can whip these up in under 10 minutes, making them perfect for last-minute treats.
- No Baking Needed: No oven? No problem! These cookies set beautifully with just melted white chocolate.
- Kid-Friendly Fun: The spider web design is simple to pipe and a great hands-on project for kids (or adults who love a little crafting).
- Festive and Delicious: Classic Oreos get a Halloween makeover that’s both festive and irresistibly tasty.

Ingredients You’ll Need
To get these spooky treats just right, you’ll want to start with simple ingredients that pack a punch together. The key is using classic Oreos for that perfect cookie crunch and creamy white chocolate for an easy pipable coating that dries smooth.
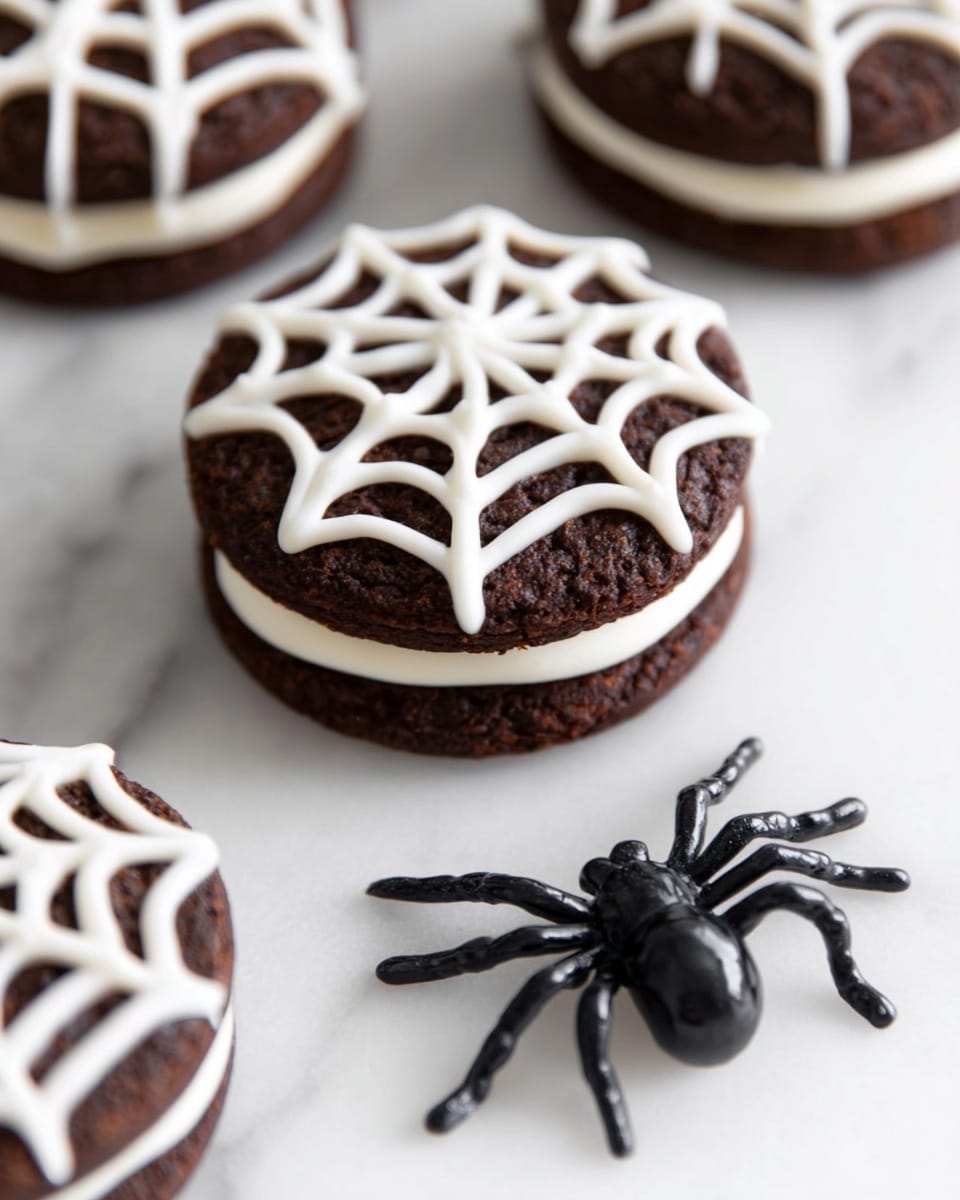
- Oreos: Grab the classic sandwich cookies because their dark color makes the spider web pop beautifully.
- White chocolate (chips or blocks): Using good quality white chocolate helps it melt smoothly without clumping, which is a huge help when piping your spider webs.
Variations
I love mixing things up with these No Bake Oreo Spider Web Cookies Recipe — it’s so easy to personalize depending on your mood or the occasion. You can make them spookier, sweeter, or even fit dietary needs with a few simple swaps.
- Dark chocolate drizzle: When I’m craving a richer twist, I swap out the white chocolate for dark chocolate; it makes the web look more realistic and gives a deeper cocoa flavor.
- Colored candy melts: For a pop of Halloween color, I sometimes use orange or purple candy melts instead of white chocolate — it’s festive and bright!
- Gluten-free Oreos: If you or your guests avoid gluten, feel free to use gluten-free sandwich cookies for the same awesome spider web effect.
- Peanut butter twist: Drizzle a little melted peanut butter on top for an unexpected nutty surprise – my family goes crazy for this combo.
How to Make No Bake Oreo Spider Web Cookies Recipe
Step 1: Prep Your Cookie Canvas
Start by laying out your Oreos on a piece of parchment or wax paper. This will keep things neat and make transferring the cookies easier later. I find spacing them apart a little helps, so you don’t accidentally smudge your beautiful spider webs.
Step 2: Melt Your White Chocolate to Perfection
Pop about 12 ounces of white chocolate chips or chopped white chocolate into a microwave-safe bowl. Microwave on high for 30 seconds, then stir thoroughly. Continue melting in 15-second bursts, stirring well in between, until the chocolate is silky smooth with no lumps. Patience here really pays off — if you rush it or skip stirring, you might end up with grainy or burnt chocolate.
Step 3: Pipe Your Spider Web Masterpiece
Transfer the melted chocolate into a piping bag or even a small sealable plastic bag. Snip just the tiniest bit off the corner — too big, and your spider web lines will be blobby, too small and you’ll frustrate yourself. Test your flow on the parchment to make sure it’s just right. Now, here’s the trick I discovered: start piping a star shape with 4 or 5 thick lines crossing over the cookie’s center, then quickly pull the tip back and forth between the spokes to create the web effect. Don’t worry if your first few aren’t perfect — practice makes perfect, and it’s all part of the fun!
Step 4: Let Them Set and Impress
Allow your spider web Oreos to set at room temperature until the chocolate hardens completely. If you’re in a hurry, you can pop them in the fridge for about 10–15 minutes. Once set, transfer the cookies to your serving platter and get ready to wow your friends and family.
Pro Tips for Making No Bake Oreo Spider Web Cookies Recipe
- Chocolate Tempering: I usually stir the white chocolate more times than I think necessary to keep it silky and avoid burning — this simple step saves a lot of frustration.
- Piping Bag Precision: Using a smaller plastic sandwich bag works in a pinch, but investing in a reusable piping bag with different tips makes piping spider webs SO much easier.
- Practice on Parchment: Before piping on your Oreos, test your spider web technique on a piece of parchment paper — it helped me nail the perfect web faster.
- Avoid Moisture: Make sure your chocolate and cookies are dry; moisture can cause the chocolate to seize, and that’s a headache you definitely want to avoid.
How to Serve No Bake Oreo Spider Web Cookies Recipe
Garnishes
I usually leave these cookies with their white chocolate spider webs uncluttered because the contrast is stunning on its own. But if you want to jazz them up, try tiny edible sugar pearls for spider eyes or a light dusting of edible glitter to add some sparkle to your creepy-cute creations.
Side Dishes
Since these Oreos are sweet and rich, I like pairing them with something light and refreshing — like a chilled glass of sparkling apple cider or a simple fruit salad. They’re also perfect alongside a cup of hot cocoa or spiced pumpkin latte for those chilly Halloween nights.
Creative Ways to Present
Once, for a Halloween party, I popped these cookies into small, clear treat bags tied with black and orange ribbons — they made the perfect party favors! You could also arrange them around a mini pumpkin centerpiece or on a dark platter with faux spider webs for a festive display everyone will love.
Make Ahead and Storage
Storing Leftovers
These cookies actually hold up really well at room temperature, stored in an airtight container for up to 3 days. I find keeping them away from humid spots prevents the chocolate from melting or becoming sticky, so a cool pantry works great.
Freezing
Freezing works if you want to prepare these well ahead of time. Just stack cookies with parchment paper in between, wrap tightly in plastic wrap, and place them in a freezer-safe container. When you’re ready, thaw them in the fridge for a few hours — the chocolate spider webs hold up surprisingly well!
Reheating
Since these are no-bake cookies, reheating isn’t really necessary. If the chocolate gets too cold and loses its shine, just bring them to room temperature before serving for the best texture and flavor.
FAQs
-
Can I use chocolate melts instead of white chocolate?
Absolutely! Candy melts designed for dipping and molding work just as well and often melt easier than white chocolate. Just be sure to follow the melting instructions on the package to avoid overheating.
-
What if I mess up the spider web design?
No worries! If your spider web lines don’t look perfect the first time, simply scrape off the white chocolate with a small knife once it sets and try again. Practice on parchment paper before doing the final piping to boost your confidence.
-
How long do these cookies stay fresh?
Stored in an airtight container at room temperature, these cookies stay fresh for about 3 days. Beyond that, the cookies might lose their crunch, but they’re usually too irresistible to last that long!
-
Can kids help with making these?
Definitely! Kids enjoy piping the spider webs, and it’s a fun way to get them involved in Halloween prep. Just be sure to supervise with the melted chocolate to keep things safe.
Final Thoughts
When I first tried this No Bake Oreo Spider Web Cookies Recipe, I was surprised at how simple it was to make something so festive and fun-looking without any baking skills. Now, it’s a family favorite for Halloween, and friends always ask me to bring these to parties. I hope you’ll enjoy making them as much as we do — it’s an easy way to add a little homemade charm to your spooky celebrations. Give it a try, and I guarantee these little cookies will become your go-to Halloween treat too!
Print
No Bake Oreo Spider Web Cookies Recipe
- Prep Time: 5 minutes
- Cook Time: 0 minutes
- Total Time: 5 minutes
- Yield: 18 cookies
- Category: Dessert
- Method: No-Cook
- Cuisine: American
Description
No Bake Oreo Spider Web Cookies are a quick and festive Halloween treat featuring classic Oreos decorated with a delicate white chocolate spider web design. Perfect for parties or a fun seasonal snack, these cookies require no baking and come together in just minutes.
Ingredients
Ingredients
- 1 package Oreos (36 cookies)
- 12 ounces white chocolate (chips or blocks for melting)
Instructions
- Arrange Cookies: Place Oreo cookies evenly spaced on a sheet of parchment paper to prepare for decorating.
- Melt Chocolate: In a microwave-safe bowl, melt white chocolate chips or chopped blocks by heating for 30 seconds, then stir. Continue to melt in 15-second increments, stirring each time until the chocolate is smooth and fully melted.
- Prepare Piping Bag: Transfer the melted white chocolate into a piping or sealable plastic bag. Carefully snip a very small tip off one corner of the bag to create a thin spout for decorating.
- Create Spider Web Design: Test the flow of chocolate by piping a small line onto parchment. Then gently squeeze the bag to drizzle white chocolate on top of each Oreo cookie in a star formation. Quickly move the piping bag back and forth over each cookie to form a delicate spider web pattern.
- Set and Serve: Allow the white chocolate to completely set and harden at room temperature. Once set, carefully transfer the finished Oreo spider web cookies to a serving platter.
Notes
- This no-bake recipe is perfect for a quick Halloween treat when you want something fun and festive without turning on the oven.
- The white chocolate spider web design can be personalized with food coloring or additional decorations for added flair.
- If your white chocolate is too thick for piping, you can gently warm it a little more to achieve the right consistency.
- Store cookies in an airtight container at room temperature to keep the chocolate web crisp and prevent melting.
Nutrition
- Serving Size: 1 cookie
- Calories: 220 kcal
- Sugar: 21 g
- Sodium: 133 mg
- Fat: 11 g
- Saturated Fat: 5 g
- Unsaturated Fat: 5 g
- Trans Fat: 1 g
- Carbohydrates: 29 g
- Fiber: 1 g
- Protein: 3 g
- Cholesterol: 4 mg


