

If you’re looking for a sweet and refreshing treat that’s perfect for the holiday season or anytime you want a little festive cheer, this Peppermint White Chocolate Bark Recipe is a fan-freaking-tastic choice! I absolutely love how the cool peppermint pairs with the creamy white chocolate and the bittersweet chocolate layers—it’s such a delightful combo that’s simple to make but feels so special. Stick around, because I’m going to walk you through every step so you can nail this classic candy bark with confidence.
Why You’ll Love This Recipe
- Easy to Make: You don’t need fancy equipment—just a microwave and a baking pan.
- Perfect Balance of Flavors: The peppermint extract and crushed candy canes add the perfect refreshing kick to the sweet chocolate.
- Great for Gifting: Once you break it into pieces, it’s ideal for sharing during the holiday season or anytime you want to surprise someone sweet.
- Customizable: You can easily swap out the candy canes or adjust the peppermint level to suit your taste.

Ingredients You’ll Need
The magic really happens with just a handful of ingredients that work together like a dream. White chocolate gives creamy sweetness, semi-sweet chocolate layers add depth, and peppermint really wakes up your palate. When shopping, make sure to pick good-quality chocolate—it makes a big difference!

- White Chocolate: Look for good-quality snacks or baking white chocolate that melts smoothly; chopped pieces melt faster and more evenly.
- Semi-Sweet or Bittersweet Chocolate: Semi-sweet adds a subtle richness that balances the white chocolate’s sweetness perfectly.
- Vegetable Oil or Coconut Oil: This helps smooth the chocolate as it melts and gives you that beautiful glossy finish I love.
- Peppermint Extract: Use pure peppermint extract for the best fresh peppermint flavor.
- Candy Canes: Crushing them yourself ensures they’re fresh and create that wonderful crunchy texture on top.
Variations
I love how versatile the Peppermint White Chocolate Bark Recipe is—once you’ve mastered the basics, feel free to customize it. I’ve played around with multiple versions and it’s always fun to tweak it to your taste or dietary needs.
- Dark Chocolate Layer: I once swapped the semi-sweet layer with a rich dark chocolate, which gave it a deeper flavor and less sweetness—my family actually preferred it!
- Nut Additions: Adding chopped pistachios or almonds on top with the crushed candy canes brings a lovely crunch and nutty contrast.
- Vegan Version: Using vegan white chocolate and dark chocolate works great if you want to make this recipe dairy-free.
- Stronger Peppermint Flavor: If you’re a peppermint fanatic like me, add a little extra peppermint extract—but be careful—too much can taste medicinal!
How to Make Peppermint White Chocolate Bark Recipe
Step 1: Line and Prep Your Pan
Start by lining an 8-inch or 9-inch square baking pan with parchment paper or aluminum foil. I smooth out any wrinkles as best as I can because it makes it easier to peel the bark once it’s set. If you want a thinner bark, I sometimes use a lined baking sheet instead—it’s totally up to you how thick you want it.
Step 2: Melt and Flavor the First White Chocolate Layer
I like using the microwave because it’s quick and easy. Place half of the white chocolate with half the oil in a heatproof bowl, then melt in 20-second bursts, stirring well in between—I learned the hard way that chocolate can scorch if you rush it. Once creamy, stir in 1/4 teaspoon peppermint extract for that subtle mint flavor. Pour it into the prepared pan and spread with an offset spatula or spoon to an even, thin layer. Chill in the fridge for 10–15 minutes until almost set but still a little tacky to the touch.
Step 3: Melt and Add the Semi-Sweet Chocolate Layer
Repeat the melting process with the semi-sweet chocolate and remaining oil. Stir in the second 1/4 teaspoon of peppermint extract once melted. Pour this layer over the white chocolate and smooth it out evenly. Pop it back into the fridge for another 10–15 minutes until it’s nearly firm but not completely set—this is key for all layers to bind well.
Step 4: Finish with the Last White Chocolate Layer and Candy Canes
Finally, melt the remaining white chocolate with the last bit of oil, but this time don’t add peppermint extract—it’s nice to have a pure creamy finish on top. Pour it over the chocolate layers and smooth it out. Immediately sprinkle with crushed candy canes while it’s still soft. To crush your candy canes, I put them in a sealed plastic bag and use a rolling pin—it’s so satisfying to hear the crunch! Refrigerate for about an hour or until completely set.
Step 5: Cut and Serve
Once it’s fully firm, lift the bark out using the foil or parchment edges. If the bark has chilled longer than a few hours, I recommend letting it sit at room temperature for 10-15 minutes before breaking—it softens slightly, preventing the layers from separating. Tear or cut it into bite-sized pieces and enjoy!
Pro Tips for Making Peppermint White Chocolate Bark Recipe
- Melt Gently and Slowly: Taking your time melting chocolate in short bursts prevents seizing and grainy texture.
- Don’t Overchill: Setting each layer until just firm helps the bark layers stick well together and prevents separation.
- Use Good Quality Peppermint Extract: Higher-quality extract gives a brighter, more natural mint flavor.
- Crush Candy Canes Fresh: Crushing right before topping preserves that perfect crunch and prevents moisture from softening the candy.
How to Serve Peppermint White Chocolate Bark Recipe

Garnishes
I usually keep the garnish simple—just crushed candy canes on top, because they add that festive pop of red and a perfect peppermint crunch. Sometimes I sprinkle a tiny pinch of flaky sea salt on the white chocolate layer underneath for a surprising salty-sweet contrast that my family can’t get enough of.
Side Dishes
This bark is fantastic alongside a hot drink—like a cozy cup of peppermint hot chocolate or spiced chai tea. I also love serving it with roasted nuts or alongside a cheese board for holiday parties; it adds a sweet, minty note that cuts through the savory flavors beautifully.
Creative Ways to Present
For holiday gifts or parties, I like breaking the bark into large chunks and wrapping them in festive cellophane with a pretty ribbon. Another fun idea is to layer them in a mason jar for a cute “DIY bark” gift. Sometimes I press edible glitter on top of the candy cane layer to add a little sparkle—because why not glam up peppermint bark?
Make Ahead and Storage
Storing Leftovers
I keep leftover peppermint bark wrapped tightly in an airtight container in the refrigerator. It stays fresh and crunchy for up to 3 weeks, which is perfect for savoring slowly or sharing with guests over time.
Freezing
Freezing peppermint bark works surprisingly well. I wrap it tightly in plastic wrap and pop it into a freezer-safe bag. When I want to enjoy it, I let it thaw in the fridge overnight to keep it from sweating, and it’s almost like freshly made!
Reheating
This type of bark really tastes best cold or at room temp, so reheating isn’t necessary, but if you find it a little too firm, letting it warm up slightly on the counter for 10 minutes helps soften it without losing that bite.
FAQs
-
Can I make Peppermint White Chocolate Bark without peppermint extract?
Absolutely! You can omit peppermint extract if you prefer a simpler white chocolate bark. The candy canes will still add peppermint flavor, but it’ll be more subtle. Alternatively, you can replace peppermint with another extract, like almond or orange, for a different twist.
-
What kind of chocolate works best for this bark?
High-quality white and semi-sweet chocolate bars or chips designed for melting work best. Avoid chocolate labeled strictly as candy coating or melts, as they often contain additives that affect texture and flavor. Chopping your chocolate ensures faster, more even melting.
-
How do I prevent the bark layers from separating?
The key is chilling each chocolate layer until it’s just firm, not fully hardened, before adding the next layer. This helps the layers bond. Also, letting the final bark sit at room temperature for a few minutes before breaking helps prevent cracks or separating layers.
-
Can I use a double boiler instead of a microwave?
Yes! If you prefer, melt each chocolate layer in a double boiler over gently simmering water, stirring often. The double boiler method gives you more control to avoid burning, but the microwave is quicker and works fine if you watch closely.
-
How long does the peppermint bark keep at room temperature?
In colder months, peppermint bark can stay fresh at room temperature for a few days without getting too soft. However, I recommend storing it in the fridge especially if your kitchen tends to be warm, to keep it firm and crunchy.
Final Thoughts
This Peppermint White Chocolate Bark Recipe will quickly become a holiday fave—or maybe your year-round go-to treat—because it’s just so delicious and comforting. I love sharing it with friends and family because it’s simple but feels extra special. Once you see how easy it is to layer and flavor, you’ll want to make it again and again. Give it a try like I’m telling a good friend: you really can’t go wrong, and the smiles it brings are totally worth the effort!
Print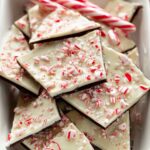
Peppermint White Chocolate Bark Recipe
- Prep Time: 30 minutes
- Cook Time: 15 minutes
- Total Time: 1 hour 45 minutes
- Yield: Just over 1 lb of peppermint bark
- Category: Dessert
- Method: No-Cook
- Cuisine: American
Description
This peppermint bark features luscious layers of white and semi-sweet chocolate infused with refreshing peppermint extract, topped with crunchy crushed candy canes. It’s a festive, easy-to-make treat perfect for the holidays or anytime you want a cool mint-chocolate delight. The bark sets in the refrigerator to create a crisp, flavorful candy that can be broken into bite-sized pieces and enjoyed or shared.
Ingredients
White Chocolate Layers
- 12 ounces (339g) white chocolate, coarsely chopped and divided
- 1 and 1/2 teaspoons vegetable oil or coconut oil, divided
- 1/2 teaspoon peppermint extract, divided (1/4 tsp for bottom white chocolate layer, 1/4 tsp for dark chocolate layer).
Chocolate Layer
- 6 ounces (170g) semi-sweet or bittersweet chocolate, coarsely chopped
Topping
- 2-3 regular-size candy canes (24-36g total), crushed
Instructions
- Prepare the Pan: Line the bottom and sides of an 8-inch or 9-inch square baking pan with parchment paper or aluminum foil, smoothing out any wrinkles. Alternatively, you can use a lined baking sheet. Set aside.
- Melt Bottom White Chocolate Layer: Place 6 ounces of white chocolate in a small heatproof bowl or liquid measuring cup. Add 1/2 teaspoon of oil. Melt in 20-second increments in the microwave, stirring vigorously after each, until smooth. Stir in 1/4 teaspoon peppermint extract. Pour this melted white chocolate into the prepared pan and spread evenly using an offset spatula or spoon. Refrigerate for 10–15 minutes until almost set but not fully hardened to prevent layer separation.
- Melt Semi-Sweet Chocolate Layer: Place the semi-sweet chocolate in a small heatproof bowl or liquid measuring cup. Add 1/2 teaspoon of oil. Melt in the same manner as the white chocolate until smooth. Stir in the remaining 1/4 teaspoon peppermint extract. Pour over the white chocolate layer and spread evenly. Refrigerate again for 10–15 minutes until almost set.
- Melt Top White Chocolate Layer: Place the remaining 6 ounces of white chocolate in a heatproof bowl or liquid measuring cup. Add the remaining 1/2 teaspoon oil. Melt as before until smooth. Pour over the semi-sweet chocolate layer and spread into a smooth layer. Do not add peppermint extract to this layer.
- Add Crushed Candy Cane Topping: Evenly sprinkle the crushed candy canes over the top white chocolate layer. To crush candy canes, place them unwrapped in a sealed zipped bag and crush gently using a rolling pin or meat mallet.
- Final Set: Refrigerate the bark until completely set, about 1 hour. Once hardened, remove from the pan and peel off the foil or parchment. Break or cut into pieces of preferred size. If the bark has chilled longer than 3–4 hours, allow it to sit at room temperature for 10–15 minutes before breaking to avoid layer separation.
- Storage: Store leftover bark covered in the refrigerator for up to 3 weeks. It may be left at room temperature for a few days in colder months but tends to soften.
Notes
- This peppermint bark is an easy layered treat perfect for gifting or festive occasions.
- Melting chocolate in short increments prevents overheating and graininess.
- Refrigerate layers until almost set to ensure they adhere well but don’t separate.
- Allow bark to soften slightly before breaking if refrigerated for extended periods to avoid cracking.
- Store in the refrigerator to maintain firmness and freshness, especially in warmer environments.
Nutrition
- Serving Size: 1 piece (approx. 40g)
- Calories: 210
- Sugar: 22g
- Sodium: 15mg
- Fat: 14g
- Saturated Fat: 8g
- Unsaturated Fat: 5g
- Trans Fat: 0g
- Carbohydrates: 24g
- Fiber: 1g
- Protein: 2g
- Cholesterol: 5mg


