
If you’re looking for a fun and festive treat to impress your guests (or just enjoy a little Halloween magic at home), I absolutely love sharing this Spider Web Cupcakes Recipe with friends. These cupcakes have the perfect combination of a moist base, bright orange frosting, and that eye-catching spooky web design that’s easier to make than you’d think! Stick with me, and I’ll walk you through every step so your cupcakes turn out flawless and totally Instagram-worthy.
Why You’ll Love This Recipe
- Show-Stopping Halloween Treat: These cupcakes look like they came right out of a haunted bakery, perfect for parties and school events.
- Simple Decorating Technique: The spider web effect is created with just a skewer and black decorator icing—no complicated piping skills needed!
- Kid-Friendly and Fun: My kids love helping with the web drawing and placing the little spiders on top.
- Make Ahead Friendly: You can bake and frost these a day ahead, keeping them fresh and stress-free on party day.

Ingredients You’ll Need
For the best Spider Web Cupcakes Recipe, I use simple pantry staples that combine for a perfect balance of flavor and festive color. You’ll want a great orange frosting—store-bought or homemade works—and the black decorator icing is essential for that spooky web design. Here’s a quick rundown with some tips.
- Cupcakes: Ready-baked and cooled cupcakes, homemade or store-bought, work just fine—vanilla or chocolate bases are both great!
- Orange frosting: Choose a rich and creamy frosting with a true orange hue for that classic Halloween vibe.
- Black decorator icing: This is used to draw the spider web; piping bags or tubes with thin tips make it much easier.
- Skewer or toothpick: The secret tool for dragging lines and creating that perfect web effect.
- Plastic black spiders: Small, safe-to-use decorations to add the finishing creepy-cute touch on top.
Variations
One of the things I love about this Spider Web Cupcakes Recipe is how easy it is to personalize. Whether you’re aiming to keep it simple or add a creative twist, there’s room for your style. Here are a few variations I’ve tried that you might enjoy too.
- Flavor swap: I once made these with chocolate cupcakes and orange cream cheese frosting—my family goes crazy for that combo!
- Color twist: Try using purple or green frosting instead of orange for a fun alternative look.
- Spider swap: Replace plastic spiders with edible candy spiders or gummy worms for a kid-friendly option.
- Diet-friendly: You can easily make gluten-free cupcakes and use dairy-free frosting if that’s your preference.
How to Make Spider Web Cupcakes Recipe
Step 1: Frosting the Cupcakes Smoothly
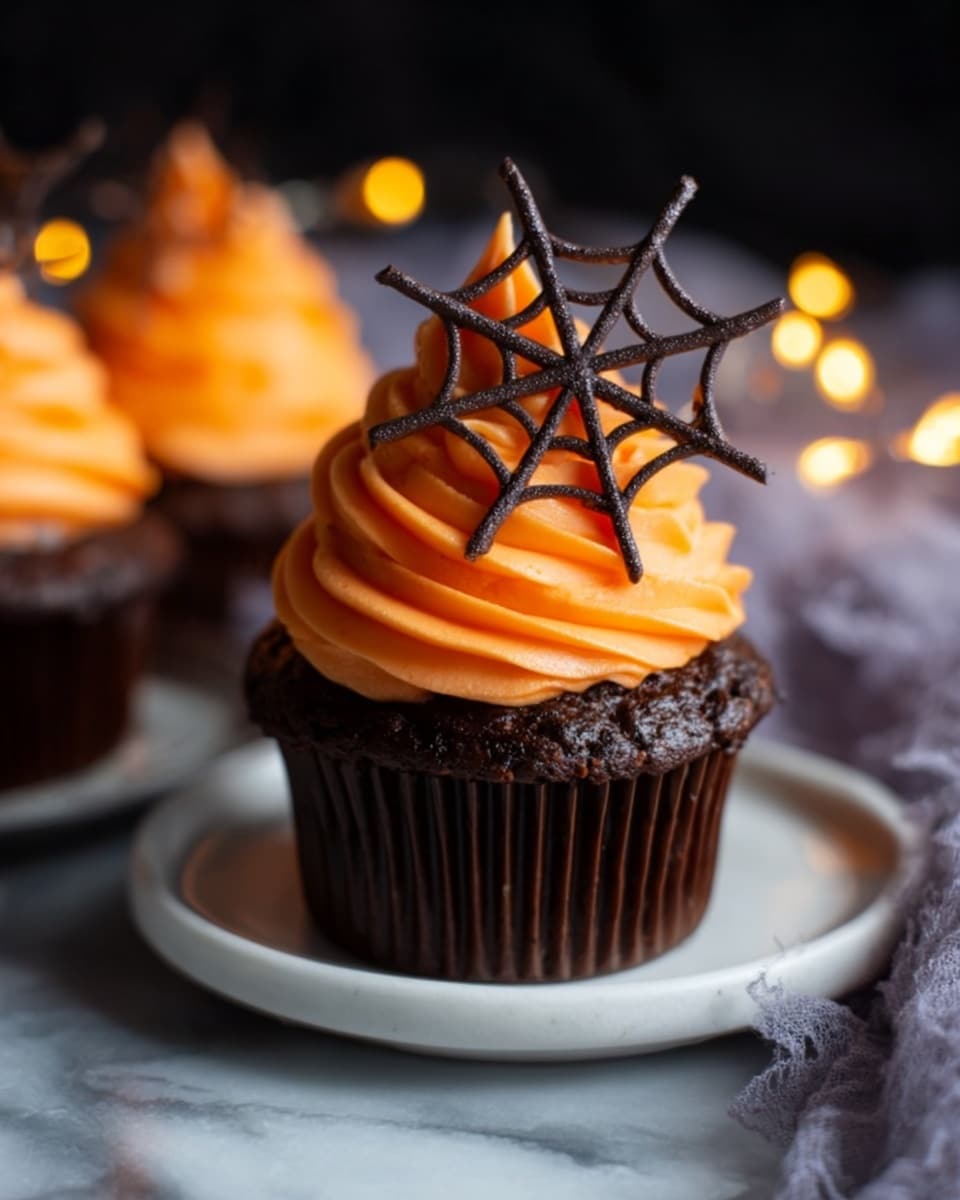
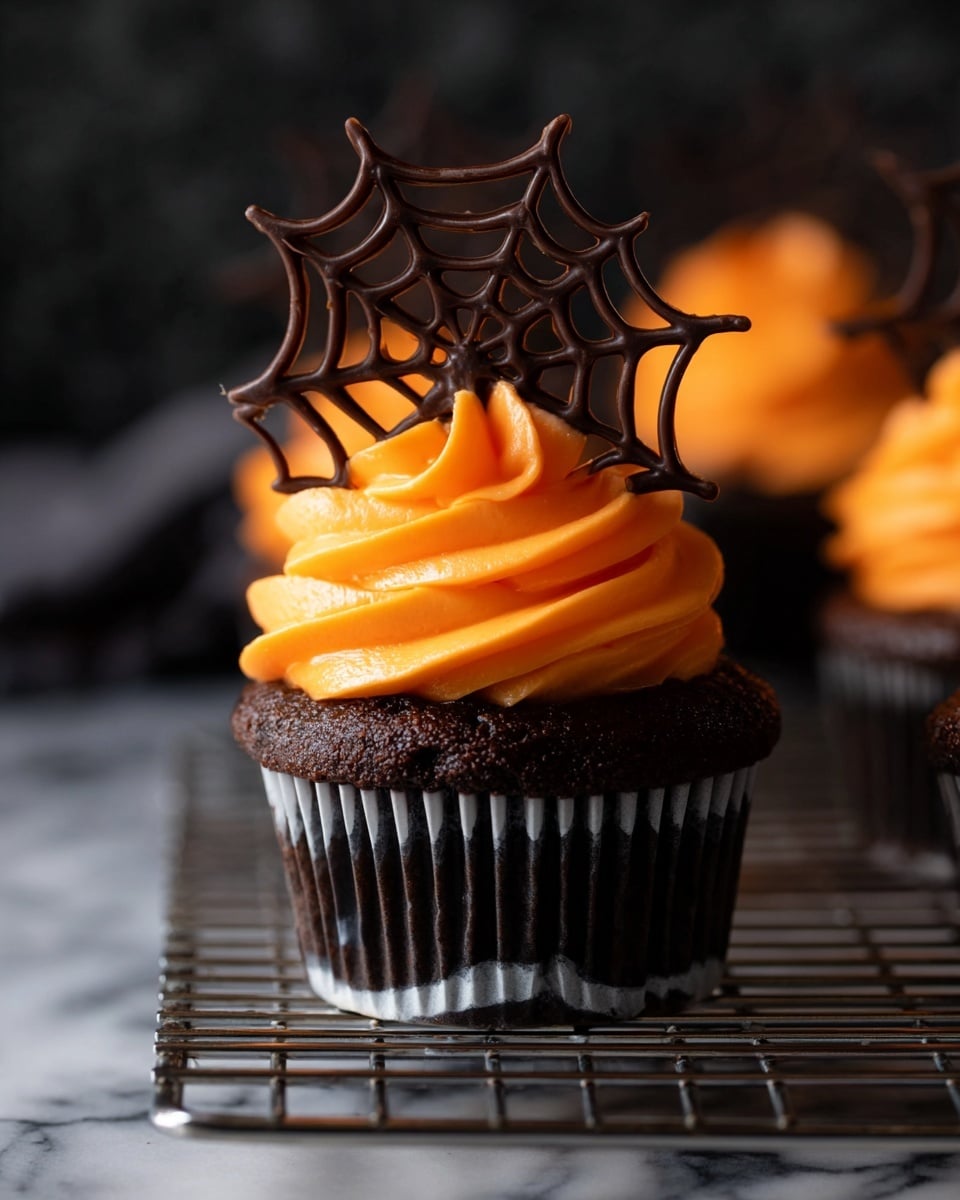
Start by frosting your cooled cupcakes with the orange frosting. Here’s a little trick I discovered that gives you a perfectly smooth top: instead of slathering frosting on and spreading it around with a knife, plop about a tablespoon in the center, hold your knife still, and spin the cupcake itself. This rotating motion gives a neat, even frost without tearing the cake. I love how simple this makes things!
Step 2: Drawing the Spider Web
Snip off the very tip of your black decorator icing tube to create a small opening. Then, pipe a small dot right in the center of your cupcake. Around that center dot, pipe three circles, like drawing a tiny bullseye. This helps make the web pattern look authentic and spooky.
Step 3: Creating the Web Lines
Now for the fun part! Grab your skewer or toothpick and drag straight lines outward from the center dot, passing over each of the circles you piped earlier. Aim for about 5 or 6 lines, spread evenly like spokes on a wheel. This pulls the black icing outward and forms the spider web pattern—trust me, it works every time!
Step 4: Top with a Creepy Crawly
Finish off your Spider Web Cupcakes Recipe by gently placing a small black plastic spider on the edge or top of each cupcake. This little touch makes them instantly festive and adorable without any mess. Kids love squealing over this detail!
Pro Tips for Making Spider Web Cupcakes Recipe
- Choose the Right Frosting Consistency: If your frosting is too stiff, it won’t spin smoothly—thin it out with a teaspoon of milk if needed.
- Practice Web Lines on Wax Paper: Before working on the cupcakes, try dragging lines on parchment to get a feel for the motion.
- Use Fresh Decorations: I’ve found plastic spiders stay crisp and clean if added just before serving, so add them last minute.
- Avoid Overcrowding Your Work Area: Having space lets you rotate cupcakes easily without smudging the frosting or web pattern.
How to Serve Spider Web Cupcakes Recipe
Garnishes
I usually keep garnishes simple—those plastic spiders steal the show! But I’ve also sprinkled a touch of edible glitter over the frosting to give it a little shimmer. Sometimes a light dusting of black sanding sugar adds subtle texture and makes the webs pop even more.
Side Dishes
For a complete Halloween spread, I like pairing these cupcakes with a bright punch (think orange soda with a splash of cranberry juice) and some savory finger foods like deviled eggs or monster-eyed meatballs. The cupcakes provide a sweet finish that balances the savory snacks perfectly.
Creative Ways to Present
One year I arranged my Spider Web Cupcakes Recipe on a black platter surrounded by faux spider webs and mini pumpkins—it instantly set the spooky vibe. Another time, placing cupcakes inside a Halloween-themed tiered stand made the display more festive and saved space for party guests.
Make Ahead and Storage
Storing Leftovers
If you find yourself with leftovers, store your unfrosted cupcakes in an airtight container at room temperature for up to two days. Once frosted, I keep them in the fridge, covered tightly with plastic wrap—though I recommend eating them within 24 hours for the best texture and flavor.
Freezing
I’ve frozen these cupcakes after baking but before frosting with great results. Just wrap them tightly in plastic wrap and foil, then freeze for up to 2 months. When ready, thaw completely, then frost and decorate fresh—this keeps the frosting from getting watery or melting.
Reheating
I usually don’t reheat frosted cupcakes because the frosting can soften or melt. If you want to warm the cake slightly, remove the spiders and frosting, heat the cupcake alone in the microwave for about 10 seconds, then re-frost and decorate again for a fresh feel.
FAQs
-
Can I use homemade frosting for the Spider Web Cupcakes Recipe?
Absolutely! Homemade frosting works wonderfully. Just make sure it’s thick enough to hold the web lines when piping with black decorator icing, but smooth enough to spread easily on the cupcakes.
-
How do I make the black web lines without messing up the frosting?
Wait until the orange frosting is set but still soft enough to pull the black icing. Then use a thin tip for piping, and a skewer or toothpick to drag lines gently outward—steady hands and slow motions help!
-
Can these cupcakes be made ahead of time?
Yes! Bake and cool cupcakes in advance. You can frost and add the webs and spiders a few hours before serving to keep decorations fresh and intact.
-
What if I don’t have black decorator icing?
If you can’t find black decorator icing, you can tint royal icing or frosting black with gel food coloring or use melted chocolate tinted with black food coloring as a creative substitute.
Final Thoughts
Honestly, this Spider Web Cupcakes Recipe has become one of my favorite quick Halloween projects—it’s fun, looks amazing, and you get lots of smiles when you serve them. Whether you’re baking with kids, prepping for a party, or just want to add a little spooky flair to your dessert table, these cupcakes won’t disappoint. Go ahead, give them a try—you’ll be amazed by how simple it is to make a showstopper that tastes just as good as it looks!
Print
Spider Web Cupcakes Recipe
- Prep Time: 20 minutes
- Cook Time: 0 minutes
- Total Time: 20 minutes
- Yield: 24 cupcakes
- Category: Dessert
- Method: No-Cook
- Cuisine: American
Description
These Spider Web Cupcakes are a festive Halloween treat featuring moist cupcakes topped with vibrant orange frosting and decorated with a spooky black spider web design. Perfect for parties or themed celebrations, these cupcakes combine simple decorating techniques with fun, creepy-crawly accents to delight guests of all ages.
Ingredients
Cupcakes
- 24 cupcakes (baked and cooled)
Frosting
- 2 cups orange frosting
- black decorator icing
Decoration
- 24 black plastic spiders
- skewer or toothpick
Instructions
- Frost Cupcakes: Using a butter knife or frosting spatula, place about a tablespoon of orange frosting in the center of each cooled cupcake. Hold the knife still and rotate the cupcake to spread the frosting smoothly over the top, creating an even, rounded surface.
- Create Spider Web Circles: Snip off the tip of the black decorator icing tube to make a small opening. Pipe a dot of black icing in the center of each frosted cupcake, then pipe three concentric circles around it to form a bullseye pattern.
- Draw Spider Web Lines: Using a skewer or toothpick, drag straight lines outward from the center dot through all the circles, like spokes on a wheel. Make 5 or 6 evenly spaced lines to create the spider web effect.
- Decorate with Spiders: Place one black plastic spider on top of each cupcake, positioning it on the web design to add a fun and spooky finishing touch.
Notes
- Spider Web Cupcakes made with cake mix, orange frosting, and black frosting.
- For best results, ensure cupcakes are completely cooled before frosting to prevent melting.
- Use a steady hand when piping the black icing circles and lines to create a neat web pattern.
- Plastic spiders can be reused or removed before serving if desired.
Nutrition
- Serving Size: 1 cupcake
- Calories: 232 kcal
- Sugar: 27 g
- Sodium: 175 mg
- Fat: 8 g
- Saturated Fat: 2 g
- Unsaturated Fat: 6 g
- Trans Fat: 0 g
- Carbohydrates: 37 g
- Fiber: 1 g
- Protein: 2 g
- Cholesterol: 1 mg


