

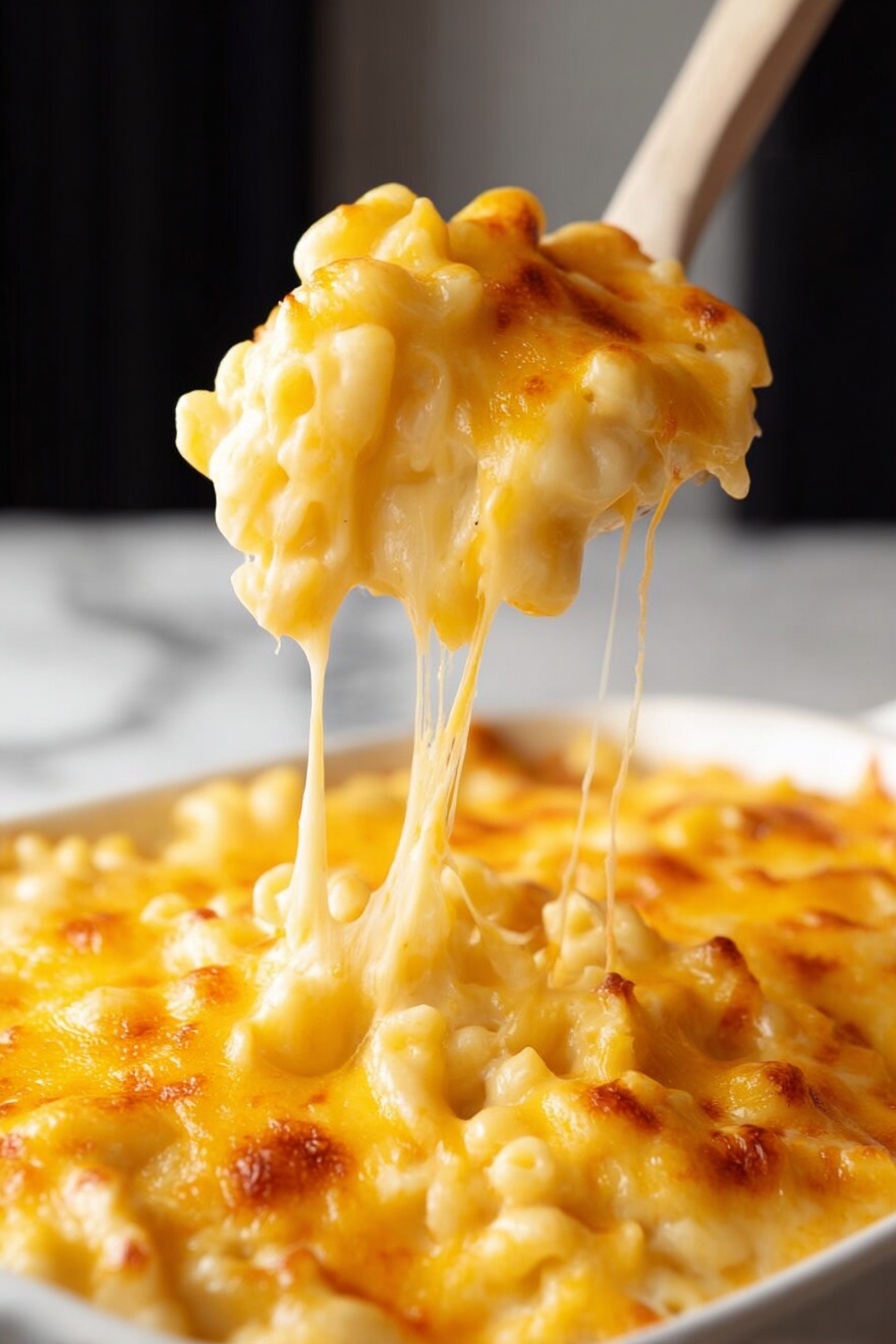
If you’re craving the ultimate comfort food that’s creamy, cheesy, and totally irresistible, then you have to try this Viral Mac and Cheese Recipe. I first stumbled upon it during one of my late-night recipe hunts, and honestly, it blew me away. This version isn’t your ordinary boxed mac and cheese — it’s luscious, rich, and has that perfect gooey pull that makes you say “just one more bite” every single time. Trust me, once you make this, your regular mac and cheese just won’t cut it anymore!
Why You’ll Love This Recipe
- Rich and Creamy Sauce: Thanks to a combo of evaporated milk and heavy cream, the cheese sauce turns out silky smooth every time.
- Perfectly Cheesy Layers: Dividing the cheese between sauce and topping makes for a golden, bubbly crust that’s pure comfort.
- Simple Ingredients: Nothing complicated here—just ingredients you can easily grab from any store, even last-minute.
- Foolproof Technique: The slow cheese melting and careful seasoning takes this mac and cheese from good to outstanding.

Ingredients You’ll Need
The ingredients list might look like a lot, but each one plays a key role in creating the silky, perfectly balanced flavor you’re after. A couple of cheese varieties work together for that creamy stretch, while spices and mustard give it a gentle kick you didn’t know you needed. I always recommend looking for quality shredded cheese or shredding your own for the freshest taste.
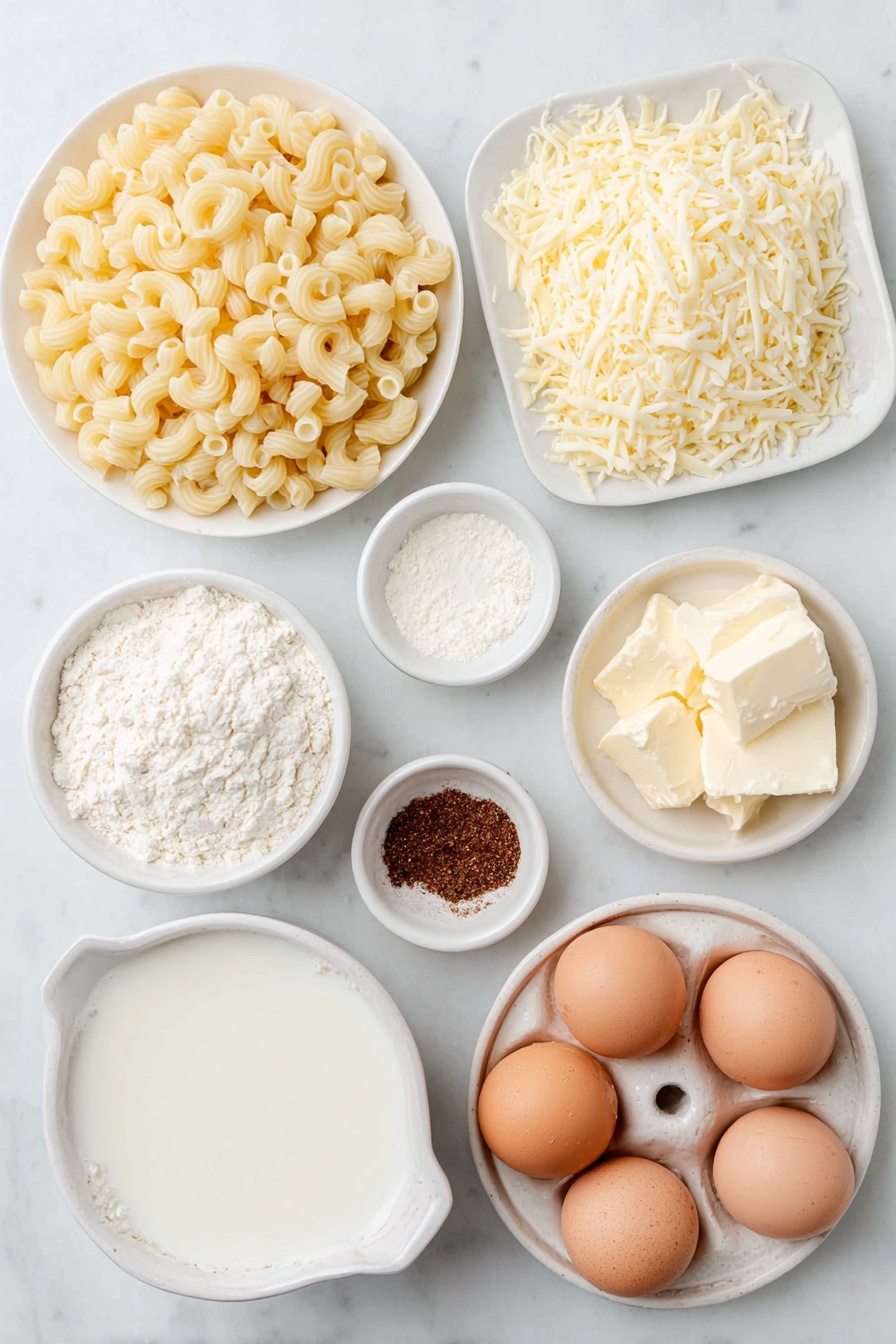
- Cavatappi pasta: I love cavatappi for its shape; the twists hold onto that cheesy sauce beautifully, but elbow macaroni works great too.
- Mozzarella: This gives the dish that delightful stretch and gooey texture everyone adores.
- Colby Jack: A smooth, mild cheese that melts perfectly and adds creaminess.
- Sharp cheddar: Adds a punch of classic cheese flavor and depth.
- Evaporated milk: Key for richness without heaviness; makes the sauce silky.
- Heavy whipping cream: Boosts creaminess and smoothness in the sauce.
- Salt: Enhances all the flavors perfectly.
- White pepper: Offers heat without black specks, keeping your sauce looking pristine.
- Garlic powder: Adds a subtle savory layer.
- Smoked paprika: Brings a gentle smoky warmth that amps up the flavor.
- Dijon mustard: This is the secret weapon – it elevates the cheese flavor with just a touch of tanginess.
- Unsalted butter: Creates the perfect base for your roux and adds richness.
- All-purpose flour: Thickens the sauce to that ideal creamy consistency.
Variations
One of the things I adore about this Viral Mac and Cheese Recipe is how easy it is to make your own. I often tweak the cheeses depending on what I have or swap spices if I want to change things up. Don’t be shy to get creative here!
- Extra Crunch: I once added panko breadcrumbs mixed with melted butter on top before baking—it adds a fantastic golden crust that’s utterly addictive.
- Spicy Kick: Toss in some finely diced jalapeños or a pinch of cayenne if you love a little heat like I do.
- Veggie Boost: Steamed broccoli or roasted cauliflower make great mix-ins for some color and nutrition without killing the creamy vibe.
- Vegan Twist: I haven’t tried this myself yet, but swapping dairy for plant-based alternatives and vegan cheese could work if you’re adventurous!
How to Make Viral Mac and Cheese Recipe
Step 1: Cook the Pasta Perfectly
Start by boiling your pasta in salted water according to package instructions—I cook my cavatappi for 7 minutes to get that perfect al dente bite. Once done, drain but don’t rinse. I always reserve the pasta water just in case I need to thin the sauce, but you likely won’t. Keeping the pasta warm while you make the sauce helps everything come together smoothly.
Step 2: Make the Roux and Build the Sauce
In a heavy-bottomed pan over medium-high heat, melt the butter and immediately whisk in the flour until it becomes a smooth paste. This roux is the backbone of your sauce, so take your time here—no lumps allowed! Slowly pour in the evaporated milk while whisking continuously. You’ll notice the sauce thickening and bubbling—this signals the magic happening. Reduce the heat to medium-low and carefully add the heavy cream, whisking steadily.
Step 3: Add Cheese Gradually for Creamy Perfection
Combine all your shredded cheeses in a bowl and split it in half. Add a handful of the cheese to the sauce and whisk vigorously until it melts smoothly. This slow, steady process took me a while to perfect, but it’s worth it—it prevents clumps and creates a heavenly texture. Don’t rush to add more cheese until the previous batch is velvety and fully incorporated. Let this develop over about 20 minutes, stirring often to cook the flour and ensure meltiness.
Step 4: Season and Combine
Once your sauce is smooth and cheesy, stir in salt, garlic powder, white pepper, smoked paprika, and Dijon mustard. The mustard especially adds a subtle depth that balances the richness so well. Then fold in the cooked pasta until every piece is coated in cheesy goodness.
Step 5: Layer, Bake, and Broil
Grab a 9×13 baking dish and layer half the pasta mixture, then sprinkle half the leftover cheese on top. Repeat with the remaining pasta and cheese. Bake at 375°F for 20 minutes until the cheese topping melts and bubbles. If you want that golden brown perfection, pop it under the broiler for 1-2 minutes—but watch carefully as it can burn in a flash. Letting it rest for 10 minutes before serving helps it set so you get perfect, cheesy servings.
Pro Tips for Making Viral Mac and Cheese Recipe
- Use Quality Cheese: Freshly shredded cheese melts better and avoids clumping, trust me—I learned the hard way with pre-shredded stuff that sometimes has anti-caking agents.
- Take Your Time Melting Cheese: Adding cheese in batches and fully melting before the next ensures a smooth, creamy consistency that’s perfectly uniform.
- Don’t Skip the Mustard: Dijon mustard amps up flavor in a way subtle but surprisingly impactful—your mac and cheese will thank you.
- Watch the Broiler Closely: The difference between a golden crust and burnt disaster can be seconds; keep an eye and stay close at this stage.
How to Serve Viral Mac and Cheese Recipe
Garnishes
I usually sprinkle freshly chopped parsley on top for a pop of color and freshness. Sometimes I add a few crispy fried onions or crumbled bacon if I’m feeling indulgent—both bring an incredible crunch and flavor contrast that really brings the dish to life. Experiment with chives or a sprinkle of smoked paprika for extra flair.
Side Dishes
My go-to sides with this Viral Mac and Cheese Recipe are always something fresh to cut through the richness—think simple green salad with vinaigrette, roasted Brussels sprouts, or garlic-sauteed green beans. For a cozy meal, crispy oven-baked chicken wings or barbecue pulled pork are total winners alongside this dish.
Creative Ways to Present
For special occasions, I like to serve mac and cheese in individual ramekins topped with extra cheese and breadcrumbs baked until bubbly and golden—makes it feel fancy and personalized. Another fun idea is turning this into mac and cheese muffins using a muffin tin; they’re great for parties and easy to grab-and-go.
Make Ahead and Storage
Storing Leftovers
I always store leftovers in an airtight container in the fridge for up to 3 days. When you reheat, add a splash of milk or cream to loosen up the sauce because it tends to thicken and firm up once chilled. Reheat gently on the stovetop or in the microwave, stirring occasionally.
Freezing
Freezing mac and cheese can be tricky, but this Viral Mac and Cheese Recipe holds up pretty well. Freeze before baking in a freezer-safe dish and thaw overnight in the fridge before baking. You can also freeze baked leftovers in portions. Just know the sauce might separate slightly after thawing, so a quick stir or adding a little cream when reheating fixes it up nicely.
Reheating
To bring leftovers back to life, I reheat covered in the oven at 350°F for about 15-20 minutes, adding a few tablespoons of cream or milk for creaminess. A gentle stovetop reheat with a lid can also work well—just keep the heat low and stir frequently to prevent sticking or drying out.
FAQs
-
Can I use other types of pasta for this Viral Mac and Cheese Recipe?
Absolutely! While cavatappi is my favorite because its twists trap the cheese sauce so well, you can use elbow macaroni, penne, or shell pasta. Just be sure not to overcook, so they hold their shape and don’t get mushy during baking.
-
What if I don’t have evaporated milk—can I substitute it?
If you don’t have evaporated milk on hand, you can substitute with whole milk, but the sauce won’t be quite as rich or silky. To mimic evaporated milk, gently simmer the milk to reduce it by about half before using in the recipe.
-
Why is Dijon mustard added to the cheese sauce?
Dijon mustard might seem unusual, but it brightens the flavor and balances the richness of the cheese and cream. It brings a subtle tang that makes the sauce more complex and delicious.
-
How do I avoid clumpy cheese sauce?
Adding the cheese gradually and fully melting it before adding more is key. Also, make sure your sauce isn’t boiling aggressively when you add cheese—keep heat low-medium to prevent the proteins from seizing up and forming clumps.
-
Can I prepare this recipe ahead of time?
Yes! You can assemble it up to the baking step, then cover and refrigerate it for up to 24 hours before baking. This makes it a great option for busy days or holiday meal prep.
Final Thoughts
I can’t tell you how often my family goes crazy for this Viral Mac and Cheese Recipe. It’s the kind of dish that brings everyone to the table with smiles and full plates. Whether you’re making it for a cozy night in, a potluck, or a holiday feast, this recipe never disappoints. Give it a try—you’ll soon find it becoming your go-to comfort food, too. And remember, the magic really is in those cheesy layers and slow, loving cooking techniques. Happy cooking!
Print
Viral Mac and Cheese Recipe
- Prep Time: 10 minutes
- Cook Time: 50 minutes
- Total Time: 1 hour
- Yield: 8 servings
- Category: Main Course
- Method: Baking
- Cuisine: American
Description
This Tini Mac and Cheese recipe is a rich, creamy, and indulgent twist on the classic comfort food, combining a blend of mozzarella, colby jack, and sharp cheddar cheeses with a creamy evaporated milk and heavy cream sauce. Perfectly baked to golden perfection with a crispy cheese topping, this viral recipe is guaranteed to be a crowd-pleaser for family dinners and holiday gatherings.
Ingredients
Pasta
- 1 Lb Cavatappi pasta (or elbow macaroni)
Cheese
- 1 Lb Mozzarella (16 OZ, shredded)
- 1 Lb Colby Jack (16 OZ, shredded)
- 1/2 Lb Sharp cheddar (8 OZ, shredded)
Dairy and Sauce Ingredients
- 12 Ounces Evaporated milk (1 can)
- 2 Cups Heavy whipping cream
- 3 Tablespoons Unsalted butter
- 3 Tablespoons All purpose flour
Seasonings
- 1 teaspoon Salt
- 1 teaspoon White pepper
- 1 teaspoon Garlic powder
- 1 teaspoon Smoked paprika
- 1 Tablespoon Dijon mustard
Instructions
- Cook Pasta: Cook the pasta in salted boiling water according to package instructions until al dente, typically about 7 minutes for cavatappi. Drain the pasta and set aside, reserving it for later use.
- Make Roux: In a heavy-bottomed pan, melt the butter over medium-high heat. Add the flour and whisk continuously until you form a smooth paste with no lumps, ensuring the flour is fully incorporated.
- Add Evaporated Milk: Gradually whisk in the evaporated milk, continuing to stir until the sauce starts to bubble and thicken, which creates the base for your cheese sauce.
- Add Heavy Cream: Reduce the heat to medium-low and slowly stir in the heavy whipping cream, maintaining a gentle simmer for the sauce to combine smoothly.
- Prepare Cheese: In a bowl, combine all shredded cheeses and divide evenly into two halves; one half will be incorporated into the sauce and the other half reserved for layering and topping the bake.
- Add Cheese to Sauce: Gradually add handfuls of cheese to the sauce, whisking vigorously until each addition is fully melted and smooth before adding more. This slow incorporation prevents curdling and ensures creaminess. This process should take around 20 minutes.
- Season Sauce: Once all the cheese has been incorporated, season the cheese sauce with salt, garlic powder, white pepper, smoked paprika, and Dijon mustard. Stir well to combine and enhance the flavor.
- Combine Pasta and Sauce: Add the cooked pasta to the cheese sauce and gently stir until every noodle is evenly coated in the rich sauce.
- Prepare Baking Dish Layers: Preheat your oven to 375°F with the rack positioned in the center. Use a 9×13 baking dish and spread a layer of the pasta mixture. Sprinkle half of the reserved shredded cheese over this first layer.
- Add Second Layer and Cheese: Add another layer of the pasta mixture over the cheese, then top with the remaining half of the shredded cheese to create a cheesy crust.
- Bake: Place the baking dish in the oven and bake at 375°F for approximately 20 minutes, or until the top cheese is melted and slightly browned.
- Broil for Golden Top (Optional): For an extra golden and crispy top, broil the mac and cheese on low for 1 to 2 minutes. Watch closely to prevent burning.
- Rest Before Serving: Remove from the oven and let the mac and cheese rest for about 10 minutes to allow the sauce to set and flavors to meld before serving.
Notes
- This viral Mac and Cheese recipe by creator Tini has amassed over 100 million views on TikTok, making it a trendy and must-try dish for holidays and special occasions.
- Using evaporated milk along with heavy cream creates a creamy and velvety cheese sauce with a balanced richness.
- Be patient with the cheese incorporation process to avoid a grainy texture; adding cheese slowly helps with smooth melting.
- Broiling the top cheese layer is optional but highly recommended for a crisp and golden crust.
- Resting the mac and cheese before serving helps the dish set and makes it easier to serve.
Nutrition
- Serving Size: 1 cup
- Calories: 480
- Sugar: 3g
- Sodium: 560mg
- Fat: 28g
- Saturated Fat: 17g
- Unsaturated Fat: 9g
- Trans Fat: 0.5g
- Carbohydrates: 40g
- Fiber: 2g
- Protein: 22g
- Cholesterol: 95mg


